How To Create an Online Course With Teachable: Your Step-by-Step Guide
There is no shortage of platforms promising to turn your knowledge into income. Most of them either overwhelm you with complexity or charge fees that eat into your earnings before you have found a rhythm.
Teachable sits in a different category. It is clean, approachable and built for people who want to teach rather than manage a software stack. If the tech has been putting you off, knowing how to create an online course with Teachable will remove that barrier. It is simpler than most people expect.
What Makes Teachable Different From the Competition
Indeed, Teachable has been helping creators sell their expertise since 2014. In that time, it has processed more than $2 billion in course revenue for solo creators. Indeed, that is not an accident. The platform is genuinely well designed for the specific job of turning knowledge into a product that sells.
In fact, building your own solution is far more complex. So, a self-hosted WordPress course requires a hosting plan, an LMS plugin, a payment gateway and manual tax setup. You also build your own sales pages from scratch.
Teachable bundles all of that into one subscription covering hosting, payments, checkout pages, course certificates and student control.
However, compared to market sites like Udemy, Teachable gives you something more important: control. Specifically, on Udemy, the platform sets your prices, runs its own promotions and owns the bond with your students. On Teachable, you set the price, you own the student data, and you show directly to your audience. Indeed, that ownership compounds in value as your business grows.
Furthermore, the platform also handles US sales tax on its own and remits VAT on behalf of global sellers. For solo creators juggling teaching, marketing and content creation, removing the tax admin headache is genuinely real.
So, before diving into the build process, it is worth knowing what you are signing up for financially. Teachable updated its pricing structure in 2026, and the plans are now named Starter, Builder, Growth and Advanced.
The Starter plan is priced at $39 per month, billed monthly or $29 per month on an annual subscription. It covers one published product and up to 100 students.
However, it charges a 7.5% transaction fee on every sale. So if your course costs $200 and you make 10 sales, Teachable takes $150 before payment fees apply. In fact, that adds up quickly.
The Builder plan at $89 per month removes the transaction fee entirely. It also adds more product slots, affiliate marketing tools and enhanced customization. Indeed, for anyone planning to sell at any real volume, the Builder plan is where the numbers start working in your favour. A single $200 sale per day would pay for the Builder plan in under five days.
The Growth plan at $189 per month removes student caps and adds more advanced reporting. The Advanced plan at $399 per month is aimed at larger teams and built education businesses.
Furthermore, all paid plans include a 7-day free trial. In fact, that is enough time to build your first course, set up your school and check whether the platform fits your needs.
For an honest look at Teachable’s real costs and where fees appear, this review from Learning Revolution covers the platform from a working creator’s view.
Step 1: Define the Outcome Your Course Delivers
Unfortunately, the most common reason courses fail to sell is not the platform, the price or the production quality. It is the absence of a clear, specific outcome that the student will achieve.
Indeed, vague course topics attract vague interest. “Introduction to Social Media” is harder to sell than “Get Your First 1,000 Instagram Followers Without Running Ads.” The second version names the exact student, the outcome and the milestone. Buyers can judge at a glance whether it solves their problem. Potential buyers can right away assess whether it solves their problem.
So, before you open Teachable, write one sentence that describes your course using this structure: “This course helps [specific person] achieve [specific outcome] even if [common objection].” For example: “This course helps freelance designers win their first five clients even if they have no portfolio yet.”
Indeed, that sentence will drive every other decision you make. Your sales page headline is a version of it. The curriculum is the path that delivers the outcome. Pricing should reflect the monetary value of achieving that result.
Also, validate your topic before you invest production time. So, post about it on social media and observe how people respond. Email five to ten people in your target audience and ask directly whether they would pay to solve the problem you are describing. Pre-selling a course before it is finished is entirely valid and tells you right away whether the idea has commercial traction.
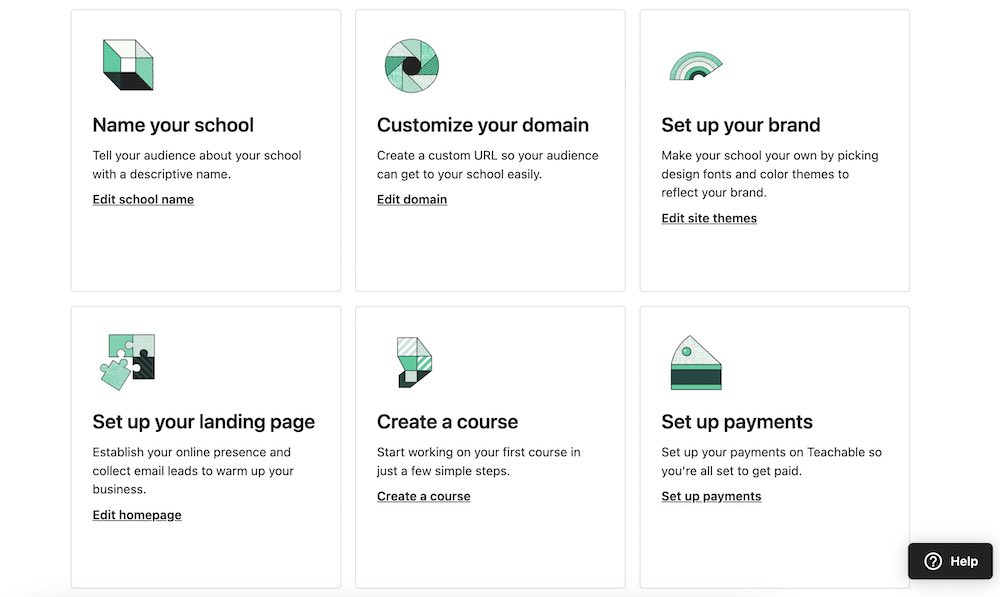
So, once you have clarity on your course topic, creating your Teachable account takes about five minutes. So, go to teachable.com, select your plan or start the free trial and complete the registration.
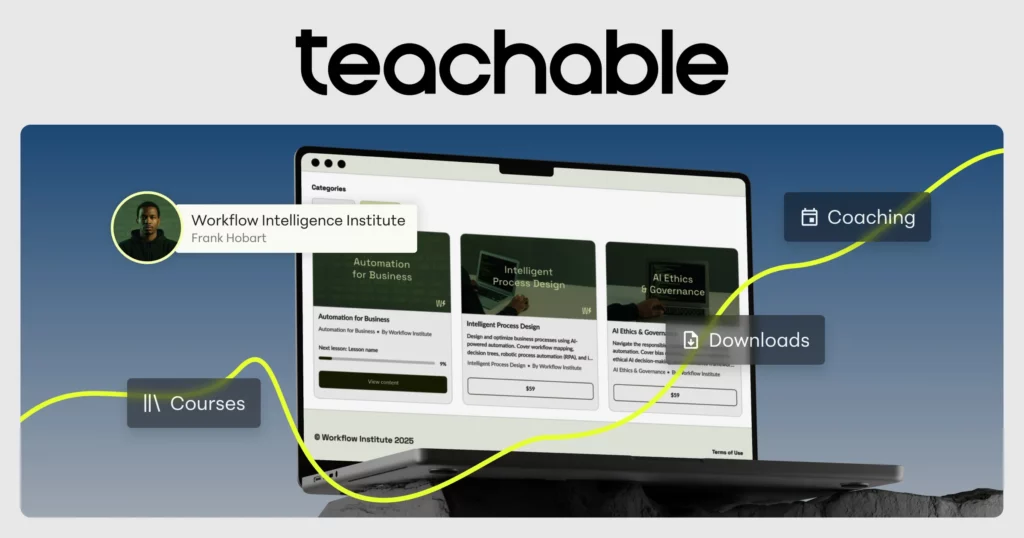
After signing up, you are taken to your school dashboard. In fact, your Teachable school is your branded home base on the platform. In fact, it is where all of your courses, products and student interactions live under one roof.
So, take time to set up your school’s branding before you create any courses. Upload your logo, choose your colour palette and add your school name. Consistency between your school’s visual identity and your social media presence builds trust with would-be students who find you through search or referral.
If you have a custom domain such as courses.yourbrand.com, connect it to your Teachable school in the settings. This removes the teachable.com branding from your school URL and makes the whole experience feel like a cohesive product. Indeed, custom domains are available from the Starter plan onwards.
Step 3: Create Your Course Structure
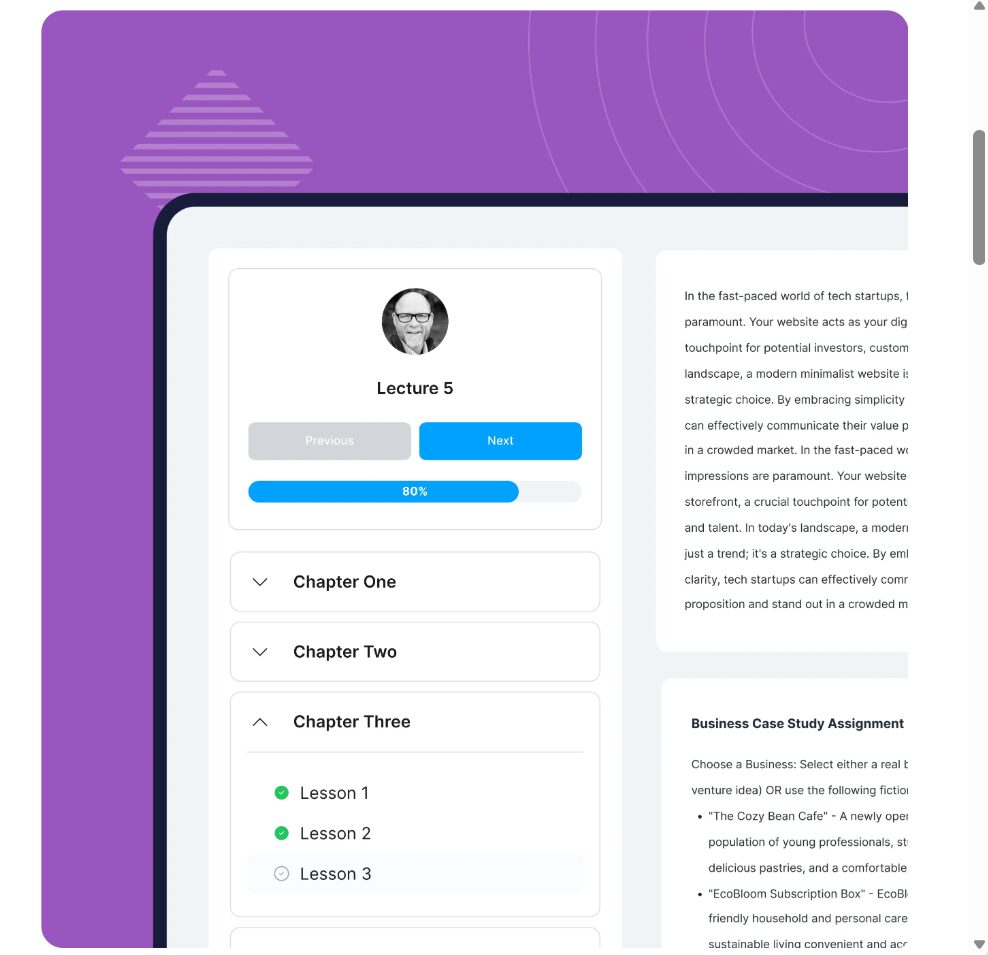
In Teachable, click on Courses in the left-hand menu and then click New Course. You will be prompted to name your course and choose how you want to build its structure.
Notably, Teachable now offers an AI Curriculum Builder as a starting option. You enter a description of your course, and the tool earns a suggested outline of sections and lectures. This is genuinely useful for getting a skeleton on screen quickly. However, treat the output as a draft that you refine rather than a finished structure you publish directly.
In Teachable, the core building blocks are sections and lectures. A section is a module or chapter, a grouping of related content. A lecture is an single lesson inside that section. Think of sections as the stages of your student’s journey and lectures as the single steps within each stage.
So, build your full structure before you start adding any content. Write all your section names and lecture titles first. This gives you a map of the entire course. It also reveals gaps where content is missing and repetition where ideas overlap without reason.
In fact, each lecture title should describe exactly what the student will be able to do or know after completing it. “How to Write a Cold Email That Gets Replies” is stronger than “Cold Emails.” It tells the student exactly what they will achieve. A general topic title does not.
Step 4: Add Your Course Content
So, with your structure mapped out, go through each lecture and add your content. Teachable supports video, audio, text, PDFs, quizzes and downloadable files within a single lecture. You can mix formats freely depending on what the lesson requires.
Video is the dominant format in online courses because students learn effectively from watching and listening. You do not need pro recording gear to start. A smartphone on a tripod, a ring light for around $25 and a quiet room are all you need. That setup produces entirely acceptable results for a first course. So, record in short, focused segments of five to fifteen minutes rather than long, unedited sessions.
Host your videos directly in Teachable. Furthermore, paid plans include unlimited video storage. So you do not need a separate hosting subscription unless you have specific analytics requirements.
Text lessons work well for reference material, written walkthroughs and content that students will want to revisit without rewatching a video. Use them for frameworks, checklists and step-by-step written instructions.
Downloadable resources add tangible value to your course. A worksheet per module, a ready-to-use template or a curated resource guide all improve the learning experience. Indeed, none of these require real production time.
Quizzes reinforce learning and help students identify gaps in their knowledge before moving on. Specifically, Teachable’s built-in quiz builder supports multiple choice, true or false and written answer formats. In fact, adding a short quiz at the end of each section takes minimal effort but really improves completion rates.
For practical help planning content that keeps students engaged, Teachable’s own blog guide covers the process clearly.
Step 5: Set Your Pricing Strategy
Pricing is one of the decisions that new course creators regularly get wrong. Unfortunately, the instinct to set a low price to attract more students is understandable but usually counterproductive.
A course priced at $19 signals low value in the buyer’s mind. It also means you need 50 sales to generate $950 in revenue. A course priced at $197 means five sales achieve the same figure. Fewer sales at a higher price point require a smaller audience and far less marketing effort.
So, the price is based on the outcome you deliver rather than the number of video hours you include. A two-hour course that helps a freelancer land their first $3,000 client is worth far more than $97. A 20-hour course covering general marketing theory may struggle to justify $200. The outcome is what your student is paying for.
In Teachable’s pricing settings, you can offer a one-time payment, a payment plan split across multiple months or a subscription for recurring access. Payment plans are especially effective at higher price points because they reduce the perceived upfront commitment. A $497 course split into three payments of $179 will outsell the single-pay option with most audiences.
Furthermore, you can also create coupon codes for launch promotions, affiliate partners and special offers. Launch discounts of 20% to 30% for a limited time window create urgency and reward early movers.
Indeed, your Teachable sales page is where curious visitors decide whether to become paying students. It deserves more attention than any other part of your course setup. Unfortunately, it is also the area where most new creators invest the least effort.
Teachable includes a drag-and-drop page builder for creating sales pages without any coding. The structure that converts best is not complicated but each element must do a specific job.
Your headline shows the core outcome. It should be specific, benefit-focused and address the student’s situation directly. “The Email Marketing Course” is not a headline. “Write Emails That People Actually Open and Act On” is a headline that makes a potential student lean forward.
Below the headline, describe the problem your ideal student is experiencing right now. Use their language rather than industry jargon. This section should make the reader feel genuinely understood. If they recognise their own situation in your description, they are already halfway to buying.
List the specific things students will be able to do by the end of the course. Use outcome statements rather than feature lists. “You will be able to write a complete 5-email welcome sequence in under 2 hours” outperforms “Module 4 covers welcome sequences.”
Include your curriculum so that would-be students can see the full scope of what they are getting. Indeed, transparency here builds confidence rather than reducing it. Also, add reviews wherever you have them. If you are launching without any reviews yet, offer a free or discounted beta cohort in exchange for honest written feedback.
Step 7: Configure Your Checkout and Payment Settings
In practice, Teachable connects with Stripe and PayPal for payment processing. Standard processing fees of 2.9% plus 30 cents per transaction apply regardless of your plan. These fees are charged by the payment processors themselves and are not unique to Teachable.
So, in your checkout settings, keep the process as simple as possible. In fact, every added field you ask students to complete before payment is a chance for them to reconsider. Name, email and card details are sufficient.
Consider enabling the order bump feature, which lets you offer a related low-priced product at checkout with a single click. A companion workbook, a 30-day email coaching programme or a resource bundle all work well as order bumps priced between $17 and $37. In fact, many creators find that 15% to 25% of buyers add the order bump, which really increases the average order value.
Also, set up your post-purchase thank-you page and auto welcome email so that new students receive a warm, clear onboarding experience right away after buying. The first few minutes after purchase set the emotional tone for the entire student bond. A student who feels welcomed and confident about their next steps is greatly more likely to complete your course and leave a positive review.
Step 8: Preview and Test the Full Student Experience
So, before you publish, go through your entire course from the student’s perspective. Create a free enrolment for yourself using a different email address and work through every lecture.
So, check that every video plays correctly. Also, confirm that downloadable files are the right documents and that they open without error. Also, complete each quiz and verify that the scoring works as intended. Test the checkout process using a real payment method to confirm that the transaction completes and that the auto confirmation email arrives.
Also, access your course on a mobile device. In practice, Teachable’s mobile experience is generally solid, but single elements like embedded PDFs can behave differently on a phone than on a desktop. In fact, catching these issues before your first paying student encounters them saves real credibility.
So, when everything works as it should, click Publish. Your course is now live.
Step 9: Launch to an Audience
Publishing your course is not the same as launching it. Many first-time creators make the expensive mistake of clicking Publish and then waiting for students to appear organically. In fact, without active promotion, nothing will happen.
In fact, a launch is a deliberate, time-limited promo event designed to drive a concentrated burst of enrolments. It typically runs for five to seven days. Urgency comes from a time-limited discount, a closing date or a launch bonus that disappears after a set point.
If you have an email list, a launch sequence of three to five emails is the most reliable structure. Your opening email introduces the course and the specific problem it solves. A follow-up email shares a deeper look at the outcome and perhaps a student result or beta tester feedback. A final email reminds subscribers that the window is closing and reinforces the core outcome.
If you have a social media following, post regularly throughout the launch window. Share behind-the-scenes content from the course creation process. Answer questions publicly so your audience can see them. Show early student experiences where possible.
For those building from zero audience, SEO-driven blog content and Pinterest are the most reliable long-term strategies. Blog posts that answer the questions your ideal students are already searching for bring in organic traffic that converts over time. Pinterest pins linking to your sales page can drive regular visitors for months after posting.
The range is wide and depends on your niche, your audience size and the consistency of your marketing. However, some useful reference points are worth knowing.
A course priced at $197 with a list of 500 subscribers at a 2% close rate earns $1,970 from a single launch. Grow that list to 2,000 subscribers, and the same conversion rate produces nearly $8,000. Add a second course and a regular content strategy and the compounding becomes real.
The creators who build to $5,000 or $10,000 per month share common traits. They have multiple products, a growing email list and an email sequence that converts new subscribers on its own. Indeed, that level of income requires real work to build. However, it is a realistic target for a focused creator working regularly over 12 to 18 months.
Indeed, the idea that a course earns truly passive income with minimal effort is misleading. The passive element comes later. In fact, it arrives after sustained active work to build an audience, refine the course and set up a marketing system.
Common Mistakes to Avoid
Unfortunately, most new course creators run into the same handful of issues. Knowing about them in advance saves real time and lost revenue.
Building Before Validating
Unfortunately, the most expensive mistake in the online course space is spending weeks creating content for a topic nobody will pay for. So, validate your idea first. Ask real people in your target audience whether they would pay for the solution you are proposing. If the response is lukewarm, the course will be too.
Setting the Price Too Low
A $17 course is not just leaving money on the table. It also attracts students with lower commitment. Indeed, those students are less likely to complete the course.
They are also less likely to earn the reviews and referrals that grow your business. So, price your course at a level that reflects the value of the outcome it delivers.
Ignoring Student Communication After Purchase
Indeed, the student bond does not end at the point of sale. A simple post-purchase email sequence makes a real difference. Check in with students at key milestones, offer encouragement where completion rates drop and invite feedback after they finish. This approach can transform your review volume and repeat purchase rate.
Waiting Until the Course Is Perfect
Perfectionism is the most common reason a course never gets published. A 70% complete course that is live and producing feedback is worth infinitely more than a 100% perfect course sitting on your hard drive. Publish, learn from real students and improve.
Ready to Build Something Real?
Knowing how to create an online course with Teachable is a genuine starting point for building income online. However, the broader strategy around audience building, content marketing and monetisation matters just as much as the platform itself.
Indeed, Teachable genuinely removes almost every technical obstacle between your knowledge and your first paying student. The platform handles hosting, payments, tax compliance, course certificates and student control. So you can direct your energy toward creating useful content, growing an audience and marketing regularly.
Knowing how to create an online course with Teachable is the technical base. What you build on that base is entirely up to you. In fact, the most successful course creators are not necessarily the most expert or the most polished. Instead, they are the ones who publish early, listen to their students, improve based on real feedback and show up regularly.
Start with one course on the topic you know best. Price it based on the value it delivers. Build a sales page that speaks directly to your ideal student.
Launch it to whatever audience you have, even if that audience feels small. The first launch teaches you more than any amount of planning. Every subsequent launch builds on what the previous one revealed.
For a full walkthrough of Teachable from an experienced creator, Wit and Wire’s Teachable tutorial is one of the best free resources out there.
Affiliate Disclosure: This post contains affiliate links. I may earn a commission if you sign up through my links, at no added cost to you. I only recommend tools and platforms I genuinely believe offer value to my readers.
How To Create an Online Store on WordPress (Even Without Tech Skills)
Building an online shop used to mean hiring a developer and spending thousands of dollars before you made a single sale. Indeed, that is no longer the case. Today, anyone with a few hours and a basic grasp of clicking around a dashboard can figure out how to create an online store on WordPress, get products listed and start accepting payments, all without writing a line of code. So, this guide walks you through every step, from choosing your hosting through to welcoming your first customer.
Why WordPress Is the Right Choice for Your Online Store
There are plenty of platforms competing for your attention. Shopify, BigCommerce and Squarespace all make the process of building a store look appealing. Unfortunately, they all share one significant disadvantage. You are paying them a monthly fee indefinitely and, in many cases, a percentage of every sale you make.
However, WordPress works differently. The software itself is free. Your online store sits on your own server.
You own the platform, the content and the customer data. Nobody takes a cut of your sales beyond the standard payment processing fee.
Specifically, WooCommerce is the free plugin that adds shop functionality to WordPress and powers roughly 23% of all e-commerce websites globally. It is used by independent creators, small businesses and large retailers alike. Furthermore, it scales with you. A store you build today on WooCommerce can handle ten orders a month or ten thousand.
Furthermore, WordPress gives you access to thousands of themes and plugins. Whatever you need your store to do, there is almost certainly a way to make it happen. Custom checkout flows, subscription products, digital downloads and membership areas are all achievable without touching any code.
Before installing anything, there are three things to sort out.
A Domain Name
Your domain name is your store’s address on the internet. It should be short, memorable and relevant to what you sell. Avoid numbers and hyphens wherever possible since they create confusion when people try to recall or share your address.
Specifically, domain names typically cost around $12 to $15 per year. Many hosting providers include a free domain for the first year when you purchase a hosting plan.
Web Hosting
Hosting is the server space where your website lives. For a new store, shared hosting is the most affordable starting point. Plans typically cost between $3 and $10 per month. Providers like SiteGround, Bluehost and Hostinger all offer plans specifically optimised for WordPress and WooCommerce.
Specifically, look for hosting that includes an SSL certificate. SSL encrypts the data customers send through your checkout, including card details. Browsers display a padlock icon on SSL-secured sites. Indeed, shoppers notice its absence, and many will leave without buying if it is missing.
A Self-Hosted WordPress Installation
You need WordPress.org, not WordPress.com. The hosted version at WordPress.com restricts the plugins you can install. Without that freedom, you cannot add WooCommerce or most other e-commerce tools. Specifically, self-hosted WordPress requires your own hosting account, which is exactly what you have already sorted in the step above.
Most hosting providers include a one-click WordPress installer in their dashboard. In fact, the setup takes about five minutes.
Step 1: Install WooCommerce
Once your WordPress site is live, the next step is to install WooCommerce. In your WordPress dashboard, go to Plugins and then click Add New. Search for WooCommerce in the search bar.
The plugin will appear at the top of the results. Click Install Now and then Activate.
After activation, WooCommerce launches a setup wizard automatically. So, do not skip this. The wizard walks you through the most important initial settings and creates several key pages for you, including your shop page, cart page and checkout page. Indeed, these are essential and recreating them manually would take far longer.
So, work through the wizard carefully. You will be asked for your store’s location, the currency you want to use and the types of products you plan to sell. Your answers help WooCommerce configure the right settings from the outset.
Step 2: Choose a Theme for Your Store
Your theme controls how your store looks. Fortunately, you do not need to spend money on a theme to launch a professional-looking store.
The free Astra and Kadence themes are both lightweight, fast-loading and highly compatible with WooCommerce. They offer clean layouts that work well for product pages, category pages and the checkout process. Both have starter templates that let you import a ready-made store design in a few clicks.
If you already use a page builder like Divi on your existing WordPress site, it works well with WooCommerce too. In practice, the important thing is to choose a theme that loads quickly. Page speed affects both your search ranking and your conversion rate. A slow store loses sales.
Importantly, whichever theme you choose, test it on a mobile device before you add your first product. In fact, over 60% of online shopping now happens on mobile. In fact, if your store is difficult to use on a phone, you will lose a large proportion of your potential customers before they even reach your product pages.
So, with WooCommerce active and your theme in place, it is time to add products. In your WordPress dashboard, go to Products and then click Add New.
Every product needs four things to function well.
A clear title. Your product title should describe what the item is in plain language. It should also include the keywords that people are likely to search for when looking for that product. Indeed, this matters for both the usability of your store and its visibility in search engines.
A compelling description. The main description sits below the title. Use it to explain what the product does, who it is for and why it is worth buying. Write for the reader, not for search engines. In fact, a genuine, helpful description converts better than one stuffed with keywords.
High-quality images. Product images are one of the most powerful conversion tools available to you. Use clear, well-lit photos that show the product accurately. Add multiple images where possible to show the item from different angles or in use. Specifically, WooCommerce supports a main product image and a gallery.
Pricing and inventory settings. Scroll down to the Product Data section. Set your regular price. If you want to run a sale, set a sale price with the dates it applies. Under the Inventory tab, add a SKU if you use one and enable stock management if you want WooCommerce to track your inventory automatically.
For digital products like ebooks, templates or software, tick the Virtual and Downloadable options in the Product Data panel. This removes the shipping options from the checkout for those products and allows customers to download their purchase immediately after payment.
Step 4: Configure Your Payment Settings
Before you can take any money, you need to connect a payment gateway. WooCommerce supports a wide range of options, including Stripe, PayPal and its own WooPayments service.
Specifically, Stripe is generally the best experience for customers since payment stays on your site throughout the transaction. The shopper never leaves to log in to a separate account. Standard Stripe fees are 2.9% plus 30 cents per transaction.
PayPal is worth enabling as an alternative since many shoppers prefer it and already have their card details saved. In fact, having both Stripe and PayPal available typically increases conversion rates compared to offering only one option.
To set up your payment gateways, go to WooCommerce, then Settings, then the Payments tab. Toggle on the gateways you want to use and click the Set Up button next to each one. Follow the prompts to connect your accounts.
Step 5: Set Up Shipping
Indeed, if you are selling physical products, shipping configuration is essential. WooCommerce lets you create shipping zones, which are geographic regions, and then assign different rates and methods to each zone.
In your WooCommerce settings, go to the Shipping tab. Create your first zone by clicking Add Shipping Zone. Name it, select the regions it covers and then add a shipping method. The three basic options are flat rate, free shipping and local pickup.
So, flat rate shipping is the simplest to start with. Set a rate that covers your average shipping cost without overcharging customers on small orders. Many store owners find a rate between $4.99 and $8.99 works well for domestic orders, depending on their product weight and carrier.
Free shipping is a powerful conversion tool. Offering free shipping on orders above a certain threshold, such as $50, encourages customers to add more to their basket. However, if you offer this, factor the shipping cost into your product pricing or minimum order value.
For digital products, no shipping configuration is needed.
Unfortunately, taxes are one of the areas new store owners often overlook until it becomes a problem. WooCommerce has built-in tax settings that you should configure before you make your first sale.
Go to WooCommerce, then Settings, then the General tab, and make sure Enable Taxes is ticked. Then navigate to the Tax tab. Here you can set your tax rates based on where your business is registered and where your customers are located.
US-based sellers generally need to charge sales tax in states where they have a tax nexus, typically the state where the business is registered. Tax rules vary significantly by state. So, for a new store, the simplest approach is to start with the basics and consult a tax professional as your sales grow.
Furthermore, WooCommerce also integrates with automated tax tools like TaxJar and Avalara for sellers with more complex requirements.
Step 7: Customise Your Store Pages
WooCommerce automatically creates a Shop page, a Cart page, a Checkout page and a My Account page during setup. These pages are functional out of the box, but they benefit from some attention.
Specifically, your Shop page is where all your products are listed. So, check that it displays correctly with your theme. Make sure product images are showing at the right size. Ensure the layout is clean and easy to browse on both desktop and mobile.
Indeed, your Checkout page is the most critical page on your entire store. Every unnecessary element on this page is a potential distraction that could cost you a sale. So, keep it clean. Remove anything that does not directly support the customer completing their purchase.
Furthermore, your My Account page allows returning customers to view their order history and manage their account details. Make sure the login and registration process is straightforward. Indeed, a frustrating account setup experience causes customers to abandon their cart.
Step 8: Install Essential Plugins
Indeed, WooCommerce handles the core e-commerce functionality, but several additional plugins are worth adding to a new store.
A caching plugin. Indeed, page speed matters enormously for e-commerce. A caching plugin like WP Rocket or the free W3 Total Cache plugin can significantly improve your store’s loading time. Faster pages lead to better search rankings and higher conversion rates.
A security plugin. Your store handles financial transactions and customer data. A security plugin like Wordfence adds a firewall, malware scanning and login protection. Indeed, these are sensible precautions for any site that processes payments.
A backup plugin. UpdraftPlus is the most widely used backup plugin for WordPress. Specifically, schedule automatic daily backups that store copies of your site offsite, such as in Google Drive or Dropbox. If something goes wrong, a recent backup can save your business.
An SEO plugin. Yoast SEO or Rank Math helps you optimise your product pages and category pages for search engines. Indeed, both plugins guide you through the key on-page factors for each page and product you publish.
Step 9: Set Up Your Essential Store Pages
Furthermore, beyond the pages WooCommerce creates automatically, your store needs a few more pages to build customer trust and comply with legal requirements.
An About page. Indeed, people buy from people they trust. A genuine About page that explains who you are, why you started the store and what makes your products worth buying builds the kind of trust that converts visitors into customers.
A Contact page. Customers need to be able to reach you. A visible contact page reduces purchase anxiety. It signals that you are a real business with real accountability.
A Returns and Refund Policy page. In fact, this is both a legal requirement in most US states and a powerful conversion tool. In fact, customers are more likely to complete a purchase if they know the returns process is clear and fair.
A Privacy Policy page. If your store collects any customer data, including email addresses or payment details, you are legally required to have a Privacy Policy. WordPress includes a privacy policy generator under Settings and then Privacy.
So, do not announce your store until you have tested the entire purchase process from a customer’s perspective.
So, create a test product priced at $0.01 or use WooCommerce’s built-in test mode for payment gateways. Add the product to your cart, proceed to checkout and complete the purchase using a real payment method. Then log in to your WooCommerce dashboard and check that the order appeared correctly.
During your test, pay attention to the following. Does the checkout page load cleanly on mobile? Is the confirmation email being sent?
Does the product download work if you are selling digital items? Are the shipping options appearing correctly for different locations?
So, fix anything that does not work before your store goes live. First impressions matter. Indeed, a poor purchase experience on day one creates refund requests and negative word of mouth that is hard to recover from.
How to Drive Traffic to Your New WordPress Store
However, getting your store live is just the beginning. Without traffic, even the best-designed store earns nothing. Fortunately, there are several reliable ways to attract your first customers.
Search Engine Optimisation
Indeed, SEO is the most sustainable long-term traffic source for a WordPress store. Optimise each product page with a clear title tag, a well-written meta description and a product description that answers the questions customers are likely to have.
Unfortunately, category pages are often overlooked but can rank well for broader search terms. Write a short introductory paragraph for each category page that explains what is in that section. This gives search engines context and helps customers navigate.
For a practical guide on how to use WooCommerce from installation through to first sale, WPBeginner’s complete WooCommerce tutorial is one of the most thorough free resources available.
Content Marketing
A blog alongside your store creates content that attracts the kind of people who are interested in your products. Indeed, writing useful, informative posts about topics related to what you sell brings in organic traffic and establishes your expertise.
For example, a store selling kitchen equipment could publish recipes, cooking guides and product comparisons. In fact, each piece of content is a potential entry point for a new customer. Over time, that content compounds and drives consistent traffic without paid advertising.
Pinterest
Specifically, Pinterest is a visual search engine with a strong buyer intent. Users come to Pinterest actively looking for products and ideas. Pins linking to your product pages or to blog content related to your products can drive meaningful traffic for months after they are posted.
Email Marketing
So, start building an email list from your first sale. Offer a discount code or a useful free resource in exchange for an email sign-up. A well-maintained email list allows you to promote new products, run sales and bring customers back to your store without depending on any external platform.
Indeed, one of the biggest misconceptions about WordPress stores is that they are completely free. However, WooCommerce itself is free, but there are unavoidable costs to running a real store.
Shared hosting costs around $36 to $120 per year, depending on the provider and plan. A domain name costs around $12 to $15 per year. A premium theme, if you choose one, costs between $50 and $100 as a one-off payment or on an annual licence. A basic plugin stack adds perhaps $50 to $100 per year.
In total, a functional WordPress store with WooCommerce can run for $100 to $250 per year. Compare that to Shopify’s basic plan at $39 per month, which adds up to $468 per year before any app or transaction fees. Indeed, the cost advantage of WordPress becomes very clear very quickly.
For a comprehensive breakdown of what a WooCommerce setup requires, Kinsta’s WooCommerce tutorial covers the full process in detail.
Common Mistakes to Avoid
Unfortunately, most new store owners run into the same handful of issues. Knowing about them in advance saves real time and money.
Choosing a Slow Theme
A heavily stylised theme with animations, sliders and complex layouts might look impressive in a demo. In fact, it can cripple your page speed. Stick with a lightweight, well-coded theme that has been optimised for WooCommerce. Indeed, your conversion rate will thank you.
Skipping the Mobile Test
As mentioned earlier, most online shopping now happens on mobile devices. In fact, a store that looks fine on a desktop but is difficult to navigate on a phone is losing sales constantly. Test every page on your phone before and after launch.
Ignoring Product Photography
Poor product images are one of the most common reasons customers do not buy. In practice, you do not need a professional photographer, but you do need clear, well-lit photos. In fact, a simple lightbox kit and a smartphone with a decent camera are enough to produce images that sell.
Not Setting Up an SSL Certificate
Indeed, an SSL certificate is non-negotiable for any store that takes payments. Most hosting providers include one free of charge. Make sure it is active and that your site loads on https rather than http before you accept any orders.
Launching Without a Returns Policy
Customers are significantly more likely to buy from a store that has a clear, fair returns policy. In fact, publishing your policy prominently reduces purchase anxiety and almost always increases sales.
Ready to Start Building Your Online Business?
Setting up an online store is a big and exciting step. However, knowing how to create an online store on WordPress is only one part of building a successful online business. The marketing strategy, the content and the audience you build around your store matter just as much.
The barrier to selling online has never been lower. You can have a fully functional, professionally designed store live within a single afternoon using free software on affordable hosting.
The tools are available. The knowledge is accessible. All that remains is to act on it.
Knowing how to create an online store on WordPress puts you in control of your business in a way that hosted platforms simply do not allow. You own the platform, the products and the relationship with every customer you serve. Indeed, that ownership compounds over time in ways that renting space on someone else’s platform never can.
Start with the basics. Get your domain, your hosting and WooCommerce in place. Add your first products and set up your payments.
Test everything. Then focus on driving traffic and building an audience. Indeed, every part of this process is learnable, and none of it requires a technical background.
Affiliate Disclosure: This post contains affiliate links. I may earn a commission if you sign up through my links, at no additional cost to you. I only recommend tools and platforms I genuinely believe offer value to my readers.
How To Create an Online Course With WordPress (Without the Tech Headache)
Indeed, if you have knowledge worth sharing and you want to turn it into income, creating an online course is one of the most powerful ways to do it. However, platforms like Teachable and Kajabi make it look easy, but they take a cut of every sale and charge you monthly whether your course earns anything or not. Fortunately, knowing how to create an online course with WordPress gives you a better option. You own your platform, you keep every dollar you earn, and you build on an infrastructure that can grow with you for years.
Why WordPress Is a Smart Choice for Online Course Creators
In fact, the debate between hosted platforms and WordPress is mostly settled for anyone who has built more than one course.
For example, hosted platforms like Teachable and Kajabi charge between $29 and $199 per month. On top of that, some charge transaction fees of up to 7.5% on every sale. Indeed, over time, those fees add up significantly. Once your course generates $2,000 per month, you could be paying $150 or more in fees alone just for the privilege of using someone else’s platform.
WordPress takes a different approach. The software itself is free. You pay for hosting, typically between $3 and $10 per month on a shared plan.
You buy a learning management system (LMS) plugin for your specific needs. After that, there are no monthly platform fees and no transaction fees on your sales. So, every dollar your students pay goes through your payment processor at the standard 2.9% plus 30 cents and straight into your account.
The other major advantage is ownership. Your course content lives on your own server. Student data belongs to you.
The site looks exactly how you want it to look. If you decide to change payment processors, update your branding or add entirely new products, you can do all of that without asking anyone’s permission.
Furthermore, WordPress powers over 43% of all websites on the internet. The ecosystem of themes, plugins and integrations is unmatched. In fact, whatever you need your course platform to do, there is almost certainly a way to make it happen with WordPress.
Before you install any plugins or start building lessons, there are a few things to get in order.
A Self-Hosted WordPress Site
First, you need a self-hosted WordPress site. Specifically, this means WordPress.org, not WordPress.com. The free hosted version at WordPress.com restricts what plugins you can install. Indeed, without that freedom, you cannot add an LMS plugin.
Specifically, self-hosted WordPress requires a hosting account and a domain name. Shared hosting plans suitable for a course site start at around $3 to $5 per month. A domain name costs around $12 to $15 per year. In fact, these are genuinely small costs when weighed against what you would pay for a hosted course platform over the same period.
Your Course Content Planned Out
So, it is worth having your course structure clear before you start building anything. Know your module and lesson structure. Decide whether you will use video, written content or a mix of both. Also, think about whether you want quizzes, assignments or certificates.
Indeed, having this planned before you open your plugin makes the building process much faster. You are not making structural decisions and technical decisions at the same time.
A Payment Method for Students
You need a way to take payment before you launch. Stripe and PayPal are both standard options. Most LMS plugins integrate with one or both.
In practice, Stripe is generally the better experience for students, since they never leave your site to pay. PayPal requires students to have or create an account, which adds friction.
Choosing the Right LMS Plugin for WordPress
In short, the LMS plugin is the engine of your course site. It handles your course structure, student enrolments, progress tracking, quizzes and payments. Choosing the right one makes a meaningful difference to both your experience as a course creator and your students’ experience as learners.
Specifically, there are three plugins worth your attention.
LearnDash
Indeed, LearnDash is the most established LMS plugin for WordPress. It has been around since 2013 and is used by universities, Fortune 500 companies and independent creators. The drag-and-drop course builder makes it straightforward to set up lessons, topics and quizzes without touching any code.
Importantly, LearnDash charges no transaction fees on your course sales. It supports one-time payments, subscriptions and membership models. You can drip content to students on a schedule, award certificates and set up prerequisite lessons that must be completed before students can progress.
Specifically, pricing starts at $199 per year for a single site. That covers unlimited courses, unlimited students and all core features. For those who prefer a managed setup, LearnDash Cloud starts at $24 per month and includes WordPress hosting bundled in.
Overall, for most solo course creators, LearnDash is the most reliable and feature-complete option. It is the plugin I would recommend if you are serious about building a long-term course business on WordPress.
Tutor LMS
Notably, Tutor LMS is a newer option that has gained significant traction since its launch in 2019. Its course builder has been praised as the most visually intuitive of the major LMS plugins. You can see your entire course structure on screen as you build it.
Indeed, the free version is genuinely useful. It includes unlimited course creation, a quiz builder with multiple question types, a student dashboard and basic monetisation through its native checkout system. The Pro version adds certificates, drip content, assignments and advanced analytics.
So, Tutor LMS is a strong choice if you are launching your first course and want to test the market before committing to a paid plugin. In fact, many creators have earned their first sales using the free version alone.
LifterLMS
LifterLMS is the most modular of the three. The core plugin is free. You then add the specific features you need as paid add-ons, each priced at around $99 per year.
In practice, this works well if you have a simple setup. However, if your requirements grow, the add-on costs can eventually exceed what LearnDash charges for its full feature set.
Furthermore, LifterLMS integrates particularly well with Divi and Beaver Builder if you are already using one of those page builders. For those building on the Divi theme, this is a notable advantage.
For a detailed comparison of these options alongside others in the market, Kinsta’s guide to the best WordPress LMS plugins provides a thorough overview with hands-on assessments of each platform.
Step-by-Step: How To Create an Online Course With WordPress
Once you have your hosting, domain and plugin sorted, the actual process of building your course follows a clear sequence.
Step 1: Install and Activate Your LMS Plugin
Specifically, in your WordPress dashboard, go to Plugins and then Add New. Search for your chosen LMS plugin. If you are using Tutor LMS, it is free to install directly. LearnDash and LifterLMS require you to download the plugin file after purchasing and upload it manually.
Specifically, once activated, each plugin runs a setup wizard to guide you through the initial configuration. So, work through this carefully. Set your currency, connect your payment processor and configure your basic settings before you create a single lesson.
Step 2: Create Your Course Structure
In LearnDash, go to LearnDash LMS and then Courses. Click Add New to create your first course. Give it a title and a clear description that explains what students will learn and who the course is designed for.
Specifically, inside the course builder, you organise your content into sections, lessons and topics. Think of sections as modules or chapters. Lessons sit inside sections. Topics sit inside lessons and break content into smaller, focused units.
Specifically, build your full structure first. Add all your sections and lesson titles before you start filling them with content. Indeed, this gives you a clear map of your course and makes it easier to see where the content is flowing well and where gaps exist.
Step 3: Add Your Course Content
So, with your structure in place, open each lesson and add your content. WordPress gives you a block editor to work with. You can add text, images, embedded videos, downloadable files and more within each lesson.
Specifically, for video content, host your videos on Vimeo or YouTube rather than uploading them directly to WordPress. Indeed, large video files slow your site significantly. For example, an embedded Vimeo or unlisted YouTube video loads quickly and keeps your storage costs low.
So, keep each lesson focused on a single idea or skill. In fact, short, focused lessons have better completion rates than long ones that try to cover too much. A lesson of 5 to 10 minutes of video or 500 to 800 words of text hits the right length for most students.
Step 4: Set Up Quizzes and Assessments
In fact, quizzes do two important things. They help students check their own understanding, and they keep them engaged with your material. Both LMS and Tutor LMS include quiz builders that support multiple question types, including multiple choice, true or false, fill in the blank and short answer.
Specifically, in LearnDash, quizzes can be added at the topic level, the lesson level or as a final assessment at the end of a section. You can set a passing score, limit the number of attempts and display feedback after each question. So, use these settings to create a learning experience that challenges students rather than just processing them through content.
Step 5: Configure Your Pricing and Payment
This is where most people spend too little time. Importantly, your pricing settings determine how students access and pay for your course.
Specifically, in LearnDash, go to the Settings tab of your course and set the Access Mode to Closed. This means students need to purchase access before they can view any content. Then set your price and connect your payment method.
So, think carefully about your pricing model. For example, a one-time payment works well for courses with a defined start and end. A recurring subscription works better for courses that you update regularly or that are part of a larger membership offering. Both options are available in most major LMS plugins.
Also, consider whether you want to offer a free introductory module. Letting potential students access the first section at no cost is a strong way to demonstrate value before asking for payment.
Step 6: Design Your Course Sales Page
Indeed, your course sales page is where you convert visitors into paying students. This is not just a box to tick. It is one of the most important pieces of content on your entire site.
Specifically, your sales page needs to clearly explain what the course covers, who it is for, what students will be able to do after completing it and why your teaching approach is the right one for them. Include a clear price and a strong call to action.
Most LMS plugins create a basic course overview page automatically. You can edit this with your page builder. Add your own branding, testimonials if you have them, a course curriculum preview and a prominent enrolment button.
Step 7: Test Everything Before You Launch
So, before you tell anyone your course exists, go through the entire student experience yourself. Create a test account, enrol in your own course and progress through every lesson. Check that videos play, that quizzes work correctly and that the payment process runs smoothly from start to finish.
Also, look for any gaps in your content. Note any lessons that feel too long or any sections where the flow feels uneven. Fix these before your first real student encounters them.
Also, test on a mobile device. Many of your students will access your course on a phone or tablet. If your course does not look good on mobile, you will have a problem with completion rates.
Setting Up Your Course Website Design
The LMS plugin handles your course functionality. Your WordPress theme handles how everything looks.
In fact, you do not need a premium theme to launch a good course site. The free Astra and Kadence themes both work extremely well with all major LMS plugins. They are lightweight, load quickly and offer enough customisation to look professional without requiring a designer.
So, if you are using Divi already, stay with Divi. It integrates well with LifterLMS and works adequately with LearnDash. If you are starting fresh, Astra or Kadence will give you a cleaner foundation.
In short, keep your design simple. Your students are there to learn from your course, not to admire your website. A clean layout with clear navigation, fast loading times and readable fonts serves your learners better than a complex design that slows everything down.
Building the course is only half the job. Getting paying students into it is the other half.
So, start with your existing audience, however small it may be. If you have an email list, tell them first. For those with a blog, write content that naturally leads to your course topic. Anyone building from scratch with no audience should lean on content marketing through SEO. It is the most reliable long-term strategy for attracting the right students.
Write blog posts that answer the questions your ideal students are already searching for. Include your course as a natural recommendation within that content. Over time, those posts build organic traffic and that traffic converts into course enrolments.
Furthermore, Pinterest is also worth considering for course marketing. It is a visual search engine with users who are actively looking for learning resources. Pins that link to your course sales page or to related blog content can drive meaningful traffic over a long period.
Indeed, email marketing is the most reliable channel once you have an audience. In fact, even a small list of 200 to 300 engaged subscribers can generate strong course launch sales if the relationship has been built properly. So, offer a free resource related to your course topic to build that list from day one.
For a comprehensive guide to building an audience and monetising your WordPress site alongside your courses, WPBeginner’s guide to making money with WordPress covers a wide range of strategies that complement the course model well.
How Much Can You Earn From a WordPress Course?
The range is wide and depends on your niche, your marketing and the quality of your course. However, the numbers can be very encouraging.
A course priced at $97 with 30 students in its first month generates $2,910 in revenue. A course priced at $197 with 20 students generates $3,940.
In fact, these are realistic targets for a focused course in a niche with genuine demand. They are not guaranteed, and results require good marketing, a strong course and a growing audience.
Indeed, the advantage of WordPress over hosted platforms becomes clear over time. If you were paying $99 per month on Teachable and a 5% transaction fee on those same sales, you would lose a significant portion of your income to the platform. In contrast, with WordPress, your LMS plugin costs $199 per yea,r and your payment processor takes its standard rate. That is it.
Common Mistakes to Avoid
Most first-time course creators make a handful of predictable errors. Indeed, knowing them in advance saves real time and money.
Waiting Until the Course Is Perfect
Unfortunately, the most common mistake is spending months polishing content before launching to a single student. Perfectionism delays income and delays real feedback.
Launch a minimum viable version of your course. Enrol your first students at a lower price in exchange for honest feedback. Use their responses to improve the content. This approach generates income faster and produces a better course.
Ignoring the Sales Page
The sales page is often the last thing creators focus on, yet it’s the first thing potential students see. In fact, a weak sales page kills conversion rates regardless of how good the course itself is. Spend real time on it. Make it clear, specific and persuasive.
Choosing the Wrong Plugin for Your Needs
Indeed, installing the most expensive or most feature-rich plugin is not always the right move. If you are building your first course, a free plugin like Tutor LMS may be all you need. So, start lean. Add functionality as your course business grows, and the revenue justifies the investment.
Not Collecting Emails
Indeed, your course platform could disappear tomorrow. Your email list cannot be taken from you. Build an email list alongside your course from the very first student. In fact, it is the single most valuable asset in your online business.
Ready to Start Building Your Online Business?
Learning how to create an online course with WordPress is a valuable skill. However, it is just one path to building income online. If you are earlier in your journey and want a clear roadmap for building an online business from scratch, including how courses fit into a broader affiliate marketing strategy, I have put together a starting point for you.
WordPress gives course creators something that hosted platforms simply do not: ownership. In short, you own your platform, your content, your student relationships and every dollar your course generates. Indeed, the upfront learning curve is real, but it is shorter than most people expect, and the long-term financial advantage is significant.
The steps are clear. Get your hosting and domain set up. Choose an LMS plugin that fits your needs.
Build your course structure and content. Configure your pricing. Design a sales page that converts. Test everything and then market consistently.
For a broader look at how the e-learning market is growing and why building your own course platform makes more sense than ever, WPBeginner’s breakdown of online course statistics and trends provides useful context on the size of the opportunity.
Knowing how to create an online course with WordPress puts you in control of that opportunity. In fact, every course you build is an asset that can generate income for years. Start lean, improve based on real feedback and build from there.
How To Start Affiliate Marketing on Pinterest- A Beginner’s Blueprint
If you have been looking for a way to earn affiliate income without a big audience or a huge budget, Pinterest is one of the best platforms to start with. In fact, it is free to use. It rewards good content over follower count.
Its pins can also drive traffic for months after you post them. In short, knowing how to start affiliate marketing on Pinterest is a genuinely useful skill. This guide walks you through every step, from setting up your account to creating pins that convert.
Why Pinterest Works So Well for Affiliate Marketing
Most social media platforms are built around real-time feeds. A post on Instagram or X is relevant for a few hours at best. Pinterest works differently.
Indeed, Pinterest is a visual search engine. People come to it looking for ideas, solutions and products. They search for things like “best budget home office setup” or “gifts for people who love cooking.” They arrive already in a buying mindset. Indeed, that intent is exactly what makes Pinterest so valuable for affiliate marketers.
According to Pinterest’s own research, over 85% of weekly users have made a purchase based on a pin they discovered. Indeed, that figure is remarkable. It means the audience is actively looking for things to buy, not just scrolling passively.
Furthermore, pins also have a much longer lifespan than posts on other platforms. The average pin continues to drive traffic for 6 to 12 months after it is published. For example, a post you created in January can still be sending clicks to your affiliate links in September. In fact, that compounding effect is one of the strongest arguments for building an affiliate strategy around Pinterest.
Furthermore, compared to Instagram or TikTok, Pinterest remains relatively uncrowded for affiliate marketers. The competition is lower. The traffic is targeted. In fact, users there also spend more per purchase than on most other platforms.
Step 1: Set Up a Pinterest Business Account
The first step in learning how to start affiliate marketing on Pinterest is getting the right type of account.
However, a personal account will not do. You need a Pinterest business account. This gives you access to analytics, Rich Pins and the proper settings for disclosing affiliate content. You can also run ads if you choose to.
Setting up a business account is free. Go to pinterest.com/business and either create a new account or convert your existing personal account. In fact, the conversion takes about two minutes.
Once your account is active, spend time optimising your profile. Specifically, your username and display name should reflect your niche, not just your personal name. For example, “Home Office Ideas and Productivity Tips” is far more searchable than just your first and last name.
Write a short, keyword-rich bio. Tell visitors exactly what they will find when they follow you. Include relevant terms that your target audience would actually search for.
Add your website URL if you have one. Even a simple blog or landing page strengthens your credibility significantly.
Indeed, Pinterest has certain niches that perform exceptionally well for affiliate marketing. Understanding which categories attract high buying intent helps you focus your effort where it counts.
The strongest niches on Pinterest in 2026 include home decor, fashion, beauty and skincare, food and healthy eating and fitness and wellness.
Personal finance, online business, parenting and travel planning are also strong. These niches attract users who are close to making a purchase.
Specifically, these niches work because Pinterest users in these categories are actively looking for specific products. Someone searching for “minimalist bedroom ideas on a budget” is already thinking about buying. Your job is to show them the right product through your affiliate link.
So, pick one niche to start with. Do not try to cover everything at once. Indeed, a focused account builds authority faster.
It also attracts a more engaged audience. Engaged audiences convert into commissions far more reliably than broad ones.
Once you have chosen your niche, create 5 to 10 boards that cover different aspects of that topic. Give each board a descriptive title and write a short description with relevant keywords. This helps Pinterest understand what your content is about and shows it to the right people.
Step 3: Join Affiliate Programmes
You cannot earn commissions without an affiliate program. Fortunately, most major programmes are free to join and straightforward to get started with.
Amazon Associates
Amazon Associates is the most commonly used programme for Pinterest affiliate marketers. It covers almost every product category imaginable, which means you can find relevant products for any niche. Specifically, commission rates range from 1% to 10% depending on the category.
The 24-hour cookie window is short. This means the user needs to buy within 24 hours of clicking your link for you to earn a commission. However, the sheer volume of products and the high conversion rates on Amazon make up for this limitation in many niches.
In practice, Amazon Associates works best when you send traffic to a blog post. Linking directly to a product listing is less effective. In fact, this is both safer from a programme compliance standpoint and tends to convert better.
ShareASale and Impact
ShareASale and Impact are affiliate networks that each host thousands of individual programmes. You join the network once and then apply to individual merchants within it. Commission rates vary widely but are often higher than Amazon, particularly in fashion, home decor and software niches.
In fact, these networks are worth exploring once you have a clear niche. Many niche-specific programmes with generous commissions exist within them that you simply would not find by searching independently.
SaaS and Software Programmes
If your niche is online business or productivity, software affiliate programs often pay recurring commissions. You earn a percentage every month for as long as the customer stays subscribed. Indeed, one referral can earn you money for a year or more.
For example, Systeme.io offers commissions of up to 60% recurring. Other tools in the marketing and business space offer 20% to 40% recurring. For content about online business tools, these programmes can generate significantly more per referral than physical product commissions.
Choosing the Right Programme for Your Niche
Ultimately, the best programme is the one that aligns naturally with your content. So, do not force products into your pins just because the commission is high. Ultimately, your audience needs to trust your recommendations.
Once your account is set up and your affiliate programmes are active, it is time to start creating content.
Board Setup
So, before creating any pins, build out your boards. Each board should represent a clear subtopic within your niche. If your niche is home organisation, you might have boards for kitchen organisation, bedroom storage, home office setups and small space living.
Give each board a keyword-rich title. Add a description that explains what the board covers. In fact, this helps Pinterest index your content and surface it in the right searches.
Pin Design
Pinterest is a visual platform. Your pins need to look good to stop someone mid-scroll. Fortunately, you do not need to be a designer. Free tools like Canva make it straightforward to create professional-looking pins without any design experience.
The standard Pinterest pin size is 1,000 by 1,500 pixels, which is a 2:3 ratio. In fact, this vertical format takes up more screen space in the feed and gets more visibility than square or horizontal images.
Use bright, clear images. Add a bold text overlay that communicates the value immediately. A headline like “10 Amazon Finds That Made My Home Office Better” tells the viewer exactly what they will get. Keep fonts clean and easy to read on a small screen, since most Pinterest users browse on mobile.
Use a consistent colour palette across your pins. Over time, this makes your content recognisable when it appears in someone’s feed or search results.
Pin Descriptions
Indeed, your pin description is where keyword research matters most. Pinterest uses the words in your title and description to decide who to show your pin to.
Write descriptions in natural, conversational language. Include your target keyword early in the description. Add a clear call to action. Something like “Click to see the full list” works well.
Avoid stuffing your description with keywords. Write for a human reader first. In fact, a description that reads naturally will keep people on your pin longer, which sends a positive signal to Pinterest’s algorithm.
Step 5: Add Affiliate Links Correctly
Importantly, Pinterest allows direct affiliate links in pins. This is one of the platform’s genuine advantages. You do not need a blog to start earning, though having one improves your results significantly.
To add an affiliate link to a pin, create your pin as normal. When you get to the destination link field, paste your affiliate tracking URL. When a user clicks the pin, they go directly to the product or page you are promoting.
There are a few important rules to follow here.
First, always disclose that a pin contains an affiliate link. Add a note in your description, such as “This pin contains affiliate links. I may earn a small commission if you buy through my links.”
The FTC and Pinterest both require this disclosure. Indeed, transparency builds trust. It does not hurt your conversions.
Second, do not use link shorteners or redirect services that hide the destination URL. Pinterest’s policy requires that affiliate links resolve to the actual destination. Specifically, cloaked links risk having your account flagged.
Third, check your affiliate programme’s rules about direct linking on Pinterest. Some programmes, including Amazon Associates, prefer that you send traffic to a blog post rather than directly to a product listing. Others allow direct links without any restrictions. So, read the terms of your specific programme before you start posting.
Step 6: Build a Blog as Your Bridge
While you can start affiliate marketing on Pinterest without a website, having a blog dramatically improves your results. It is the single biggest difference between affiliates who earn sporadically and those who build consistent income.
So, here is why a blog matters. A pin that links to a helpful blog post converts better than a direct product link.
The blog post gives you space to explain the product and compare alternatives. That trust matters before the reader clicks through to buy.
A blog also allows you to capture email addresses. Pinterest users often save pins to browse later. If their affiliate cookie expires before they buy, you lose the commission.
An email list means you can follow up. You can continue the relationship beyond that single pin click.
Furthermore, having a website makes it easier to get approved for affiliate programmes. Many programmes, including Amazon Associates, ask for a website URL during the application process. A simple blog with even 5 to 10 posts gives your application far more credibility than no web presence at all.
Starting a self-hosted blog does not need to be expensive. A shared hosting plan costs around $3 to $5 per month. A domain name costs around $12 per year. For under $75 per year, you have a professional, fully-owned website that acts as the hub for all of your Pinterest traffic.
In practice, consistency is the most important factor in Pinterest affiliate marketing. The platform rewards accounts that post regularly and penalises those that go dormant.
Aim to post between 10 and 20 fresh pins per week. Not every pin needs to contain an affiliate link.
Follow an 80/20 approach. Roughly 80% of your content should be genuinely helpful. The remaining 20% can include direct affiliate promotions.
Indeed, this ratio matters because it keeps your account looking valuable rather than spammy. Pinterest’s algorithm is more likely to show content from accounts that consistently provide genuine value to users.
Create multiple pin designs for each affiliate post or product. Different images attract different people. For example, three or four pin variations linking to the same destination give your content more chances to appear in searches and earn clicks.
Use a scheduling tool to stay consistent without burning out. Tailwind is the most widely used tool for Pinterest scheduling. It lets you queue pins in advance and publish them at optimal times.
In fact, you can batch your pin creation once or twice a week. After that, the tool keeps you active on the platform without daily logins.
Step 8: Optimise for Pinterest SEO
So, Pinterest SEO is how you get your pins in front of people who are actively searching for what you are recommending. It differs from Google SEO, but the core idea is the same. Match your content to the words your audience uses when they search.
So, start by using Pinterest’s search bar to research keywords. Type your niche topic into the search bar and look at the suggestions that appear. These are the actual terms that real Pinterest users are searching for. Build your pin titles, descriptions and board names around these phrases.
Specifically, focus on long-tail keywords. A search term like “small apartment storage ideas for renters” is far more specific than “storage ideas.” In fact, those searches attract people who know exactly what they want. They tend to convert much better than broad traffic.
Specifically, include your primary keyword in your pin title, your pin description and the alt text of your image if possible. Importantly, do this naturally. The description should read like something a helpful friend wrote, not like a keyword list.
Furthermore, Pinterest also factors in engagement when deciding which pins to show. Pins that get saves, clicks and close-ups early in their life tend to get pushed to more people. This is why creating genuinely useful and visually appealing content matters so much. In fact, it drives the early engagement that builds momentum.
Step 9: Track Your Results and Improve
Indeed, knowing what is working is just as important as creating content. Pinterest’s business analytics dashboard shows you exactly which pins are driving the most impressions, saves and outbound clicks.
Look at your top-performing pins regularly. Note what they have in common. Is it a particular format? A specific type of product?
Replicate what works and create more of it.
Also, track which pins are generating affiliate clicks and commissions in your affiliate programme’s dashboard. High impressions on Pinterest do not always mean high conversions. So, focus your energy on the content that actually drives income, not just traffic.
Also, test different pin designs for the same product. Sometimes a simple change in the headline or image colour dramatically changes how a pin performs. Indeed, small experiments lead to big improvements in your overall results.
The honest answer is that most Pinterest affiliate marketers see their first commissions within 30 to 90 days. That assumes you post consistently and focus on the right content.
In practice, the first month is usually about building your foundations. You are setting up boards, joining programmes, learning what resonates and developing your pin style. So, do not expect significant income at this stage.
Typically, by months 2 and 3, consistent posting with well-targeted content should start turning clicks into occasional sales. Think of this as proof that the system works, not as a meaningful income stream yet.
Indeed, from months 3 to 6, the compounding effect of older pins still driving traffic starts to add up. Accounts with 200 to 300 pins across focused boards often start generating $100 to $300 per month at this stage.
Furthermore, beyond 6 months, the range becomes much wider. It depends on your niche, your programmes and how much you have invested in building a blog alongside your Pinterest strategy. Some creators reach $1,000 per month within a year. Others build to much more over a longer period.
Ultimately, the key is patience combined with consistent effort. Indeed, Pinterest is not a fast income source. It is a slow-build, compounding one. In fact, that makes it far more sustainable than most paid traffic strategies.
Common Mistakes to Avoid
Unfortunately, most beginners make a handful of predictable mistakes when starting out. Indeed, knowing them in advance saves you a lot of wasted effort.
Posting Without a Strategy
Pinning randomly without a clear niche or keyword focus produces very few results. Every pin you create should connect to a specific audience and a specific search term. Random content attracts a random audience. Random audiences do not convert.
Ignoring Disclosure Requirements
Indeed, failing to disclose affiliate links is not just an ethical issue. It is a legal requirement under FTC guidelines and a violation of Pinterest’s own terms of service. Always be transparent. In fact, your audience will respect it, and your account will stay safe.
Giving Up Too Early
Unfortunately, most people quit Pinterest affiliate marketing before the compounding effect kicks in. They post for four or six weeks, see modest results and move on. Typically, the people who succeed treat the first three months as a foundation-building phase rather than an income phase.
Linking Directly Without Checking the Rules
Not every affiliate programme allows direct linking from Pinterest. Some, like Amazon Associates, strongly prefer that you link through a blog post. So, always check the specific terms of your programme before you start posting affiliate links.
Ready to Start Building Your Online Business?
Indeed, Pinterest affiliate marketing works best when it is part of a broader strategy. In fact, combining Pinterest with a simple blog and an email list creates a system where each part supports the others.
Pinterest is one of the most beginner-friendly platforms available for affiliate marketers in 2026. It is free to use. Its audience arrives in a buying mindset.
The content you create today can still earn commissions a year from now. That combination of low cost and long lifespan is hard to match anywhere else.
In short, the steps are straightforward. Set up a business account, choose a focused niche and join the right affiliate programmes. Create well-designed pins with keyword-rich descriptions and post consistently over time. Add a blog and an email list to that foundation, and you have a genuine long-term income machine.
Ultimately, knowing how to start affiliate marketing on Pinterest is the easy part. In practice, the real work is showing up consistently, learning from your analytics and improving your content week after week. Indeed, do that for six months to a year, and the results will speak for themselves.
Affiliate Disclosure: This post contains affiliate links. I may earn a commission if you sign up through my links, at no additional cost to you. I only recommend tools and platforms I genuinely believe offer value to my readers.
Can You Make Money With a Free Website? Yes, But Here’s the Truth
Can you make money with a free website? In short, yes. The longer answer is that your platform choice will either support your income goals or quietly work against them.
Free websites come with real limits. Some of those limits matter a great deal. Others are manageable. This article walks you through exactly what is possible, what holds you back and how to get the best outcome.
What Does “Free Website” Actually Mean?
Before we get into the money side of things, it is worth being clear about what we are talking about.
A free website typically means one of two things. First, it could be a hosted platform like WordPress.com, Wix or Blogger that gives you a site at no cost in exchange for a branded subdomain and some limitations on what you can do. Second, it could be a writing platform like Medium or Substack that publishes your content within their ecosystem.
Indeed, both paths can generate income. However, they are very different in how they work and how much control you have over your earning potential.
For most people reading this, a free hosted platform such as WordPress.com or Blogger is what comes to mind. So, that is the main focus here.
However, here is the thing. Making money with a free website is genuinely possible. Many people have done it. However, free platforms come with trade-offs that most beginners do not fully understand until they hit them head-on.
In fact, the biggest issues are these. Most free plans give you a subdomain rather than a custom domain. Instead of yoursite.com, you get yoursite.wordpress.com or yoursite.wix.com.
Notably, that subdomain signals to visitors that you are just starting out. It can reduce trust and make it harder to build authority in a niche.
Furthermore, many free plans restrict or completely block certain monetisation methods. WordPress.com’s free plan, for example, does not allow third-party ads. Wix’s free plan puts Wix-branded ads on your site that you cannot remove. These are not small issues if earning money is the goal.
The SEO picture is also more complicated on free platforms. You have less control over technical SEO. Your site sits on someone else’s domain. Google tends to give less authority to subdomains than to self-hosted sites with custom domains.
However, none of this means you cannot earn. It means you need to understand the rules of the platform you are using.
Free Platforms Compared: What You Can and Cannot Do
Let us look at the main options and what each one allows when it comes to earning money.
WordPress.com
WordPress.com is the hosted version of WordPress. It is free to start, but the free plan is fairly restrictive.
Specifically, on the free plan, you cannot install custom plugins. You also cannot run third-party ads from networks like Google AdSense. You get a WordPress.com subdomain. WordPress.com does have its own ad-sharing programme called WordAds, but this is only available on paid plans.
However, you can still use affiliate links on the free plan. This is significant. Affiliate marketing does not require running ads. It simply requires linking to products with your tracking code. That means income is possible from day one, even on the free tier.
If you upgrade to even the cheapest paid plan, the options expand. A custom domain costs around $4 to $7 per month, depending on which plan you choose. In fact, that small investment makes a meaningful difference to how your site is perceived and how it ranks.
Blogger
Blogger is Google’s free blogging platform. It has been around since 1999 and remains one of the few truly free platforms that allows you to connectto Google AdSense. That makes it genuinely useful for ad-based income.
You get a blogspot.com subdomain on the free plan. You can, however, connect a custom domain for the cost of the domain itself, which is typically around $10 to $15 per year. Furthermore, Blogger does not charge hosting fees. So, a fully custom-domain Blogger site costs under $15 per year to run.
The trade-offs are limited design flexibility and fewer built-in tools compared to WordPress. Overall, for a beginner who wants to test ad revenue with minimal investment, Blogger is a solid starting point.
Wix
Wix is a popular drag-and-drop builder with a generous free plan. Unfortunately, the free plan puts Wix branding and ads on your site. You also get a wix.com subdomain.
The key limitation for money-making is that many of Wix’s monetisation features require a paid plan. You can add affiliate links on the free plan. However, e-commerce, removing ads and a custom domain all require an upgrade. Paid plans start at around $17 per month.
Medium
Medium is a different kind of free platform. It has its own built-in audience and a Partner Programme that pays writers based on reading time from paying Medium members. If your content resonates, you can earn from Medium directly without needing to build a separate audience from scratch.
However, the limitation is that you do not own your audience. You are publishing within someone else’s ecosystem. Medium can change its algorithm, its payment rates or its terms at any time. In fact, many writers use Medium as a supplement to their main site rather than as the primary platform.
Now, let us look at what actually works when it comes to turning a free website into an income source.
Affiliate Marketing
Affiliate marketing is the most practical way to earn from a free website. You join an affiliate programme, get a unique link and include that link naturally in your content. When someone clicks your link and buys, you earn a commission.
Indeed, the beauty of affiliate marketing is that it does not require you to create your own products. It does not require a lot of traffic to start generating some income. Also, it does not depend on ad network approvals. Furthermore, it works on almost every free platform since you are simply placing a link in your content.
Specifically, commission rates vary widely. Amazon Associates pays between 1% and 10%, depending on the product category. Software and SaaS affiliate programmes often pay between 20% and 60%. Furthermore, some pay recurring commissions every month for the life of the customer’s subscription.
For a complete breakdown of how the affiliate model works and how to approach it strategically, Backlinko’s guide to affiliate marketing covers the core concepts clearly and in depth.
Display Advertising
Display ads are the passive option. You add a script to your site, and ads appear automatically. Each time a visitor clicks an ad, you earn money.
Specifically, Google AdSense is the most accessible network for beginners. The earning rates are low, typically between $1 and $3 per 1,000 pageviews on most niches. However, it is passive and scales with traffic. As your site grows, the income grows with it without requiring much additional effort.
Premium ad networks like Mediavine and Raptive pay significantly more, typically between $15 and $30 per 1,000 pageviews. However, both require a traffic threshold to join.
Mediavine requires 50,000 sessions per month. Raptive requires 100,000 monthly pageviews. These are not starting-point options. They are targets to work toward.
However, the important caveat here is that on most free platforms, you cannot run your own ads. Blogger is the main exception through its AdSense integration. On WordPress.com, ad income only becomes available once you move to a paid plan.
Sponsored Content
As your site grows, brands may pay you to write content that features their products or services. Rates vary enormously based on your niche, traffic and audience quality. Some bloggers charge $500 per sponsored post. Others with established audiences in high-value niches charge $2,000 to $5,000.
However, this income stream takes time to develop. It requires an audience that brands find valuable. However, it is one of the higher-earning methods once you get there.
You can pursue sponsored content on a free platform. Furthermore, having a professional-looking site with a custom domain makes you far more credible when approaching brands.
Digital Products
Selling ebooks, guides, templates, or courses is another strong income source. Indeed, the margin is excellent since there is no cost of goods. You create the product once and sell it indefinitely.
On free platforms, selling digital products directly is limited. You would typically need to use a third-party platform like Gumroad or Payhip to host and sell the product. You link from your site to the product page. In practice, this works reasonably well and means you are not entirely blocked by the platform’s limitations.
The Real Problem With Free Websites for Long-Term Income
However, here is the honest challenge. Free platforms are great for getting started. They lower the barrier to entry to almost zero. That is genuinely valuable.
However, the limitations start to matter as soon as you take earning money seriously.
You cannot customise your site the way you can on a self-hosted platform. You have less control over SEO. Your site sits on someone else’s domain.
The platform can change its rules at any time. In the worst case, it could shut down your account or even the entire service.
Everything you build on a free platform exists at someone else’s discretion. In fact, that is a meaningful risk when you are trying to build a real income.
Typically, the most common path is this. Start on a free platform to learn the basics and test your niche. Then move to a self-hosted platform once you have a clearer sense of what you are building and what your audience responds to.
For example, self-hosted WordPress with a shared hosting plan costs as little as $3 to $5 per month. Add a domain name for around $12 per year. For under $75 per year, you have a professional, fully-owned website with complete control over how you monetise it.
That is not a huge investment. However, for many people just starting out, even that small cost feels like a risk. Free platforms give those people a place to begin.
If you are committed to starting free, here is how to give yourself the best possible chance of earning.
Choose the Right Platform for Your Goal
If ad revenue is your main goal, use Blogger. It is the most accessible free platform for Google AdSense integration.
If affiliate marketing is your focus, WordPress.com or Blogger both work well. You can add affiliate links to either. WordPress.com has a cleaner editing interface and more themes.
If you want to test writing and get paid based on reads, Medium’s Partner Programme is worth exploring. It will not replace a full affiliate marketing business. However, it can generate some early income while you build your main site.
Focus on a Specific Niche
In fact, a niche site outperforms a general site almost every time. When your content is tightly focused on a specific topic, you attract an audience that is more likely to act on your recommendations.
Typically, the most profitable niches for affiliate marketing and ad revenue tend to be personal finance, online business, health and fitness, technology and home improvement. These are not the only options. Ultimately, the best niche is one where you have genuine knowledge and interest alongside reasonable commercial potential.
Build Content Around Search Intent
Ultimately, the content that earns the most is content that people are actively searching for. So, before writing any post, research your target keyword. Understand what the person searching for that term actually wants. Then write something that answers their question better than what is already ranking.
In fact, this matters even more on a free platform where your domain authority is lower. For example, long-tail keywords with less competition give you a realistic chance of ranking. Over time, those rankings build traffic, and that income follows.
For a detailed look at how to build a content strategy that drives consistent organic traffic, Shopify’s guide to making money blogging is one of the most thorough and practical resources available.
Add Affiliate Links Strategically
In short, do not add affiliate links to every post or every paragraph. Add them where they are genuinely relevant and helpful to the reader. In fact, a recommendation that fits naturally within useful content converts far better than a link that feels forced.
Specifically, the most effective formats for affiliate content are product reviews, comparison articles and best-of lists. These formats attract readers who are already close to making a buying decision. So, that intent makes them far more likely to click and convert.
Build an Email List From Day One
Indeed, this is the piece most beginners miss. Your email list is the one asset you fully own, regardless of which platform you build on. If your site gets penalised or a platform changes its rules, your list stays with you.
For example, use a free email marketing tool such as Mailchimp or the free tier of a similar service to start collecting emails from day one. Specifically, offer something valuable in exchange for a sign-up. A free checklist, a short guide or a useful resource all work well.
Furthermore, your list lets you promote new content, share affiliate recommendations and maintain a direct line to your audience that does not depend on Google or any platform algorithm.
A Realistic Income Timeline for a Free Website
It is worth being honest about the timeline here. Most free websites do not generate meaningful income in the first 1 to 3 months.
The content needs time to rank. Your audience needs time to grow. Trust also takes time to build.
For example, between months 3 and 6, you might start to see your first affiliate clicks and perhaps your first small commissions. Think $10 to $50 per month in a good month at this stage.
Indeed, between months 6 and 12, consistent effort starts to compound. Sites in good niches with well-researched content and consistent publishing schedules can reach $200 to $500 per month.
Beyond 12 months, the range becomes much wider. Some sites plateau at a few hundred dollars per month. Others grow into full-time incomes. Typically, the difference is the quality and volume of content, the niche and whether the creator has built an email list alongside the site.
According to WPBeginner’s research on online business and monetisation, there are more than 30 proven ways to make money from a website, ranging from display ads and affiliate marketing to selling services and creating digital products. Indeed, the platform you start on does not limit the eventual ceiling. It only affects how quickly you can access each option.
When to Upgrade From a Free Website
Here are the clearest signals that it is time to move to a paid, self-hosted platform.
For instance, you are consistently publishing content and seeing early traffic, but you feel limited by what you can customise or test. You want to run ads, but your free platform does not allow the ad network you need. A custom domain makes your site look more professional and builds more trust. You are starting to earn small amounts, and the income could fund the modest cost of hosting.
Indeed, that last point is worth sitting with. Once a free website is generating even $20 to $30 per month, it is effectively paying for its own upgrade. At that point, moving to a self-hosted setup makes complete commercial sense.
Ready to Start Building Something Real?
Whether you begin with a free website or go straight to a self-hosted setup, the fundamentals are the same. Choose a niche, build an audience, create helpful content and recommend products that solve real problems.
Common Questions About Making Money With a Free Website
Can you really make money from a free website without upgrading?
Yes, but your options are narrower. Affiliate marketing is the most practical method since it only requires that you add links to your content. Ad revenue is harder because most free platforms restrict which ad networks you can use. Display ads from Google AdSense are only available on Blogger among the main free platforms.
How much traffic do you need to make money?
It depends on the monetisation method. Affiliate marketing can produce income with relatively low traffic if the content is focused on high-intent keywords. A site with 500 monthly visitors in the right niche can earn meaningful commissions if the content is well-matched to buyer intent.
Display ads require much more traffic to generate meaningful income. Under 10,000 monthly pageviews, ad revenue from most networks will be modest at best.
Is it better to start free or pay from the beginning?
Starting free makes sense if you are still figuring out your niche, testing different content approaches or have a very limited budget. Notably, it removes the financial pressure and lets you focus on learning.
However, if you are serious about building an income from the start, a self-hosted setup with a custom domain gives you more control, more credibility and more monetisation options from day one. The annual cost is low enough that most people can justify it.
What is the biggest mistake people make on free websites?
Choosing a platform that blocks the income method they actually want to use. Many beginners sign up for a free platform without checking whether it allows affiliate links, ads or the specific tools they need. So, checking the monetisation rules of any platform before you invest time in building on it is always the right first step.
Final Thoughts
So, can you make money with a free website? Absolutely. The tools available to beginners in 2026 are genuinely impressive. You can start building an online income without spending a penny on hosting or a domain. That accessibility is real and valuable.
In fact, the honest truth is that free websites are a starting point rather than an end destination. In practice, the limitations on design, SEO and monetisation mean you will eventually outgrow the free tier if you are serious about building a real income. Furthermore, the good news is that the upgrade is affordable. Furthermore, by the time you need it, your site should be generating enough to cover the cost.
Start where you can. Indeed, learn as you go. Build your content and grow your audience.
In short, that is the real answer to can you make money with a free website. Yes, you can. Furthermore, with the right approach, it can be the beginning of something much bigger.
Affiliate Disclosure: This post contains affiliate links. I may earn a commission if you sign up through my links, at no additional cost to you. I only recommend tools and platforms I genuinely believe offer value to my readers.
Can You Make Money With a Free Blog? Here’s the Honest Truth
It is one of the most common questions anyone new to online business asks. Can you make money with a free blog? The short answer is yes, you can.
However, the more useful answer is that it depends enormously on which free platform you choose, how you plan to earn and how seriously you intend to grow. Free blogs have real limitations that most guides gloss over. This article covers them honestly and shows you a clear path forward.
Why People Start With Free Blogs
Starting a blog without spending any money is genuinely appealing. You have no financial risk. Testing ideas costs nothing. Learning the basics of writing, SEO and audience building all happen before you invest a single dollar.
Indeed, for many people, that is exactly the right approach. Most successful bloggers started on a free platform before moving to something more powerful. The experience of writing consistently and finding your voice is worth more than the platform itself in the early stages.
So in practice, the question is not whether a free blog is good or bad. It is whether a free blog can actually earn money and how much you can realistically expect before the limitations become a barrier.
The Main Free Blogging Platforms
So, before we look at money-making potential, it helps to understand what the main free options actually offer.
WordPress.com
WordPress.com is the hosted version of WordPress. It is free to sign up and easy to use. You get a subdomain like yourblog.wordpress.com and a selection of basic themes. Importantly, the platform handles hosting, security and backups automatically.
However, the free plan has real restrictions. WordPress displays its own ads on your blog, and you do not earn any revenue from them. You cannot use a custom domain without upgrading.
SEO customisation is also limited on the free tier. Monetisation through affiliate links is possible in theory, but a subdomain signals a lack of commitment to both readers and Google. Paid plans start at around $4 per month and unlock a custom domain.
Blogger
Blogger is Google’s free blogging service. It has been around since 1999 and integrates directly with Google AdSense. That means you can place display ads on your blog and earn revenue from traffic even on the free plan.
However, the platform is basic, and the design options are limited. You blog on a blogspot.com subdomain unless you connect a custom domain. Support is minimal. However, for a complete beginner who wants to start earning from ads without spending anything, Blogger is one of the most accessible free options available.
Medium
Medium is a writing-focused platform with over 100 million readers. Indeed, it has a built-in audience, which makes it attractive to writers who want their work seen quickly. The Medium Partner Programme pays writers based on how much time paying Medium members spend reading their content.
However, Medium has real limitations as a business tool. You cannot add your own display ads. Affiliate links are technically allowed but must be disclosed clearly.
SEO control is limited. Writing on Medium’s domain means you do not build your own site authority. Also, you need at least 100 followers before you can join the Partner Programme.
Substack
Substack combines blogging with email newsletters. It is free until you start monetising through paid subscriptions, at which point Substack takes a 10% cut. It is excellent for writers who want to build a direct subscriber relationship.
Unfortunately, the platform is not built for SEO in the traditional sense. Discovery mainly happens through Substack’s own network or social media sharing. Design options are minimal. However, for building a paid audience around a strong written voice, Substack is one of the most effective free tools available right now.
Can You Actually Make Money With a Free Blog?
Here are the main ways it happens.
Display Advertising
Indeed, display advertising is the simplest form of blog income. You place ads on your blog and earn money based on impressions and clicks. Google AdSense is the most accessible starting point. It is free to join and works well with Blogger.
The earnings per thousand visitors (RPM) vary widely by niche. Finance and business blogs can earn $15 to $30 per thousand visitors. Lifestyle topics often earn $5 to $10.
So, you need meaningful traffic before display ads become significant. However, it is passive income once the ads are in place.
The Medium Partner Programme
If you write well and your content resonates with readers, Medium can pay directly for your work. In fact, writers on the platform report earning anything from a few dollars to several hundred dollars per month. A small number of highly productive writers earn considerably more.
However, the key limitation is that the income is unpredictable and largely dependent on the platform’s algorithm. You are not building your own audience asset. If Medium changes its payment model or loses readers, your income changes with it.
Sponsored Posts and Brand Deals
Once your blog has an audience, brands may pay you to write about their products or services. This works on free platforms as well as paid ones. The blog’s niche and audience size matter more than the platform itself for this income stream.
Sponsored post rates vary from $50 per post for new blogs with modest traffic to several thousand dollars per post for established blogs with loyal audiences. However, this income stream typically does not develop until you have been publishing consistently for at least 6 to 12 months.
Affiliate Marketing
Indeed, affiliate marketing is the most accessible income stream for new bloggers on any platform. You write helpful content and include links to products or services. When a reader clicks through and buys, you earn a commission. Furthermore, most affiliate programmes are free to join.
You can do this on almost any free platform, including WordPress.com and Blogger. The income potential is real. According to a 2026 blogging income survey cited by Shopify, blogs between one and three years old earn an average of $205 per month. That is not life-changing, but it is genuinely achievable for a blogger who publishes consistently and targets the right keywords.
Furthermore, by years five to ten, the average jumps to around $2,621 per month. In fact, blogs over ten years old average $5,624 per month. The income grows with the content library and the trust you build.
The Real Limitations of Free Blogs for Making Money
Here is where things get honest. Free blogs can earn money. However, they carry specific limitations that will hold you back as you grow.
You Do Not Own Your Content
This is the most important limitation. When you blog on a free platform, the platform owns the infrastructure. It can change its rules, suspend your account or shut down entirely.
Your content sits on their servers. In some cases, they can remove your blog with very little notice.
Indeed, this is not a theoretical risk. Blogger has shut down blogs without warning. WordPress.com has suspended accounts that violated its terms. Building your income on someone else’s platform is a genuine risk that grows as your income grows.
Subdomain vs Custom Domain
A free blog typically lives on a subdomain. Yourblog.wordpress.com or yourblog.blogspot.com. Importantly, this matters for two reasons.
First, it signals to readers that the blog is not an established business. That matters when you are recommending products or asking people to trust your advice. Also, Google tends to rank individual sites with custom domains more reliably than subdomains. SEO is harder on a free subdomain, which means less organic traffic over time.
Limited Monetisation Options
Unfortunately, most free platforms restrict what you can do commercially. WordPress.com’s free plan runs its own ads without paying you. Medium does not allow display advertising. The affiliate marketing options are present but limited by traffic restrictions and platform rules.
Also, many of the best ad networks, such as Mediavine and Raptive, require a self-hosted site with a custom domain before you can join. Those networks typically pay three to five times more than Google AdSense. In practice, a free blog permanently locks you out of it.
SEO Restrictions
Search engine optimisation is the main long-term driver of blog traffic. Free platforms offer limited control over technical SEO. Installing plugins like Yoast SEO is not an option.
Customising site speed, structured data or schema markup is also restricted. Over time, these limitations put a free blog at a disadvantage against self-hosted blogs in the same niche.
Despite the limitations, there are situations where starting free is entirely the right choice.
If you are testing a new niche, a free blog lets you validate the idea without financial commitment. If you are a complete beginner learning to write and publish consistently, the platform itself matters less than the habit you are building. If your goal is to write for Medium’s audience rather than build a standalone site, the free model is the correct one.
However, the key is to know the limitations upfront. Use the free platform for what it is good at. Do not expect it to replace a proper self-hosted setup when you are ready to grow.
When to Move to a Self-Hosted Blog
In fact, most bloggers who build a meaningful income eventually move to a self-hosted WordPress.org setup. The move typically makes sense when you are publishing consistently, have a clear niche and are ready to invest in growth.
Self-hosted WordPress gives you full ownership of your content. You can install any plugin, use any ad network and customise everything about your site. Hosting costs as little as $2 to $5 per month through providers like Bluehost or Hostinger. A custom domain typically costs around $10 to $15 per year.
That investment removes the biggest limitations of a free blog. You gain full SEO control. Premium ad networks like Mediavine become accessible.
Building a proper email list is also straightforward. The asset is entirely yours.
Indeed, the blogging industry as a whole is projected to surpass $107.5 billion by 2026. There is real money in this space. However, the bloggers earning significant income are almost universally running self-hosted sites with custom domains and full control over their content and monetisation.
For a detailed breakdown of how bloggers actually make money in 2026, Shopify’s guide to making money blogging is an excellent resource that covers multiple income streams with real data.
The Fastest Way to Make Money From a Blog
Regardless of whether you start free or paid, the income strategy that works fastest for most new bloggers is affiliate marketing. Here is why.
You do not need a large audience to start. A small, targeted audience that trusts your advice is worth more than a large, disengaged one. There are no products to create and no customer service to manage. Write helpful content, include your affiliate links and earn a commission when readers buy.
Importantly, the key is choosing the right niche. Profitable niches include personal finance, health and fitness, online business, technology and home improvement. These areas have audiences that buy products and services online. The affiliate programmes available in them pay well.
Also, you need to choose your keywords carefully. Targeting low-competition keywords with genuine search volume gives a new blog a realistic chance of ranking in Google. Jaaxy and similar keyword research tools help identify these opportunities quickly.
Indeed, consistency matters more than almost anything else. Publishing one or two solid articles per week, every week, for twelve months builds a content library that can generate income around the clock. Most people quit before the compound effect kicks in. Staying is, in many ways, the entire strategy.
A Practical Starting Point
If you are reading this and wondering where to actually begin, the answer is straightforward. Start by learning the fundamentals of affiliate marketing and blogging strategy before you worry about which platform to use or whether to go free or paid.
It covers the tools I use, the platforms I recommend and how to get started without wasting money on things you do not need yet.
How to Build Traffic to a Free Blog
Getting traffic to a free blog is harder than to a self-hosted site, but it is not impossible. The key is understanding which traffic sources are available to you on a free platform.
Indeed, organic search is the most valuable long-term source. For this to work, you need to target keywords that real people type into Google. Ideally, you want keywords with reasonable monthly search volume and low competition. On a free blog, your SEO is limited, so focusing on genuinely niche, low-competition topics gives you the best chance.
Furthermore, social media is a strong option for free blog traffic. Pinterest in particular works well for blogs in niches like food, personal finance, home decor and lifestyle. In fact, a single well-designed pin can drive traffic to a blog post for months. Importantly, Pinterest traffic does not require a custom domain at all.
Also, cross-posting is always worth considering. Writing on Medium and linking back to your main blog, or sharing content across Substack and a separate site, can build traffic from multiple directions at once. In fact, this is a legitimate and effective strategy for free bloggers.
What Most Free Blog Guides Do Not Tell You
Unfortunately, most content about free blogging is optimistic to the point of being misleading. Here is what those guides often leave out.
Your email list is your most valuable asset, not your blog. Indeed, a blog drives traffic. An email list gives you a direct line to readers that no platform can take away.
Free blogs often make it harder to build an email list because they offer limited integration with email marketing tools. Indeed, building your list from day one is essential.
Also, most search engines struggle to give strong rankings to subdomain blogs. That does not mean free blogs never rank. However, the ceiling on organic traffic is noticeably lower than for a custom domain site. If search traffic is your primary plan, the limits of a free blog become apparent within the first twelve months.
Finally, the time you invest in content on a free platform is not wasted if you migrate later. You can move posts from WordPress.com or Blogger to a self-hosted site. However, some of the backlinks and SEO value built up under the old URL may not transfer cleanly. So, planning your migration carefully minimises that loss.
Free Blog vs Self-Hosted Blog: A Quick Comparison
So, it helps to see the key differences laid out clearly.
A free blog costs nothing to start. Setup takes minutes. However, it lives on someone else’s domain, restricts monetisation and limits SEO. You do not fully own the content or the platform.
A self-hosted blog costs around $3 to $5 per month for hosting and roughly $10 to $15 per year for a domain. Admittedly, setup takes a little longer. However, you own everything.
SEO is fully customisable. All monetisation methods are available. The platform cannot remove your content.
Indeed, for anyone planning to earn money seriously from blogging, the self-hosted option is clearly better in the long run. In fact, the cost difference is small. The capability difference is enormous.
That said, starting free is not wrong at all. It is a valid first step for learning, validating ideas and building the writing habit. Importantly, the key is to know when to upgrade and not to stay on a free platform once you are ready to grow.
Common Questions About Free Blogs and Money
How Long Does It Take to Make Money From a Free Blog?
Most bloggers see their first affiliate commissions or ad earnings within two to four months of publishing consistently. Building income that replaces a part-time wage typically takes twelve to eighteen months. A full-time income takes longer still. The timeline depends on your niche, your keyword targeting and how consistently you publish.
Which Free Blogging Platform Pays the Most?
Blogger, combined with Google AdSense, is the most direct way to earn money on a free platform because it allows display advertising without any paid subscription. Medium’s Partner Programme also pays directly for well-read content. WordPress.com on the free plan does not pay you for the ads displayed on your site.
Can You Use Affiliate Links on a Free Blog?
Yes, in most cases. WordPress.com allows affiliate links. Blogger allows them. Medium allows them with proper disclosure. The income depends on your traffic rather than the platform itself.
Is It Worth Starting a Blog in 2026?
Yes. Blogging is more competitive than it was five years ago. However, the earning potential is also higher. According to multiple industry surveys, experienced bloggers with established sites earn over $53,000 per year on average. The blogs that succeed are those with a clear niche, consistent publishing and a genuine focus on helping their readers.
For a deeper look at the data behind blogging income, Backlinko’s guide to how to write a blog post is a useful resource for understanding what makes blog content rank and convert.
Final Thoughts
So, can you make money with a free blog? Yes, you genuinely can. Blogger lets you run AdSense ads from day one.
Medium pays through its Partner Programme. Any free platform that allows affiliate links gives you access to the most accessible income stream in blogging.
However, the honest truth is that free blogs have real ceilings. They limit your SEO options, restrict your monetisation tools and put your content on someone else’s infrastructure. In fact, the bloggers who build the most significant income are almost always running self-hosted sites with custom domains.
Start free if the budget is tight or if you are not yet sure about your niche. Use that time to write consistently, learn about your audience and test your ideas.
Then, when you are ready to treat your blog as a real business, move to a self-hosted setup. That is the path that most successful bloggers take. It is the one I am following with this site.
Affiliate Disclosure: This post contains affiliate links. I may earn a commission if you sign up through my links, at no additional cost to you. I only recommend tools and platforms I genuinely believe offer value to my readers.
AI Blog Writing Tools- Stop Wasting Money on the Wrong Ones
If you have ever sat staring at a blank screen, wondering how on earth you are going to publish enough content to compete online, you are not alone. The good news is that AI blog writing tools have changed the game for solo bloggers and small business owners in a way that simply was not possible a few years ago.
The bad news is that the market is now flooded with options, and many of them are not worth a penny of your money. This article is going to cut through the hype, show you exactly what these tools can and cannot do and help you figure out which one is the right fit for where you are right now in your business.
Why Bloggers Are Turning to AI in the First Place
Let us be honest about something. Writing high-quality blog content is genuinely hard work. It is not just the writing itself. It is the research, the planning, the optimising, the editing and the constant pressure to publish consistently while also running every other part of your business or managing a full-time job.
Indeed, for most solo bloggers and side hustlers, content creation is the single biggest bottleneck standing between them and real growth. You know you need more posts, and you know you need better posts. The problem is that you simply do not have the hours to produce them at the rate the algorithm rewards.
That is precisely where AI blog writing tools come in. They do not replace the writer. Instead, they tackle the parts of the writing process that eat up the most time.
Specifically, think outline generation, first-draft creation, headline ideas, intro paragraphs, topic research and repurposing existing content. When you use them correctly, the time savings are significant.
According to research by HubSpot, marketers who use AI tools for content creation save an average of 2.5 hours per day. Over the course of a week, consequently, that is more than 12 hours returned to your schedule. Indeed, for a side hustler trying to build an audience around a full-time job, those hours are transformative.
However, the keyword in all of this is “correctly”. AI blog writing tools work brilliantly as a collaborator. They struggle when people treat them as a copy-and-paste shortcut.
What Separates a Good AI Blog Writing Tool from a Bad One
Before we look at specific platforms, it is worth understanding what actually matters when you are evaluating one of these tools. Not all of them are built with bloggers in mind.
Quality of Output
The single most important factor is the quality of the text the tool produces. Does it write in a way that sounds natural and engaging? Does it avoid the repetitive, robotic phrasing that signals machine-generated content to both Google and your readers?
Consequently, the best tools produce drafts you can genuinely work with. The worst produce content you would spend more time fixing than if you had simply written it yourself.
Ease of Use
For example, if you are not technical, the last thing you need is a platform that requires a PhD in prompt engineering before you can get useful output. The best AI blog writing tools have a clear, intuitive interface that guides you through the process. Ultimately, you should be able to produce a working draft within minutes of signing up.
Pricing and Value
Unfortunately, this is the area where most bloggers get burned. For example, it is very easy to sign up for a $69-per-month platform because the marketing looks impressive and then realise three months later that you are paying more than your content is currently earning.
Instead, the right tool for a beginner or budget-conscious blogger is not necessarily the tool with the longest feature list. It is the tool that delivers a meaningful return relative to where you actually are right now.
Template Availability
Templates save enormous amounts of time. A good AI blog writing tool will offer pre-built templates for blog post introductions, product reviews, how-to guides, comparison articles, listicles and more. Instead of starting from scratch every time, you select the template that fits the format you need and let the tool do the heavy lifting.
SEO Awareness
Notably, writing a blog post and writing a blog post that ranks in Google are two very different things. Unfortunately, some tools have absolutely no understanding of search intent, keyword placement or content structure. Others are built specifically around SEO and integrate SERP data directly into the writing process. Consequently, where your tool sits on that spectrum matters a great deal if organic traffic is part of your strategy.
The Best AI Blog Writing Tools Available Right Now
Let us look at the main options bloggers are using and what each one actually delivers.
Rytr
Rytr is the most affordable dedicated AI blog writing tool on the market. It starts at just $9 per month for the unlimited plan. Nevertheless, despite the low price, it covers a genuinely impressive range of use cases. You can use it to write blog post introductions, full outlines, section content, product descriptions, email copy, social media captions and ad headlines.
Additionally, the platform supports over 40 use cases and writes in more than 30 languages. It includes a built-in editor, a content improver, a plagiarism checker and a tone selector with over 20 options. Additionally, the interface is clean and beginner-friendly.
Furthermore, for someone building an online business from scratch, Rytr offers genuine value without putting pressure on a budget that has not yet started generating income. Specifically, it handles the majority of what a new blogger needs. You get consistent, workable first drafts that you can edit, add your own voice to and publish with confidence.
Admittedly, it is not the most advanced tool on the market. However, for the price point and the stage of business it serves, it is genuinely hard to beat. If you are just starting out and want a practical, affordable AI blog writing tool to help you publish more content consistently, Rytr is where I would tell you to begin.
Jasper is one of the most well-known AI blog writing tools on the market. It is built primarily for marketing teams that need to produce large volumes of on-brand content across multiple channels. Specifically, the platform’s “Brand Voice” feature lets you train the tool on your specific tone, guidelines and terminology. Everything it produces then stays consistent with your brand identity.
Additionally, Jasper also offers workflow automation through its “Content Pipelines” feature. This allows teams to automate the process from idea generation through to final draft without switching between tools. Indeed, in our testing across various reviews, Jasper consistently produces some of the strongest blog post drafts of any tool in this category.
However, the downside is the price. Plans start at $59 per seat per month when billed annually or $69 per month when billed monthly. For an established marketing team producing content daily, that investment pays for itself. For a solo blogger in the early stages of building an audience, it is a difficult number to justify before your content starts generating income.
Consequently, Jasper is the right choice if you are managing a content operation at scale and need brand consistency across multiple writers. It is not the right starting point for most individual bloggers.
Writesonic
Writesonic stands out for one feature that most of its competitors have not caught up with yet: built-in SEO data. The platform integrates real keyword research data directly into the content creation process. This means you can write a blog post with your target keyword already embedded in the tool’s understanding of what the search results look like.
Furthermore, the platform also generates content that draws on real-time web data. As a result, the articles it produces are less likely to include outdated information. Writesonic has also been developing features around generative engine optimisation, which helps your content appear in AI-powered search results such as Google AI Overviews and Perplexity.
Plans start from around $49 per month for the individual tier. There is a limited free plan available. Overall, Writesonic is a strong choice for content creators who are primarily focused on SEO and organic traffic. The keyword integration saves a meaningful amount of research time.
Frase
Frase takes a different approach to most AI blog writing tools. Rather than starting with a blank prompt, it analyses the top-ranking pages for your target keyword before producing anything. It then builds a content brief around the topics, headings and questions those pages cover. As a result, your content is grounded in real search intent before you write a single word.
As a result, this brief-first approach makes Frase particularly strong for long-form SEO content. The real-time optimisation score updates as you write, giving you feedback on whether your article is covering the topic comprehensively relative to what is already ranking. Plans start at $45 per month.
Consequently, Frase is the right tool if your primary goal is to rank in Google and you produce long-form blog posts regularly. It is less useful for short-form content or if SEO is not yet a central part of your strategy.
ChatGPT
ChatGPT deserves a mention even though it is not a dedicated AI blog writing tool. It is a conversational AI model that can be used for drafting, research, brainstorming, outlining and editing. Indeed, many bloggers use it daily at no cost.
The main limitation compared to dedicated blog writing platforms is that it lacks built-in templates, SEO integrations and brand voice settings. You have to configure it yourself through prompting.
However, for a bootstrapper on a tight budget, ChatGPT remains one of the most versatile and cost-effective tools available. Specifically, the free tier gives you access to a capable model. The paid Pro version at $20 per month unlocks the most powerful available models.
Copy.ai
Copy.ai is most effective at short-form marketing copy rather than long-form blog content. It excels at ad headlines, email subject lines, product descriptions and social media captions. For bloggers who also manage marketing content across multiple channels, it covers a useful range of tasks.
Additionally, the platform includes a large library of templates and allows you to iterate on output using follow-up prompts. The Pro plan starts at $20 per month. Therefore, Copy.ai is worth considering as a complement to a dedicated blog writing tool. However, if long-form blog posts are your primary content type, a tool built specifically for that purpose will serve you better.
How to Actually Use AI Blog Writing Tools Effectively
Understanding which tool to use is only half the answer. The other half is knowing how to use it in a way that produces genuinely good content rather than generic text that nobody wants to read.
Always Start with Your Own Research
The biggest mistake people make with AI blog writing tools is asking the tool to do all the thinking for them. The best content starts with your own understanding of the topic and the audience.
Before you open your AI tool, spend time understanding what your reader is searching for and why. Read the top-ranking articles on the topic. Note what they cover well and where the gaps are.
Subsequently, use your AI tool to help you structure, draft and fill in the gaps. Specifically, the tool handles the heavy lifting. You provide the perspective and the intelligence.
For a practical guide on how to plan and write blog content that actually performs well in search, Backlinko’s guide to how to write a blog post is one of the most thorough and actionable resources available.
The fastest way to get useful output from any AI blog writing tool is to use the right template for the format you are writing. A how-to guide needs a different structure from a product review. A comparison article needs a different structure from a listicle. Generally, the more clearly you match the template to your content type, the more usable the output will be.
Alternatively, if your tool does not have a template that fits, take a few minutes to build a detailed prompt that tells the tool exactly what you want. Include the format, the target keyword, the audience and the tone. Ultimately, the quality of your input determines the quality of your output.
Always Edit Before You Publish
This is non-negotiable. AI-generated content is a first draft. It should always be edited before publishing.
Specifically, add your own voice and perspective. Check every fact and statistic the tool includes. Remove anything that sounds generic or robotic.
Add examples from your own experience. Indeed, these additions are what separate content that builds trust from content that gets ignored.
According to HubSpot’s research, 86% of marketers who use AI to generate written content make significant edits before publishing. Only 4% publish without any changes at all. The 86% are the ones building something real.
Publish Consistently
Furthermore, one of the biggest advantages that AI blog writing tools offer solo bloggers is the ability to maintain a consistent publishing schedule. Indeed, consistency matters enormously in content marketing. Google rewards sites that publish regularly. Audiences grow when they can rely on new content appearing at predictable intervals.
Without AI assistance, many bloggers publish once every two or three weeks because the writing process takes so long. With the right tools, that same person can publish two or three times per week. Over the course of 12 months, the difference in content volume is dramatic. More content means more keywords, more traffic and more affiliate revenue.
For a deeper understanding of how content volume and consistency affect long-term organic growth, Backlinko’s guide to using AI for writing exceptional content is an excellent resource that covers best practices directly from an experienced editorial team.
Common Mistakes Bloggers Make with AI Blog Writing Tools
Understanding what not to do is just as valuable as knowing what works.
Publishing Generic Content
The most common and most damaging mistake is publishing content that sounds like it came from a machine. Generic AI content ranks poorly, attracts low engagement and does nothing for your credibility. Your readers will notice. Google will notice. Instead, the solution is to always edit thoroughly and inject your own voice and experience.
Expecting Instant Results
AI blog writing tools help you produce content faster. They do not, however, fast-track SEO rankings. Organic traffic takes time.
Realistically, you should expect to wait 3 to 6 months before new content begins to generate meaningful search traffic. However, the tools speed up the creation process. They do not replace the patience that organic growth requires.
Over-investing Too Early
It is very tempting to sign up for the most feature-rich platform available when you first start exploring AI tools. However, paying $69 per month for an enterprise-grade platform before your blog is generating any revenue is a fast way to feel discouraged.
Start with an affordable tool that covers the basics. Master it and use it consistently. Upgrade once your content is generating income that can fund a more powerful platform.
Speed without strategy produces a lot of content that nobody finds. Before writing any blog post, spend time researching your target keyword. Understand the search intent behind it.
Write content that answers the question better than what is already ranking. AI can help you execute on that strategy. It cannot replace the research behind it.
For a comprehensive look at how to use data and content marketing statistics to build smarter strategies, Semrush’s content marketing statistics report provides detailed insights into how content investment translates into measurable results.
Which AI Blog Writing Tool Is Right for You?
The right tool depends entirely on where you are in your business journey and what you are trying to achieve.
If you are just starting out
Start lean. Specifically, there is no reason to pay $69 per month for an enterprise platform before you have a single dollar of revenue. Rytr covers everything a new blogger needs at $9 per month. It handles blog post drafts, outlines, introductions, social captions and more. Use it to build your content library and your audience before investing in more specialist tools.
If SEO is your primary focus
Frase and Writesonic are the strongest options here. Both integrate search data into the writing process in ways that most general-purpose AI tools do not. If your strategy depends on ranking in Google, one of these platforms will support that goal more directly than a general content generator.
If you manage a team
Jasper is worth serious consideration if you are managing multiple writers and need brand consistency across all of them. The collaboration features, approval flows and brand voice training are built for this use case. For a solo blogger, however, the price point is hard to justify.
If you need short-form copy alongside blog content
Copy.ai handles short-form marketing copy well and complements a dedicated blog writing tool if you are also managing social media or email marketing content.
The Realistic Picture of What AI Can Do for Your Blog
There is a lot of hype around AI blog writing tools. It is worth cutting through it with an honest assessment of what you can realistically expect.
AI tools will help you write faster. A blog post that previously took 4 hours can be drafted in under an hour with the right tool in place. Indeed, that is not an exaggeration. It is a realistic outcome for a blogger who learns to use the tool properly.
AI tools will help you be more consistent. The blank page problem disappears. You show up to your desk with a keyword and a topic, and the tool gives you something to work with immediately. As a result, that removes one of the biggest obstacles to regular publishing.
AI tools will not replace your voice. The best content online sounds like a real person with a distinct perspective on a specific topic. Generic output sounds like nobody in particular.
Your competitive advantage as a blogger is your specific experience and your authentic voice. Instead, the tools are there to support that. They are not there to replace it.
AI tools will not guarantee rankings. Publishing AI-generated content without a clear keyword strategy and a commitment to genuine quality will not move the needle. The tools amplify a good strategy. They cannot substitute for one.
Final Thoughts
The landscape of AI blog writing tools has shifted dramatically over the past few years. What once required a team of writers can now be handled by a single person with the right tools and a clear strategy. That is genuinely exciting for anyone building a content-based online business with limited time and a limited budget.
The tools themselves are only as good as the strategy and the effort behind them. An AI blog writing tool in the hands of someone who understands their audience, researches keywords carefully, and edits thoroughly is a genuine competitive advantage. However, used carelessly, it is simply a faster way to produce content that does not rank and does not convert.
Start with the right tool for your stage. Build your process. Publish consistently. Edit everything. Add your own voice to everything the tool produces. Therefore, if you are looking for a practical, affordable and beginner-friendly place to start, I recommend taking a look at Rytr. It is not the flashiest tool on the market, but it is reliable, versatile and priced at a level that makes sense before your blog is generating income.
Ultimately, the bloggers who succeed with AI are not the ones who pay the most for the most powerful platforms. They are the ones who choose a tool that fits where they are right now, learn it properly and use it every single week without fail.
AI Content Writing Tools: Which Ones Are Actually Worth Your Time?
The number of AI content writing tools available today is genuinely staggering. In fact, new platforms seem to launch every single week. Type that phrase into Google, and you will find hundreds of options. Each one promises to save you hours of work and rank your content on page one.
Most of them, however, will not deliver on that promise. Some will. And a handful are genuinely brilliant for the right person in the right situation. Consequently, this article is going to cut through the noise and help you figure out which tools are worth your attention.
Why So Many People Are Turning to AI Content Writing Tools
Before we look at specific tools, it is worth understanding why this category has exploded. Content creation is hard, time-consuming and relentless. Indeed, there is simply no getting around that.
For example, blogs need updating. Social media needs feeding. Email lists need nurturing.
Product descriptions need writing too. For most small business owners and solopreneurs, the sheer volume of content required to compete online is genuinely overwhelming.
Fortunately, AI content writing tools tackle that problem directly. According to research by HubSpot, marketers who use AI for content save an average of 2.5 hours per day. Over a working week, those savings therefore add up fast.
Furthermore, research from Semrush found that 36% of marketers who use AI spend less than one hour writing a long-form blog post. For comparison, the average writer without AI takes 2 to 3 hours to complete the same task.
Therefore, those statistics explain the explosion in adoption. However, they do not mean that every tool on the market is worth your money. The quality varies enormously, and choosing the wrong tool can waste both time and money. So, ultimately, let us look at what actually matters when evaluating these tools and which ones come out on top.
For a broader understanding of how AI fits into content strategy, HubSpot’s guide to AI in content marketing is a solid starting point. It is data-backed and practical.
What Are AI Content Writing Tools and How Do They Work?
AI content writing tools are software platforms that use large language models to generate, edit or optimise written content. You provide a prompt, a keyword, a brief or a topic, and the tool produces text based on that input. The underlying technology draws on patterns from enormous volumes of existing writing. It predicts what a helpful, coherent piece of content should look like.
Notably, most tools in this category fall into one of three broad types.
Content generators create text from scratch. You give them a topic, and they produce an article, a social media caption, a product description or an email. Jasper, Writesonic and Rytr all work in this way.
SEO optimisation tools analyse what is already ranking in Google and help you structure your content to compete. Frase and Surfer SEO are the most well-known examples. They do not simply generate content. Instead, they ground your writing in real search data before a single word gets written.
Editing and improvement tools take existing writing and refine it. Grammarly and Hemingway work in this way. They do not replace your writing. Instead, they make it cleaner, more readable and more polished.
The most capable platforms in 2026 combine elements of all three. However, most still have a primary focus. However, understanding which category a tool primarily belongs to helps you choose the right one for your specific needs.
The Big Question: Do AI Content Writing Tools Actually Produce Good Results?
Indeed, this is the question most people are really asking, and the honest answer is: it depends entirely on how you use them.
Essentially, AI content writing tools produce first drafts, not finished copy. This is the single most important thing to understand before you invest in any platform.
The output is a starting point. Specifically, it gives you structure and removes the blank page problem. However, it does not replace your judgement, your voice or your expertise.
According to HubSpot’s research, only 4% of marketers use AI to write entire pieces of content without any editing. The vast majority use it to spark inspiration, create outlines or produce a few paragraphs to build on. Among those who use AI to generate written content, 86% make edits before publishing. Overall, that is the correct approach.
When you treat AI as a collaborator rather than a replacement, the results are impressive. Specifically, you write faster, cover topics more comprehensively and produce more content without burning out.
When you treat it as a copy-and-paste shortcut, however, the results are generic, inaccurate and easily recognisable as machine-generated text.
Let us look at the main players and what each one is best suited for.
Jasper
Jasper is one of the most well-known AI writing platforms for marketing teams. Indeed, it consistently ranks at the top of most industry comparisons. It supports a wide range of content types, from blog posts to social media ads and product descriptions.
One of its strongest features is “Jasper IQ”. This lets you feed the tool your brand guidelines, tone of voice and company information. Everything it produces then stays consistent with your brand.
Jasper also offers “Content Pipelines”, which automate your entire content workflow from idea generation to final draft. For large teams, this saves significant time. Consequently, many marketing teams report producing more content with fewer people.
Furthermore, the platform draws on GPT-4, Cohere and Anthropic models depending on the task. Plans start at $69 per month per seat. For solopreneurs and beginners, that price point is hard to justify. For a marketing team producing content daily, it can pay for itself quickly.
Writesonic
Writesonic is a versatile platform covering a wide range of content formats. It generates SEO-optimised blog posts, landing page copy, ads and social media content. The tool includes a built-in SEO checker with real-time optimisation insights. It also connects to real-time data, so the content it produces is less likely to include outdated information.
Writesonic has also moved into generative engine optimisation. This helps users track how their content appears in AI-powered search results. Plans start from around $16 per month, making it more accessible than Jasper for budget-conscious creators.
Copy.ai
By contrast, Copy.ai focuses on short-form marketing copy. It excels at ad headlines, email subject lines, product descriptions and social media captions. One of its standout features is the ability to iterate on content using follow-up inputs. For example, you can give it feedback, ask for a different angle and keep refining until the result meets your standards.
The unlimited plan removes word count anxiety for high-volume users. Copy.ai starts at $20 per month for the Pro plan. It is not the strongest choice for long-form blog content, but for short-form marketing copy, it is genuinely useful.
Frase
Notably, Frase works differently from most tools in this category. Rather than starting with a blank prompt, it analyses the top-ranking pages in Google for your target keyword. It then builds a content brief around the topics, headings and questions those pages cover. As a result, your content is grounded in real search intent from the start.
Frase is most useful for SEO-focused content creators who produce long-form articles regularly. It includes a real-time optimisation score that updates as you write. Plans start at $39 per month with a 7-day free trial.
Grammarly
Meanwhile, Grammarly occupies a slightly different space. It does not generate content from scratch. Instead, it checks your writing for grammar, clarity, tone and engagement as you type. It works across WordPress, Google Docs, email clients and social media.
For anyone who writes online, Grammarly is a genuinely useful tool. The free plan covers essential grammar and spelling checks. The premium version adds tone detection, clarity suggestions and plagiarism checking, starting at around $12 per month when billed annually.
ChatGPT
ChatGPT deserves a mention even though it is not a dedicated AI content writing tool. It is a conversational AI model you can use for drafting, research, brainstorming, outlining and editing. Many content creators use it daily at no cost. The paid Pro version at $20 per month unlocks the most powerful available models.
However, the main limitation compared to dedicated writing tools is the lack of built-in templates, brand voice settings and SEO integrations. You have to configure it yourself. Nevertheless, for a bootstrapper on a tight budget, it remains one of the most versatile tools available.
Rytr
Rytr is the most affordable dedicated AI content writing tool on the market. It starts at just $9 per month for the unlimited plan. Despite its low price, it covers a surprisingly wide range of use cases. You can use it to write blog posts, product descriptions, email copy, social media captions and ad headlines.
Additionally, Rytr supports over 40 use cases and writes in more than 30 languages. The platform includes a built-in editor, a content improver and a tone selector with over 20 options. For beginners building an online business, Rytr offers genuine value without a heavy financial commitment.
How to Choose the Right AI Content Writing Tool for Your Situation
With so many options available, the choice can feel paralysing. However, the decision is actually simpler than it appears. Ultimately, it becomes much easier once you are honest about what you actually need.
If You Are Just Starting Out
Start lean. You do not need to pay $69 per month for a premium platform before you have a single dollar of revenue. Start with a tool that covers the basics and does not strain your budget.
Both ChatGPT and Rytr are, therefore, excellent starting points. Consequently, they handle the majority of your content creation needs while you build your audience. Additionally, you can always upgrade to a more specialist tool once your content operation is generating income.
If You Are Focused on SEO and Organic Traffic
If your primary goal is to rank in Google, you need a tool that understands search intent. Specifically, you need one built around SERP data. Frase and Surfer SEO are the strongest options in this category.
Specifically, they produce content structured around what is already working in the search results. Furthermore, Writesonic is worth considering for its built-in SEO checker and real-time data integration.
If You Are Running a Marketing Team
If you manage a team producing content across multiple formats and channels, Jasper is worth serious consideration. The brand voice settings, content pipelines and team collaboration features are genuinely useful at scale. Copy.ai is worth looking at for short-form copy and ad campaigns.
If You Want to Improve Your Existing Writing
Grammarly is the obvious choice here. It integrates with virtually every platform you already use. Specifically, it works in the background as you type.
Additionally, it checks your writing without requiring you to switch tools. For readability improvements, the Hemingway Editor is also worth adding to your workflow.
Common Mistakes People Make with AI Content Writing Tools
Understanding what not to do is just as important as understanding what these tools can achieve.
Publishing Without Editing
Indeed, this is the most common and most damaging mistake. AI-generated content is a draft. Always edit it before publishing. Consequently, add your own perspective and personal experience.
Consequently, check every fact the tool includes. Remove anything that sounds generic or robotic. Add your voice. The tools produce the skeleton, and you provide the flesh.
Expecting Instant Rankings
AI content writing tools help you produce better-structured content faster. They do not, however, fast-track Google rankings. SEO takes time.
Realistically, you should expect to wait 3 to 6 months before new content delivers meaningful traffic. The tools speed up the writing process. They do not replace the patience that organic growth requires.
Using Too Many Tools at Once
It is tempting to sign up for multiple platforms and try everything at once. However, this rarely ends well. Resist that urge.
Choose one or two tools, learn them properly and use them consistently. Adding more tools does not produce better results. It produces confusion and wasted subscriptions. Start with one platform, master it fully and then assess whether a second tool is genuinely needed.
Ignoring SEO Entirely
Some AI writing tools make content creation so fast and easy that people publish without any thought about search intent. Unfortunately, speed without strategy produces content that nobody finds.
Before you write any article, research your target keyword. Understand what the person searching for that term actually wants. Then use your AI tool to produce content that answers their question better than the competition.
What AI Content Writing Tools Cannot Do?
Indeed, it is important to be clear about the limitations of these tools. This is especially true if you are new to them.
Firstly, AI writing tools cannot replace original research. They cannot interview experts, conduct surveys or produce genuinely new insights. Everything they generate draws on patterns from existing content.
If you want to stand out in a crowded niche, your advantage comes from your own experience and expertise. Use the tools to speed up your writing. Instead, do not use them as a substitute for having something genuine to say.
Furthermore, they cannot guarantee accuracy. AI models can produce plausible-sounding but factually incorrect information. This is particularly true for statistics, quotes and technical details.
Always verify claims before you publish. Overall, a single inaccurate statistic can damage your credibility significantly.
Finally, AI tools cannot replicate your authentic voice without significant effort. The best content online sounds like a real person with a distinct perspective. Generic AI output sounds like nobody in particular.
Developing your voice takes time and practice. The tools can support that process. They cannot replace it.
The Role of AI Content Writing Tools in Building an Online Business
If you are building an online business and relying on content marketing, AI content writing tools offer a genuine competitive advantage. As a result, a single person can now produce the volume of content that would normally require a team. Furthermore, these tools remove the blank page problem and help you cover topics more comprehensively by surfacing angles you might otherwise miss.
Specifically, according to Semrush’s content marketing research, 77% of marketers agree that AI helps them create better and more personalised content. Furthermore, 83% of marketers say AI helps them produce significantly more content than they could without it. For a solopreneur building a content-based business around affiliate marketing, those advantages directly translate into more articles and more traffic. More traffic means more potential revenue.
However, the key is to use the tools strategically. Focus on keywords with genuine search volume. Write content that provides real value rather than simply filling a page with words. Edit everything before publishing.
Additionally, build a consistent publishing schedule and stick to it. The tools make consistency easier. They do not make it automatic, and that distinction matters a great deal.
Want the data behind current trends? Semrush’s content marketing statistics is a comprehensive resource that covers how AI is reshaping content creation.
A Recommended Starting Point
If you are in the early stages of building an online business and you want a practical, affordable and beginner-friendly AI writing tool, I recommend starting with Rytr. It covers a wide range of content creation needs, supports dozens of use cases and starts at just $9 per month for unlimited writing.
Indeed, it is not the flashiest tool on the market. However, it is genuinely useful, consistently reliable and easy to get started with. For someone building their first content library from scratch, that combination of affordability and versatility is exactly what the situation requires.
Therefore, there is no reason to spend $69 per month on a premium platform before your content is generating any income. Start lean, publish consistently and invest in more specialist tools once your content operation starts to grow.
Final Thoughts
The landscape of AI content writing tools has changed significantly in a short space of time. Essentially, what once required a team of writers and researchers now sits in the hands of a single person with a laptop and the right tools. That is genuinely exciting for anyone building a content-based online business.
However, the tools themselves are only as good as the strategy behind them. An AI writing tool in the hands of someone who understands their audience, researches keywords carefully and edits their content thoroughly is a powerful asset. By contrast, the same tool in the hands of someone looking for a shortcut is just a fast way to produce content nobody reads.
Use these tools with intention. Indeed, edit everything before you publish. Moreover, add your own voice and perspective. Publish consistently and treat it as a long-term commitment.
The AI content writing tools available today are genuinely remarkable. Used well, they can help you build something real and sustainable. However, used carelessly, they are simply a faster way to produce average content.
The Frase AI Writing Tool- Does It Actually Help You Rank?
Most AI writing tools start with a blank page and a prompt. The Frase AI writing tool starts somewhere more interesting. Instead of simply generating text, it first analyses what is already ranking in Google. Then it builds your content around that data. On paper, it sounds like a genuinely smart approach. In practice, the reality is a little more nuanced. In this review, we are going to look honestly at what Frase does well, where it falls short and who it is actually built for.
What Is the Frase AI Writing Tool?
Frase is an AI-powered content creation and SEO optimisation platform. Frase built the platform to help content marketers, bloggers and SEO professionals. It creates content structured around real search data. Essentially, it replaces the blank page with a data-driven foundation. Essentially, the core idea behind it is straightforward. Rather than starting from scratch, you enter a target keyword, and Frase analyses the top-ranking pages in Google for that term. It then extracts the key topics, headings, questions and patterns those pages use. From there, it builds a content brief and helps you write an article around those insights.
Notably, this approach sets Frase apart from many of its competitors. Tools like Jasper or Writesonic focus primarily on speed and content generation across multiple formats. Frase, by contrast, focuses on search intent first. It wants to understand what is already working in the SERPs before a single word is written. For SEO-focused content creators, that distinction matters considerably.
Since its launch, over 30,000 content and SEO teams have trusted Frase. Importantly, it integrates with Google Search Console, WordPress and Google Docs. Additionally, it has evolved significantly in recent years. The platform now includes an AI Agent with over 80 skills. It also offers site audit tools, AI visibility tracking and content optimisation features, all within a single dashboard.
Understanding who benefits most from Frase will save you time and money. Indeed, it is not a universal tool, and it is not trying to be.
SEO Professionals and Content Marketers
Frase is most useful for people who create content with the specific goal of ranking in search engines. If you are an SEO professional managing a client’s blog, Frase had you firmly in mind. The same applies if you are a content strategist producing keyword-targeted articles or a niche site builder competing in Google. The research and optimisation features are genuinely powerful for this use case.
Freelance Writers and Content Agencies
Freelancers who write for clients often spend hours researching topics before they can even begin writing. Frase speeds up that research phase significantly. As a result, you can move from keyword to draft much faster. Furthermore, it produces structured content briefs you can share directly with writers. This makes it very useful for agencies managing multiple contributors. As a result, the document sharing feature means you can send editable briefs to your team in minutes rather than hours.
Bloggers Building Organic Traffic
If you are building a content-based website and relying on organic search for traffic, Frase helps you write better. It produces articles structured around what Google actually rewards. That said, it is important to be realistic. Frase does not guarantee rankings. Instead, it simply helps ensure that your content covers the topics, questions and themes that the top-ranking pages already address.
Who Should Probably Look Elsewhere
If you are looking for a general-purpose writing tool for emails, social media captions or ad copy, Frase is not the best fit. Frase built it specifically for long-form, SEO-driven content. Therefore, if your needs are broader than that, a tool like Rytr or Writesonic may serve you better and cost you less in the process.
Frase AI Writing Tool: Key Features Explained
So let us look at what the platform actually offers, beyond the marketing language on its homepage.
SERP Research and Content Briefs
This is the feature that makes Frase genuinely distinctive. When you enter a keyword, Frase pulls data from the top-ranking pages in Google. It analyses their headings, word counts, topics covered, questions answered and structural patterns. Subsequently, it organises all of that into a content brief. As a result, you start writing with a clear picture of what the competition is covering and what your article needs to include to compete.
Indeed, this feature alone saves hours of manual research. Instead of opening ten browser tabs and reading through competing articles yourself, Frase condenses the most relevant information into a single view. For busy content marketers, that time saving is significant.
The AI Writer
Frase includes a built-in AI writer that generates content based on your keyword and the SERP data it has collected. For example, you can use it to produce full article drafts, write individual sections or expand on bullet points from your brief. The research data informs the AI writer. As a result, the content it produces tends to be more topically relevant than what you would get from a general-purpose AI tool.
However, it is important to be honest here. The AI writer produces solid first drafts. It does not produce publish-ready copy. Ultimately, the outputs will always require editing, fact-checking and personalisation before they are good enough to publish. That is true of all AI writing tools, but it is worth stating clearly.
Content Optimisation Scoring
As you write inside Frase, you receive a real-time optimisation score. Frase bases this score on how well your content covers the topics and themes found in the top-ranking results for your keyword. The higher your score, the more comprehensively your article addresses what Google’s top results address.
In practice, this feature functions similarly to how Yoast works inside WordPress. However, rather than focusing on keyword density and readability, Frase is looking at topical coverage and competitive alignment. Overall, it is a genuinely useful tool for ensuring your article does not miss important angles.
Google Search Console Integration
Frase connects directly to your Google Search Console account. This integration allows the platform to identify which of your existing pages are ranking for specific keywords but not yet converting that ranking into traffic. In other words, it helps you identify content that could be improved rather than always focusing on creating something new.
Consequently, this feature is particularly useful for content audits. Furthermore, it means Frase can surface actionable insights about where your existing content strategy has gaps or opportunities.
The AI Agent
Frase’s AI Agent is a newer addition to the platform. It comes with over 80 skills covering research, content creation, optimisation, publishing and SEO. Rather than performing tasks manually within the platform, the Agent can work through multi-step content workflows on your behalf. For teams producing content at scale, this saves meaningful time.
Site Audits and AI Visibility Tracking
Beyond content creation, Frase also includes site audit tools and AI visibility tracking. Indeed, the AI visibility feature is particularly interesting in the current landscape. It allows you to see which AI-powered search engines, such as ChatGPT or Perplexity, are citing or referencing your content. Therefore, as AI-generated search results become more prominent, understanding your visibility within those systems is increasingly valuable.
Integrations
Frase integrates with Google Search Console, Google Docs, WordPress, HubSpot and other major platforms. As a result, these integrations mean you can manage your content workflow within tools you are already using.
The entry-level plan starts at $39 per month. It includes full access to the Frase AI Agent, content optimisation, AI visibility tracking, site audits and publishing. Specifically, plans differ in terms of volume. This includes the number of articles, audit pages and visibility prompts included. Features stay the same across all plans. Every plan comes with a 7-day free trial with full access to all features and no credit card required.
Team and Agency Plans
Frase designed the higher-tier plans for teams and agencies. They include additional seats, more domains and greater monthly content volumes. You can also add extra articles, audit pages or seats at any time from your dashboard without having to upgrade your entire plan.
Enterprise
For organisations that need enterprise-level infrastructure, compliance features and dedicated support, Frase offers custom enterprise pricing. Frase tailors this option to larger organisations with specific security and scale requirements.
Is the Price Worth It?
At $39 per month, Frase positions itself as a professional SEO workflow tool rather than a casual AI writing assistant. Whether that price feels worth it depends entirely on how you use it. For a freelancer or small agency producing multiple SEO articles per week, the research features alone can save enough time to justify the cost easily. However, for a beginner who only publishes one article per month, the investment is harder to justify. In that case, a more affordable tool would serve you better in the short term.
Frase AI Writing Tool: The Pros
The Research Feature Is Genuinely Impressive
The SERP analysis and content brief generation are the strongest reasons to use Frase. It condenses hours of manual research into minutes. For anyone producing keyword-targeted content regularly, this is a meaningful and measurable benefit.
Content Optimisation Is Practically Useful
The real-time optimisation scoring gives you clear, actionable feedback as you write. Instead of guessing whether your article is comprehensive enough, you can see exactly which topics you have covered and which you have missed. This feature is particularly useful for writers who are still developing their SEO instincts.
The Google Search Console Integration Adds Real Value
Most AI writing tools focus exclusively on creating new content. Frase goes further by helping you improve what you already have. The Search Console integration surfaces existing pages with ranking potential that you have not yet fully optimised. That is a smarter use of your time in many cases. For further reading on how to write content that performs well in search, Backlinko’s guide to SEO content is an excellent and practical resource.
It Is Built Around Search Intent
Unlike tools that generate content based purely on a prompt, Frase grounds its outputs in actual search data. As a result, the content briefs and AI-generated drafts are more likely to address what users genuinely want. They go beyond what the AI simply assumes they need.
A Strong Tool for Teams
The document sharing features, multi-seat plans and AI Agent capabilities make Frase a practical choice for content teams and agencies. Specifically, it helps standardise the research and briefing process across multiple writers, which is difficult to do consistently without a tool like this.
If you are hoping to generate polished, publish-ready articles with minimal effort, Frase will disappoint you. The AI writer produces useful first drafts. However, the outputs consistently require significant editing to sound natural, accurate and genuinely helpful. Nevertheless, this is not a criticism unique to Frase, but it is worth stating clearly if you are new to AI writing tools.
It Is Not a General-Purpose Writing Tool
Frase focuses specifically on long-form, SEO-focused content. For instance, if you need help with email copy, social media posts, product descriptions or ad campaigns, you will find the platform limited. In that case, a more versatile tool would be a better investment.
The Price Adds Up
At $39 per month as a starting point, Frase is not cheap for someone who is just getting started online. Furthermore, if you need additional articles, seats or audit pages, the costs can increase fairly quickly. For budget-conscious beginners, there are more affordable alternatives that cover the essential writing use cases.
Keyword Research Is Limited
Frase includes basic keyword discovery features through its Topic Planner. However, it does not offer the depth of keyword research that dedicated tools like Ahrefs or Semrush provide. Therefore, if detailed keyword analysis is a core part of your workflow, you will likely still need a separate tool for that.
A Learning Curve for New Users
Because Frase centres on a specific research and optimisation workflow, new users sometimes find it less intuitive than simpler AI writing tools. However, most users report that the learning curve levels off fairly quickly once you understand how the SERP analysis and brief creation process works.
How Frase Compares to Other AI Writing Tools
Understanding where Frase sits in the broader market helps you decide whether it is the right tool for your situation.
Frase vs Jasper
Jasper is a content generation platform built for marketing teams. It excels at producing large volumes of content across multiple formats quickly. Frase, on the other hand, centres on SEO research and optimisation first. If your priority is ranking in search engines, Frase offers more relevant tools. If you need broad content creation across multiple formats and channels, Jasper has the edge.
Frase vs Surfer SEO
People often compare Surfer SEO to Frase. Both work as content optimisation platforms. However, they differ in how far they go with AI writing. Both tools analyse top-ranking pages and provide optimisation scoring. However, Surfer SEO focuses more on on-page optimisation and keyword scoring. Frase goes further by adding AI writing features and Google Search Console integration. Many content professionals use both tools together for different stages of their workflow.
Frase vs Writesonic
Writesonic is a more versatile AI writing tool. It covers a wider range of content types and formats. Moreover, it is generally more affordable than Frase. For writers who need a flexible, budget-friendly option without a strong SEO research focus, Writesonic is a solid alternative.
Frase vs Rytr
Rytr is one of the most affordable AI writing tools on the market. It starts at $9 per month. While it does not have Frase’s SERP analysis capabilities, it covers a wide range of content creation use cases at a fraction of the price. For beginners or side hustlers who are not yet ready to invest in a specialist SEO tool, Rytr offers a practical and accessible starting point.
Real-World Use Cases for Frase
Understanding how people actually use Frase helps you assess whether it fits your workflow.
Creating Competitor-Informed Blog Posts
The most common use case is writing blog posts that are structured around what is already ranking for a given keyword. You enter your target term, review the content brief Frase generates and use that brief to guide your writing. The result is a comprehensive article. Additionally, it is more likely to align with what Google rewards.
Producing Content Briefs for Freelancers
Many content managers use Frase to generate briefs that they then pass on to freelance writers. This saves significant time on the briefing process. Additionally, it ensures that every writer receives clear, data-driven guidance rather than vague topic descriptions.
Optimising Existing Content
Using the Google Search Console integration, you can identify pages that are ranking on pages 2 or 3 for specific keywords. You can then use Frase’s optimisation scoring to improve those pages. This can potentially push them onto page 1. This is often a faster win than creating entirely new content.
Running Content Audits
Specifically for websites with large content libraries, Frase’s audit tools help identify which pages are underperforming and why. This gives you a prioritised list of pages to update. Consequently, you do not have to audit your content manually.
If you do decide to invest in Frase, a few practical habits will help you get more value from the platform.
Always edit the AI output. The AI writer is a starting point, not a finishing line. Every article needs a human review before it is published. Therefore, add your own insights, check every fact and make sure the writing sounds like a real person wrote it.
Use the content brief before you start writing. The biggest mistake new users make is skipping straight to the AI writer. The content brief is where Frase delivers its real value. Spend time reviewing the topics, questions and competitor structures before you write a single sentence.
Connect your Google Search Console account. Without this integration, you are only using part of what Frase offers. In fact, the Search Console connection unlocks the content audit and optimisation features that make Frase useful beyond just creating new articles.
Check your optimisation score as you write. Do not leave the optimisation check until the end. Instead, review your score periodically as you write and address any missing topics before you finish. This saves time compared to restructuring a completed article.
Be realistic about timelines. Frase helps you produce better-structured content faster. However, it does not fast-track Google rankings. Unfortunately, SEO takes time. You should still expect to wait 3 to 6 months before seeing meaningful traffic from new content, regardless of how well optimised it is. For further context on using AI effectively in your content strategy, Backlinko’s guide to using AI for writing offers excellent practical advice.
Is the Frase AI Writing Tool Worth It in 2026?
The answer, as with most tools, depends on your situation.
If you are producing SEO-focused blog content consistently and relying on organic traffic as a primary channel, Frase offers genuinely useful features. Specifically, the SERP research, content brief generation and optimisation scoring save real time and help ensure your content is structured correctly. For content agencies and SEO professionals, it is a tool that can pay for itself quickly.
However, if you are just starting out, building your first website or working with a tight budget, Frase may not be the right first investment. The $39 per month starting price is a meaningful commitment when you are still learning the ropes. In that case, a more affordable and versatile writing tool makes more sense. You can always add a specialist SEO tool later once your content operation grows.
Overall, the honest assessment is this: Frase is a solid and well-designed platform. Indeed, it is genuinely useful for the right user. However, it is not a magic solution for ranking in Google. It still requires significant effort and expertise to use effectively. It is also not the most accessible tool for beginners.
A More Affordable Starting Point
If you are in the early stages of building an online business, you need a practical and affordable writing tool. I would recommend taking a look at Rytr. It starts at just $9 per month. It covers a wide range of content creation needs without the complexity or price tag of a specialist SEO platform.
There is no shame in starting lean. In fact, keeping your costs low in the early stages of building an online income gives you far more runway. You can always invest in more specialist tools later, once your content is generating consistent traffic and revenue.
Final Thoughts
The Frase AI writing tool occupies an interesting and genuinely useful space in the AI content landscape. It is not trying to be a general-purpose writing assistant. Instead, it focuses on helping you create content grounded in real search data and built to compete in Google. For the right user, that focus is a strength. For beginners or those with broader content needs, however, it may be more tool than the situation currently requires.
If SEO-driven content sits at the heart of your online business strategy, Frase is worth a serious look. Start with the 7-day free trial. Assess honestly whether the research and optimisation features save you enough time to justify the monthly cost. Either way, using the Frase AI writing tool alongside a broader content strategy is the approach most likely to deliver consistent, long-term results. Isolation rarely works.
Is the Jasper AI Writing Tool Worth the Hype? An Honest Review
If you have spent any time researching AI writing tools, you have almost certainly come across the Jasper AI writing tool. It is one of the most talked-about platforms in the space. The marketing behind it is slick, confident and hard to ignore. But here is the real question: Is Jasper worth the money? Or are you paying a premium for something a cheaper tool could do just as well? In this review, we are going to pull apart exactly what Jasper offers, who it is genuinely built for and where it falls short. No fluff, no sponsored spin.
What Is the Jasper AI Writing Tool?
Jasper is an AI-powered content creation platform. It was originally built with marketers firmly in mind. Unlike general-purpose AI chatbots, Jasper was designed to help teams produce high-volume, on-brand content across multiple formats. Think blog posts, social media captions, email campaigns, ad copy, landing pages and product descriptions.
The tool launched in 2021 under the name Jarvis. It then rebranded to Jasper in 2022. As a result, it quickly built a loyal following among content marketers and digital agencies. At its peak, Jasper was widely considered the go-to AI writing assistant for serious content producers. Since then, the platform has continued to evolve significantly. It has, for instance, added brand voice training, a long-form editor, team collaboration features and an image generation suite.
At its core, Jasper runs on large language models fine-tuned for marketing use cases. Rather than generating generic responses like a basic chatbot, it is designed to produce structured, conversion-focused drafts. Crucially, those drafts are built to align with your brand identity.
Who Is the Jasper AI Writing Tool Actually Built For?
This is the part most reviews gloss over. However, it is genuinely important. Jasper is not a tool for everyone. Indeed, understanding who gets the most value from it will save you a lot of money and frustration.
Marketing Teams and Agencies
Jasper genuinely shines when used by a team producing large content volumes consistently. For example, if you run an agency managing content for multiple clients, the collaboration features start to make real sense. Similarly, if you are part of an in-house marketing team pushing out campaigns across several channels, the brand voice controls become very useful.
The ability to train Jasper on your brand’s tone is one of the platform’s most compelling features. You can upload your style guide and share that context across your whole team. As a result, everyone generates content that actually sounds like your brand, rather than a collection of slightly different AI voices.
Established Entrepreneurs and Course Creators
If you are already generating consistent revenue online, Jasper offers a compelling middle ground. Specifically, it helps you scale content output without hiring a full writing team. You can draft long-form posts, repurpose content across formats and create marketing assets at a pace that would otherwise be impossible to sustain.
Who Should Probably Look Elsewhere
Solo bloggers, beginners and budget-conscious creators will likely find Jasper’s pricing hard to justify. At $59 per month on the annual plan or $69 per month billed monthly, it is one of the more expensive AI writing tools available. Therefore, if you are just starting out and building an income from scratch, there are far more affordable options that will serve you just as well.
Jasper AI Writing Tool: Key Features Explained
Let us get into what the platform actually offers, beyond the marketing language.
Brand Voice Training
This is arguably Jasper’s strongest differentiator. You can upload existing content, style guides or brand documents. Jasper will then analyse the tone, vocabulary and structure to create a custom Brand Voice profile. From that point forward, every piece of content it generates will attempt to mirror your established voice.
For businesses with a distinct brand identity, this is genuinely valuable. It reduces editing time after generation and helps maintain consistency across multiple writers. Specifically, the Pro plan allows up to 2 Brand Voices. The Business plan, on the other hand, offers unlimited Brand Voices.
The Long-Form Editor (Canvas)
Jasper’s document editor is called Canvas. It functions similarly to a Google Docs-style workspace. You write on one side while AI assists on the other. Additionally, it supports SEO mode through an integration with Surfer SEO. This allows you to track keyword targets and content scores in real time.
The editor also includes a plagiarism checker powered by Copyscape. It comes with a one-click rephrase and rewrite function plus automatic version history. Overall, for anyone producing long-form blog content regularly, Canvas is a genuinely useful working environment.
Jasper includes more than 50 pre-built templates for specific content types. These cover Facebook ad copy, product descriptions, YouTube video outlines, email subject lines and landing page hero sections. Importantly, these templates are built around proven copywriting frameworks. As a result, the outputs tend to be more conversion-focused than what you would get from a standard chatbot.
The Browser Extension
One underrated feature is Jasper’s Chrome and Edge browser extension. It lets you access the AI directly within Gmail, WordPress, HubSpot and LinkedIn. Rather than switching between tabs constantly, you can trigger Jasper from wherever you are already working. That alone saves a meaningful amount of friction throughout the day.
AI Image Generation
In the Business plan, Jasper includes access to its Image Suite. This allows you to generate, edit and optimise campaign imagery directly within the platform. You can remove backgrounds, upscale images and generate entirely new visuals from text prompts. For marketers who need visual assets alongside written content, this is a useful addition.
Team Collaboration
The Business plan adds real-time document collaboration and shared workspaces. It also includes admin controls, user permission settings and team analytics. Consequently, if you are managing a content team, these features reduce the friction of coordinating multiple writers in the same platform.
Jasper AI Pricing: What Does It Actually Cost?
Jasper currently offers two main pricing tiers.
Pro Plan
$59 per month when billed annually
$69 per month when billed monthly
Includes 1 seat, 2 Brand Voices, 5 knowledge assets and core content creation tools
Comes with a 7-day free trial
Business Plan
Custom pricing tailored to your company’s needs
Includes unlimited Brand Voices, unlimited knowledge assets, team collaboration and API access
Also includes advanced admin controls and a dedicated customer success manager
Best suited to larger organisations and agencies
Is the Price Justified?
Here is where we need to be honest. At $69 per month, Jasper is expensive compared to many competitors. For comparison, ChatGPT Plus costs $20 per month. Rytr starts at just $9 per month. That is a significant price gap.
That said, for an established marketing team producing dozens of content pieces per month, Jasper can justify its cost. The time saved on editing and brand alignment alone can outweigh the monthly subscription fee. However, for solo creators still building their income, the value equation looks very different.
Jasper AI Writing Tool: The Pros
Strong Brand Voice Consistency
The Brand Voice feature is more sophisticated than anything in most competing tools at this price point. For teams managing multiple brands or client accounts, this is a genuine competitive advantage. Moreover, it consistently reduces the time spent editing AI-generated content.
Marketing-Focused Output Quality
Because Jasper’s models are fine-tuned for marketing content, the outputs tend to be more structured and conversion-aware. The difference is not always dramatic. However, it is noticeable when you are producing ad copy, email campaigns or landing page content.
Excellent Template Library
The 50+ templates cover a wide range of marketing use cases. They are useful for generating structured first drafts quickly. Furthermore, selecting a template for a specific content type saves meaningful time compared to engineering prompts from scratch.
Solid Integrations
Jasper integrates with Surfer SEO, Grammarly, Google Docs, HubSpot, Slack and Webflow. For teams already using these tools, bringing AI into existing workflows is a practical benefit. You do not have to change platforms to take advantage of the features.
A Supportive Learning Community
Jasper has built an active community through its Facebook group and online learning resources. For new users trying to get good results, access to guidance from other marketers is a real advantage. For a broader perspective on using AI tools effectively, Backlinko’s guide to AI copywriting is an excellent independent resource worth bookmarking.
There is no avoiding this. At $69 per month, Jasper is one of the pricier AI writing tools available. For someone building an online business from scratch, that is a substantial ongoing cost. Particularly in the early months, before income starts flowing, it is a hard expense to justify.
Outputs Still Require Editing
This applies to all AI writing tools. However, it is worth being direct: Jasper does not produce publish-ready content straight out of the box. You will need to fact-check, refine and personalise everything it generates. Human judgment remains an essential part of the process.
A Learning Curve for New Users
Getting genuinely good results from Jasper takes time and practice. New users who skip learning the platform’s features will get mediocre outputs. They may then conclude the tool is not worth it. The quality ceiling is high, but reaching it requires some effort upfront.
Limited Value Outside Marketing
Jasper was built specifically for marketing content. Therefore, if you need deeply technical writing or highly nuanced subject matter expertise, you will hit its limitations fairly quickly. It is a specialist tool, not a generalist one.
Subscription Pausing Issues
Some users have flagged frustration with Jasper’s pause policy. Reportedly, pausing your plan prevents access immediately, even if you have remaining days in your billing cycle. For anyone considering a temporary pause rather than cancellation, this is worth knowing in advance.
How Does Jasper Compare to Other AI Writing Tools?
The AI writing tool market has become increasingly competitive. Jasper is no longer the only serious option. Furthermore, several alternatives offer strong value at lower price points.
Jasper vs ChatGPT
ChatGPT Plus costs $20 per month. That is significantly cheaper than Jasper. For general content writing, it produces comparable quality. However, ChatGPT lacks Jasper’s brand voice training, team collaboration features and dedicated marketing templates. For solo creators, ChatGPT is often the smarter financial choice.
Jasper vs Writesonic
Writesonic is more affordable and includes solid SEO writing features. It lacks the brand voice depth and team infrastructure of Jasper. Nevertheless, it represents strong value for individual bloggers and content marketers. For a detailed comparison from real users, G2’s Jasper reviews include helpful side-by-side assessments.
Jasper vs Rytr
Rytr is one of the most affordable AI writing tools available. It starts at just $9 per month. For beginners building an online income, Rytr offers a genuinely capable writing assistant at a fraction of Jasper’s price. It does not have Jasper’s brand voice depth or team features. However, for individual content production, it performs well and keeps your costs low.
Copy.ai is a strong alternative for short-form content, social media copy and ad campaigns. It is more accessible in terms of pricing and user experience. As a result, it makes a better starting point for newer marketers who are still finding their feet.
Real-World Use Cases for the Jasper AI Writing Tool
Understanding the theory is one thing. Knowing how people actually use Jasper in practice is more useful.
Email Marketing Campaigns
Jasper’s email-specific templates are useful for producing sequences, newsletters and promotional campaigns quickly. For businesses running regular email marketing, the time savings on drafting can be significant. Additionally, the templates help structure campaigns in a way that improves readability and flow.
Social Media Content
The platform’s short-form templates cover Instagram captions, LinkedIn posts, Twitter threads and Facebook ads. For social media managers handling multiple accounts, batch-generating content drafts and then refining them is genuinely time-efficient. It also reduces the mental load of starting from scratch every time.
Ad Copy and Landing Pages
This is arguably where Jasper’s marketing focus pays off most clearly. The conversion-oriented templates for Google ads and landing page hero copy tend to produce stronger first drafts. The outputs still need human refinement. However, the structure and direction are typically better from the start.
Content Repurposing
The Remix Content feature allows you to take existing content and repurpose it for a different channel. For instance, you could turn a blog post into social captions, an email excerpt and a LinkedIn post from a single source asset. For businesses trying to maximise the return on each piece of content, this is a practical and time-saving workflow.
Blogging and SEO Content
Many bloggers use Jasper to speed up their content pipeline. A typical workflow involves generating a first draft, then editing and adding personal insights before publishing. Done well, this approach can reduce the time spent per article by 40% to 60%. Importantly, it does this without sacrificing quality when you apply proper human review.
Common Mistakes People Make With Jasper
Understanding the common pitfalls will help you get far more value from the platform.
Treating AI output as final copy. The biggest mistake is publishing what Jasper generates without reviewing it first. AI tools make factual errors and produce generic sentences. Always edit before you publish. No exceptions.
Skipping the Brand Voice setup. Many users start generating content without configuring their Brand Voice properly. As a result, every piece of content sounds like it could have been written for any company. Simply taking the time to set this up correctly will make your outputs noticeably better.
Using generic prompts. The quality of Jasper’s output is tied directly to the quality of your instructions. Vague prompts produce vague content. Therefore, the more context and direction you provide, the stronger the results will be.
Choosing Jasper when a cheaper tool would do. If you are a solo blogger writing 2 articles per week, you simply do not need Jasper’s team features. Match the tool to your actual situation, not to your aspirations.
Is the Jasper AI Writing Tool Worth It in 2026?
The honest answer depends entirely on your situation.
If you are running a content-heavy business or managing a team of writers, Jasper is genuinely impressive. It saves significant time and produces consistent results across your brand. In that case, the price is justified. The alternative, which is hiring additional writers or manually aligning content, often costs more.
However, if you are a solo creator or a beginner on a tight budget, Jasper’s pricing is hard to justify right now. The good news is that you do not have to choose between no AI and an expensive AI. There are excellent, affordable alternatives that will serve you well while you build. You can always upgrade later when your business genuinely supports the investment.
The AI writing tool space has matured considerably. You no longer need to pay a premium just to get good results. Choosing the right tool for your current stage is simply a smarter strategy.
A More Affordable Alternative Worth Considering
If you are building an online business from scratch, I would encourage you to take a look at Rytr. It starts at $9 per month and covers all the essential content creation use cases. Moreover, it is far more accessible for beginners and side hustlers who are still in the growth phase.
Starting lean is not a compromise. In fact, keeping your costs low in the early stages gives you far more runway. Furthermore, you can always scale up once your content income justifies a larger investment.
Final Thoughts
The Jasper AI writing tool is a serious platform built for serious marketing teams. Its brand voice training, long-form editor, and team collaboration features make it one of the most capable AI writing platforms available. For the right user, the price is genuinely justified. However, a significant proportion of people considering Jasper would get equal or better value from a cheaper alternative. Power alone does not make it the right choice for every situation.
If you are an established business producing high volumes of content, Jasper deserves serious consideration. If you are still in the early stages of building your online income, start with something more affordable. Focus on producing great content consistently. Then revisit the decision once your business can genuinely support the investment. Either way, the most important step is to start using an AI writing tool of some kind. The efficiency gains are real, and the creators who embrace AI well are already moving ahead.