
How To Create an Online Course With Teachable: Your Step-by-Step Guide
There is no shortage of platforms promising to turn your knowledge into income. Most of them either overwhelm you with complexity or charge fees that eat into your earnings before you have found a rhythm.
Teachable sits in a different category. It is clean, approachable and built for people who want to teach rather than manage a software stack. If the tech has been putting you off, knowing how to create an online course with Teachable will remove that barrier. It is simpler than most people expect.

What Makes Teachable Different From the Competition
Indeed, Teachable has been helping creators sell their expertise since 2014. In that time, it has processed more than $2 billion in course revenue for solo creators. Indeed, that is not an accident. The platform is genuinely well designed for the specific job of turning knowledge into a product that sells.
In fact, building your own solution is far more complex. So, a self-hosted WordPress course requires a hosting plan, an LMS plugin, a payment gateway and manual tax setup. You also build your own sales pages from scratch.
Teachable bundles all of that into one subscription covering hosting, payments, checkout pages, course certificates and student control.
However, compared to market sites like Udemy, Teachable gives you something more important: control. Specifically, on Udemy, the platform sets your prices, runs its own promotions and owns the bond with your students. On Teachable, you set the price, you own the student data, and you show directly to your audience. Indeed, that ownership compounds in value as your business grows.
Furthermore, the platform also handles US sales tax on its own and remits VAT on behalf of global sellers. For solo creators juggling teaching, marketing and content creation, removing the tax admin headache is genuinely real.
Visit my Get Started Here page for an honest walkthrough of how I am building an online business alongside a corporate job. It covers the tools I use, the strategy I follow and how to start without overspending.
Understanding Teachable’s Plans Before You Build
So, before diving into the build process, it is worth knowing what you are signing up for financially. Teachable updated its pricing structure in 2026, and the plans are now named Starter, Builder, Growth and Advanced.
The Starter plan is priced at $39 per month, billed monthly or $29 per month on an annual subscription. It covers one published product and up to 100 students.
However, it charges a 7.5% transaction fee on every sale. So if your course costs $200 and you make 10 sales, Teachable takes $150 before payment fees apply. In fact, that adds up quickly.
The Builder plan at $89 per month removes the transaction fee entirely. It also adds more product slots, affiliate marketing tools and enhanced customization. Indeed, for anyone planning to sell at any real volume, the Builder plan is where the numbers start working in your favour. A single $200 sale per day would pay for the Builder plan in under five days.
The Growth plan at $189 per month removes student caps and adds more advanced reporting. The Advanced plan at $399 per month is aimed at larger teams and built education businesses.
Furthermore, all paid plans include a 7-day free trial. In fact, that is enough time to build your first course, set up your school and check whether the platform fits your needs.
For an honest look at Teachable’s real costs and where fees appear, this review from Learning Revolution covers the platform from a working creator’s view.
Step 1: Define the Outcome Your Course Delivers
Unfortunately, the most common reason courses fail to sell is not the platform, the price or the production quality. It is the absence of a clear, specific outcome that the student will achieve.
Indeed, vague course topics attract vague interest. “Introduction to Social Media” is harder to sell than “Get Your First 1,000 Instagram Followers Without Running Ads.” The second version names the exact student, the outcome and the milestone. Buyers can judge at a glance whether it solves their problem. Potential buyers can right away assess whether it solves their problem.
So, before you open Teachable, write one sentence that describes your course using this structure: “This course helps [specific person] achieve [specific outcome] even if [common objection].” For example: “This course helps freelance designers win their first five clients even if they have no portfolio yet.”
Indeed, that sentence will drive every other decision you make. Your sales page headline is a version of it. The curriculum is the path that delivers the outcome. Pricing should reflect the monetary value of achieving that result.
Also, validate your topic before you invest production time. So, post about it on social media and observe how people respond. Email five to ten people in your target audience and ask directly whether they would pay to solve the problem you are describing. Pre-selling a course before it is finished is entirely valid and tells you right away whether the idea has commercial traction.
Visit my Get Started Here page for an honest walkthrough of how I am building an online business alongside a corporate job. It covers the tools I use, the strategy I follow and how to start without overspending.
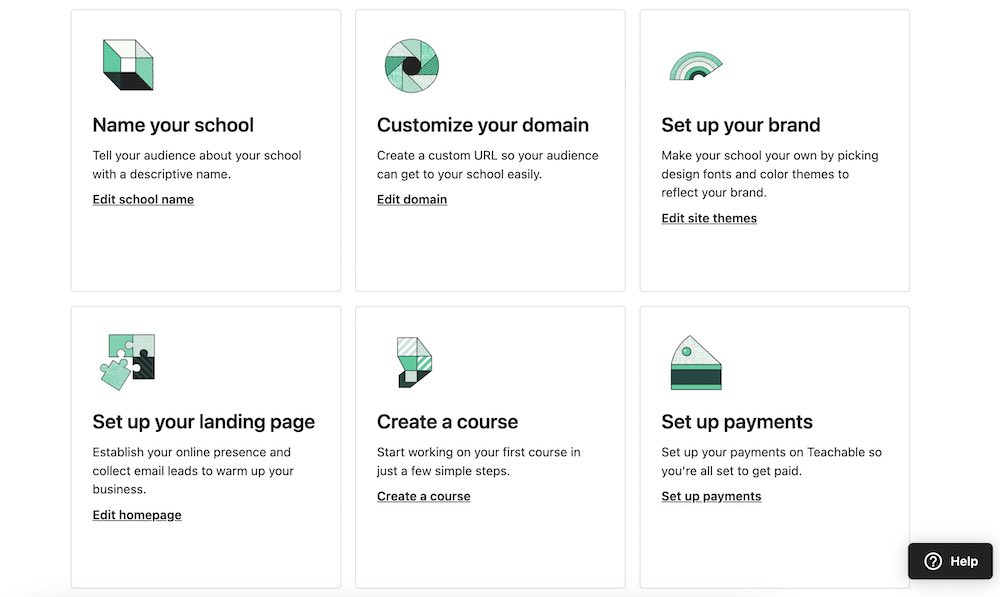
Step 2: Sign Up and Set Up Your Teachable School
So, once you have clarity on your course topic, creating your Teachable account takes about five minutes. So, go to teachable.com, select your plan or start the free trial and complete the registration.
After signing up, you are taken to your school dashboard. In fact, your Teachable school is your branded home base on the platform. In fact, it is where all of your courses, products and student interactions live under one roof.
So, take time to set up your school’s branding before you create any courses. Upload your logo, choose your colour palette and add your school name. Consistency between your school’s visual identity and your social media presence builds trust with would-be students who find you through search or referral.
If you have a custom domain such as courses.yourbrand.com, connect it to your Teachable school in the settings. This removes the teachable.com branding from your school URL and makes the whole experience feel like a cohesive product. Indeed, custom domains are available from the Starter plan onwards.
Step 3: Create Your Course Structure
In Teachable, click on Courses in the left-hand menu and then click New Course. You will be prompted to name your course and choose how you want to build its structure.
Notably, Teachable now offers an AI Curriculum Builder as a starting option. You enter a description of your course, and the tool earns a suggested outline of sections and lectures. This is genuinely useful for getting a skeleton on screen quickly. However, treat the output as a draft that you refine rather than a finished structure you publish directly.
In Teachable, the core building blocks are sections and lectures. A section is a module or chapter, a grouping of related content. A lecture is an single lesson inside that section. Think of sections as the stages of your student’s journey and lectures as the single steps within each stage.
So, build your full structure before you start adding any content. Write all your section names and lecture titles first. This gives you a map of the entire course. It also reveals gaps where content is missing and repetition where ideas overlap without reason.
In fact, each lecture title should describe exactly what the student will be able to do or know after completing it. “How to Write a Cold Email That Gets Replies” is stronger than “Cold Emails.” It tells the student exactly what they will achieve. A general topic title does not.
Step 4: Add Your Course Content
So, with your structure mapped out, go through each lecture and add your content. Teachable supports video, audio, text, PDFs, quizzes and downloadable files within a single lecture. You can mix formats freely depending on what the lesson requires.
Video is the dominant format in online courses because students learn effectively from watching and listening. You do not need pro recording gear to start. A smartphone on a tripod, a ring light for around $25 and a quiet room are all you need. That setup produces entirely acceptable results for a first course. So, record in short, focused segments of five to fifteen minutes rather than long, unedited sessions.
Host your videos directly in Teachable. Furthermore, paid plans include unlimited video storage. So you do not need a separate hosting subscription unless you have specific analytics requirements.
Text lessons work well for reference material, written walkthroughs and content that students will want to revisit without rewatching a video. Use them for frameworks, checklists and step-by-step written instructions.
Downloadable resources add tangible value to your course. A worksheet per module, a ready-to-use template or a curated resource guide all improve the learning experience. Indeed, none of these require real production time.
Quizzes reinforce learning and help students identify gaps in their knowledge before moving on. Specifically, Teachable’s built-in quiz builder supports multiple choice, true or false and written answer formats. In fact, adding a short quiz at the end of each section takes minimal effort but really improves completion rates.
For practical help planning content that keeps students engaged, Teachable’s own blog guide covers the process clearly.
Step 5: Set Your Pricing Strategy
Pricing is one of the decisions that new course creators regularly get wrong. Unfortunately, the instinct to set a low price to attract more students is understandable but usually counterproductive.
A course priced at $19 signals low value in the buyer’s mind. It also means you need 50 sales to generate $950 in revenue. A course priced at $197 means five sales achieve the same figure. Fewer sales at a higher price point require a smaller audience and far less marketing effort.
So, the price is based on the outcome you deliver rather than the number of video hours you include. A two-hour course that helps a freelancer land their first $3,000 client is worth far more than $97. A 20-hour course covering general marketing theory may struggle to justify $200. The outcome is what your student is paying for.
In Teachable’s pricing settings, you can offer a one-time payment, a payment plan split across multiple months or a subscription for recurring access. Payment plans are especially effective at higher price points because they reduce the perceived upfront commitment. A $497 course split into three payments of $179 will outsell the single-pay option with most audiences.
Furthermore, you can also create coupon codes for launch promotions, affiliate partners and special offers. Launch discounts of 20% to 30% for a limited time window create urgency and reward early movers.
Visit my Get Started Here page for an honest walkthrough of how I am building an online business alongside a corporate job. It covers the tools I use, the strategy I follow and how to start without overspending.
Step 6: Build a Sales Page That Converts
Indeed, your Teachable sales page is where curious visitors decide whether to become paying students. It deserves more attention than any other part of your course setup. Unfortunately, it is also the area where most new creators invest the least effort.
Teachable includes a drag-and-drop page builder for creating sales pages without any coding. The structure that converts best is not complicated but each element must do a specific job.
Your headline shows the core outcome. It should be specific, benefit-focused and address the student’s situation directly. “The Email Marketing Course” is not a headline. “Write Emails That People Actually Open and Act On” is a headline that makes a potential student lean forward.
Below the headline, describe the problem your ideal student is experiencing right now. Use their language rather than industry jargon. This section should make the reader feel genuinely understood. If they recognise their own situation in your description, they are already halfway to buying.
List the specific things students will be able to do by the end of the course. Use outcome statements rather than feature lists. “You will be able to write a complete 5-email welcome sequence in under 2 hours” outperforms “Module 4 covers welcome sequences.”
Include your curriculum so that would-be students can see the full scope of what they are getting. Indeed, transparency here builds confidence rather than reducing it. Also, add reviews wherever you have them. If you are launching without any reviews yet, offer a free or discounted beta cohort in exchange for honest written feedback.

Step 7: Configure Your Checkout and Payment Settings
In practice, Teachable connects with Stripe and PayPal for payment processing. Standard processing fees of 2.9% plus 30 cents per transaction apply regardless of your plan. These fees are charged by the payment processors themselves and are not unique to Teachable.
So, in your checkout settings, keep the process as simple as possible. In fact, every added field you ask students to complete before payment is a chance for them to reconsider. Name, email and card details are sufficient.
Consider enabling the order bump feature, which lets you offer a related low-priced product at checkout with a single click. A companion workbook, a 30-day email coaching programme or a resource bundle all work well as order bumps priced between $17 and $37. In fact, many creators find that 15% to 25% of buyers add the order bump, which really increases the average order value.
Also, set up your post-purchase thank-you page and auto welcome email so that new students receive a warm, clear onboarding experience right away after buying. The first few minutes after purchase set the emotional tone for the entire student bond. A student who feels welcomed and confident about their next steps is greatly more likely to complete your course and leave a positive review.
Step 8: Preview and Test the Full Student Experience
So, before you publish, go through your entire course from the student’s perspective. Create a free enrolment for yourself using a different email address and work through every lecture.
So, check that every video plays correctly. Also, confirm that downloadable files are the right documents and that they open without error. Also, complete each quiz and verify that the scoring works as intended. Test the checkout process using a real payment method to confirm that the transaction completes and that the auto confirmation email arrives.
Also, access your course on a mobile device. In practice, Teachable’s mobile experience is generally solid, but single elements like embedded PDFs can behave differently on a phone than on a desktop. In fact, catching these issues before your first paying student encounters them saves real credibility.
So, when everything works as it should, click Publish. Your course is now live.
Step 9: Launch to an Audience
Publishing your course is not the same as launching it. Many first-time creators make the expensive mistake of clicking Publish and then waiting for students to appear organically. In fact, without active promotion, nothing will happen.
In fact, a launch is a deliberate, time-limited promo event designed to drive a concentrated burst of enrolments. It typically runs for five to seven days. Urgency comes from a time-limited discount, a closing date or a launch bonus that disappears after a set point.
If you have an email list, a launch sequence of three to five emails is the most reliable structure. Your opening email introduces the course and the specific problem it solves. A follow-up email shares a deeper look at the outcome and perhaps a student result or beta tester feedback. A final email reminds subscribers that the window is closing and reinforces the core outcome.

If you have a social media following, post regularly throughout the launch window. Share behind-the-scenes content from the course creation process. Answer questions publicly so your audience can see them. Show early student experiences where possible.
For those building from zero audience, SEO-driven blog content and Pinterest are the most reliable long-term strategies. Blog posts that answer the questions your ideal students are already searching for bring in organic traffic that converts over time. Pinterest pins linking to your sales page can drive regular visitors for months after posting.
Visit my Get Started Here page for an honest walkthrough of how I am building an online business alongside a corporate job. It covers the tools I use, the strategy I follow and how to start without overspending.
How Much Can You Realistically Earn?
The range is wide and depends on your niche, your audience size and the consistency of your marketing. However, some useful reference points are worth knowing.
A course priced at $197 with a list of 500 subscribers at a 2% close rate earns $1,970 from a single launch. Grow that list to 2,000 subscribers, and the same conversion rate produces nearly $8,000. Add a second course and a regular content strategy and the compounding becomes real.
The creators who build to $5,000 or $10,000 per month share common traits. They have multiple products, a growing email list and an email sequence that converts new subscribers on its own. Indeed, that level of income requires real work to build. However, it is a realistic target for a focused creator working regularly over 12 to 18 months.
Indeed, the idea that a course earns truly passive income with minimal effort is misleading. The passive element comes later. In fact, it arrives after sustained active work to build an audience, refine the course and set up a marketing system.

Common Mistakes to Avoid
Unfortunately, most new course creators run into the same handful of issues. Knowing about them in advance saves real time and lost revenue.
Building Before Validating
Unfortunately, the most expensive mistake in the online course space is spending weeks creating content for a topic nobody will pay for. So, validate your idea first. Ask real people in your target audience whether they would pay for the solution you are proposing. If the response is lukewarm, the course will be too.
Setting the Price Too Low
A $17 course is not just leaving money on the table. It also attracts students with lower commitment. Indeed, those students are less likely to complete the course.
They are also less likely to earn the reviews and referrals that grow your business. So, price your course at a level that reflects the value of the outcome it delivers.
Ignoring Student Communication After Purchase
Indeed, the student bond does not end at the point of sale. A simple post-purchase email sequence makes a real difference. Check in with students at key milestones, offer encouragement where completion rates drop and invite feedback after they finish. This approach can transform your review volume and repeat purchase rate.
Waiting Until the Course Is Perfect
Perfectionism is the most common reason a course never gets published. A 70% complete course that is live and producing feedback is worth infinitely more than a 100% perfect course sitting on your hard drive. Publish, learn from real students and improve.
Ready to Build Something Real?
Knowing how to create an online course with Teachable is a genuine starting point for building income online. However, the broader strategy around audience building, content marketing and monetisation matters just as much as the platform itself.
Visit my Get Started Here page for an honest walkthrough of how I am building an online business alongside a corporate job. It covers the tools I use, the strategy I follow and how to start without overspending.

Final Thoughts
Indeed, Teachable genuinely removes almost every technical obstacle between your knowledge and your first paying student. The platform handles hosting, payments, tax compliance, course certificates and student control. So you can direct your energy toward creating useful content, growing an audience and marketing regularly.
Knowing how to create an online course with Teachable is the technical base. What you build on that base is entirely up to you. In fact, the most successful course creators are not necessarily the most expert or the most polished. Instead, they are the ones who publish early, listen to their students, improve based on real feedback and show up regularly.
Start with one course on the topic you know best. Price it based on the value it delivers. Build a sales page that speaks directly to your ideal student.
Launch it to whatever audience you have, even if that audience feels small. The first launch teaches you more than any amount of planning. Every subsequent launch builds on what the previous one revealed.
If you are ready to take that first step, visit my Get Started Here page and find out how to build an online income that compounds over time.
For a full walkthrough of Teachable from an experienced creator, Wit and Wire’s Teachable tutorial is one of the best free resources out there.
Affiliate Disclosure: This post contains affiliate links. I may earn a commission if you sign up through my links, at no added cost to you. I only recommend tools and platforms I genuinely believe offer value to my readers.