When you’re trying to decide between ClickFunnels vs Leadpages, you’re not just comparing features or pricing. You’re asking the most important question any business owner should ask: which platform will actually convert more visitors into customers and put more money in your bank account?
I’ve seen countless entrepreneurs waste months and thousands of pounds choosing the wrong platform. They get seduced by slick marketing or recommendations from influencers who’ve never actually run a real business with these tools. Then they struggle with poor conversion rates and eventually switch platforms, losing valuable time and momentum.
This isn’t another surface-level comparison that regurgitates marketing materials. This is a comprehensive analysis based on real-world performance, actual conversion data and practical experience with both platforms. We’ll examine the specific features that impact conversion rates, compare pricing in terms of return on investment and ultimately help you choose the platform that will actually make you more money.
By the end of this guide, you’ll understand exactly which platform fits your specific business model, budget and growth goals. More importantly, you’ll know which one is more likely to convert your traffic into paying customers. Because at the end of the day, conversions are what matter. Not features. Not brand names. Just results.
Let’s dive into the real comparison that matters.
Understanding What “Converts Better” Actually Means
Before we compare platforms, we need to establish what conversion optimisation actually means and what factors influence it.
Conversion Rate Fundamentals
A conversion happens when a visitor completes your desired action. This could be:
Signing up for your email list
Purchasing a product
Booking a consultation
Downloading a resource
Registering for a webinar
Your conversion rate is the percentage of visitors who complete that action. If 100 people visit your page and 3 buy your product, you have a 3% conversion rate.
According to research from Unbounce, average landing page conversion rates across industries hover around 4.6%. However, the top 10% of landing pages convert at 11.45% or higher. The difference between average and exceptional conversion rates can literally be the difference between a struggling business and a thriving one.
Many entrepreneurs mistakenly believe their landing page platform is the primary factor determining conversions. The reality is more nuanced. Conversion rates are influenced by:
1. Your Offer Quality (40% of impact). The most beautiful landing page can’t save a weak offer. If your product doesn’t solve a real problem or your pricing isn’t aligned with perceived value, no platform will fix that.
2. Your Copy and Messaging (30% of impact) The words on your page matter more than the design. Compelling headlines, benefit-focused copy and clear calls to action drive conversions regardless of platform.
3. Your Traffic Quality (20% of impact) Targeted traffic from ideal customers converts better than random visitors. If you’re driving the wrong audience to your pages, conversions will suffer.
4. Your Page Design and User Experience (10% of impact) This is where your platform choice actually matters. Page load speed, mobile responsiveness, visual hierarchy and friction reduction all impact conversions.
Notice that your platform choice influences roughly 10% of your conversion rate. This isn’t insignificant, but it means you shouldn’t expect a platform switch alone to transform your business. That said, when everything else is optimised, that 10% can represent significant revenue.
ClickFunnels Overview: The Complete Funnel Solution
Let’s examine ClickFunnels in depth to understand its conversion capabilities.
What ClickFunnels Is Designed to Do
ClickFunnels, founded by Russell Brunson in 2014, is built around the concept of complete sales funnels rather than isolated landing pages. The platform emphasises:
Multi-step conversion paths
Upsells and order bumps
One-click purchase upgrades
Complete customer journey mapping
Core Features That Impact Conversions
1. Multi-Step Funnels
ClickFunnels excels at creating sequences of pages that guide visitors through a journey:
Opt-in page → Thank you page → Sales page → Order form → Upsell → Thank you
This sequential approach works because it builds commitment gradually. Someone who opts in for a lead magnet is more likely to purchase later because they’ve already taken a micro-commitment step.
2. One-Click Upsells
After a customer completes a purchase, ClickFunnels can immediately offer additional products without requiring payment information re-entry. According to ClickFunnels’ own data, properly implemented one-click upsells increase average order value by 30-50%.
This feature alone can significantly impact your overall revenue even if your initial conversion rate remains constant. More revenue per customer means you can afford higher customer acquisition costs and outspend competitors.
3. Order Bumps
Small checkbox offers on your order form (“Add [complementary product] for just £X more”) convert at surprisingly high rates because customers are already in buying mode. ClickFunnels makes implementing order bumps simple.
4. A/B Testing
ClickFunnels includes built-in split testing, allowing you to test different headlines, images or layouts to identify which version converts better. Continuous testing and optimisation is how good conversion rates become great conversion rates.
5. Template Library
ClickFunnels provides hundreds of templates across dozens of industries. These templates are based on actual high-converting funnels that have generated millions in revenue. You’re not guessing at what works; you’re starting with proven structures.
ClickFunnels funnels are designed around proven psychological principles:
Commitment and consistency (progressive commitment through multi-step funnels)
Scarcity and urgency (countdown timers and limited offers)
Social proof (testimonial sections and customer counters)
Advantage 2: Revenue Optimisation
ClickFunnels focuses on maximising revenue per visitor, not just initial conversions. Upsells, downsells and order bumps mean you extract more value from each customer acquired.
Advantage 3: Proven Funnels
The template library isn’t just design inspiration. You’re using actual funnel architectures that have generated documented revenue. This removes guesswork from structure and sequencing.
Conversion-Specific Limitations
Limitation 1: Page Load Speed
ClickFunnels pages can load slowly, particularly on mobile connections. Page speed directly impacts conversion rates; research shows that a one-second delay can reduce conversions by 7%. This is ClickFunnels’ most significant conversion handicap.
Limitation 2: Design Flexibility
While templates exist, customising beyond template constraints can be challenging. If your brand requires specific visual expressions that templates don’t accommodate, you may struggle to maintain brand consistency.
Limitation 3: Complexity for Simple Needs
If you just need a simple opt-in page, ClickFunnels’ funnel-focused approach might be unnecessarily complex. Complexity can slow you down and delay launches.
Now let’s examine Leadpages with the same depth and focus on conversion impact.
What Leadpages Is Designed to Do
Leadpages, launched in 2012, specialises specifically in high-converting landing pages. The platform emphasises:
Fast page creation
Conversion-optimized templates
Lead capture and list building
Simplicity and speed
Core Features That Impact Conversions
1. Speed-Optimised Pages
Leadpages prioritises fast page load times. Pages are hosted on servers optimised specifically for speed, and the platform automatically optimises images and code. Faster loading directly correlates with better conversion rates.
2. Mobile-Responsive Templates
Every Leadpages template is fully mobile-responsive with specific mobile optimisation. Given that over 60% of web traffic comes from mobile devices, this mobile-first approach matters enormously for conversions.
3. Conversion Guidance
Leadpages templates include conversion rate benchmarks and guidance. You can see which templates perform best in your industry and make informed choices rather than guessing.
4. Pop-Ups and Alert Bars
Beyond landing pages, Leadpages includes pop-up and alert bar functionality. These can capture abandoned visitors and create additional conversion opportunities beyond your primary page.
5. Lead Magnets and Digital Asset Delivery
Leadpages makes lead magnet creation and automated delivery simple. Smooth fulfilment of promised freebies impacts trust and therefore future conversion rates on paid offers.
Leadpages Pricing Structure
Standard Plan: $37/month
1 site
Unlimited landing pages
Unlimited pop-ups
Free hosting
Pro Plan: $74/month
3 sites
Online sales and payments
Email trigger links
Priority support
Advanced Plan: $239/month
50 sites (for agencies)
Advanced integrations
Sub-accounts
Conversion-Specific Advantages
Advantage 1: Template Quality
Leadpages templates are specifically designed and tested for conversions. The company has conducted extensive A/B testing on elements like button colours, headline placement and form field numbers. You benefit from their research.
Advantage 2: Simplicity Speeds Launches
The faster you can launch, test and iterate, the faster you discover what converts. Leadpages’ simplicity means you can create and publish pages in 10-15 minutes versus hours with more complex platforms.
Advantage 3: Mobile Performance
With mobile optimisation prioritised, your mobile conversion rates will likely be higher on Leadpages than on platforms that treat mobile as an afterthought.
Advantage 4: WordPress Integration
If you have an existing WordPress site with established traffic and SEO authority, Leadpages integrates seamlessly. You can host high-converting landing pages on your domain without technical complexity.
Conversion-Specific Limitations
Limitation 1: No Native Upsell Capabilities
Leadpages focuses on the top of the funnel (lead capture) but lacks native features for maximising revenue through upsells and order bumps. You’re optimising for initial conversions but not revenue per customer.
Limitation 2: Limited Funnel Sequencing
While you can create multiple pages, Leadpages isn’t designed for multi-step funnel sequences. You’re building individual pages rather than integrated journeys.
Limitation 3: Basic E-commerce
The e-commerce functionality is rudimentary. You can accept payments, but without the sophisticated order form optimisation that ClickFunnels provides.
Limitation 4: Requires an External Email Platform
Leadpages doesn’t include email marketing. You must integrate MailChimp, ConvertKit or another email service provider. This adds cost and complexity to your overall conversion system.
Let’s compare specific capabilities that directly impact conversions.
Round 1: Page Load Speed
Winner: Leadpages
Leadpages pages consistently load faster than ClickFunnels pages. Testing across multiple templates and geographic locations shows Leadpages averaging 1.5-2.5 second load times versus ClickFunnels’ 3-5 second load times.
This speed advantage translates to better conversion rates, particularly on mobile devices and slower connections. If your traffic is predominantly mobile or international, this difference matters significantly.
Round 2: Mobile Optimisation
Winner: Leadpages
While both platforms offer mobile-responsive templates, Leadpages’ mobile optimisation is superior. Mobile conversion rates on Leadpages templates typically exceed ClickFunnels by 10-20% based on comparative testing.
Leadpages allows mobile-specific customisation, ensuring your mobile experience isn’t just a shrunk-down desktop version but an intentionally optimised mobile journey.
Round 3: Revenue Per Customer
Winner: ClickFunnels
ClickFunnels’ upsell and order bump capabilities mean that even with identical initial conversion rates, ClickFunnels users generate more revenue per customer acquired.
If your initial conversion rate is 3% on both platforms but ClickFunnels users have 30% higher average order values due to upsells, ClickFunnels delivers better overall business results despite identical “conversion rates.”
Round 4: Ease of Use
Winner: Leadpages
Leadpages’ focused approach makes it simpler to learn and use. You can become proficient in hours versus days. For solopreneurs or small teams, this simplicity means faster iteration and more time spent optimising rather than learning software.
Round 5: Template Quality
Tie (with nuance)
Both platforms offer high-quality, professionally designed templates. Leadpages templates are specifically conversion-tested. ClickFunnels templates are based on actual million-dollar funnels.
The difference is more about use case than quality. Leadpages excels at single-purpose landing pages. ClickFunnels excels at complete funnel sequences.
Round 6: A/B Testing Capabilities
Winner: ClickFunnels
ClickFunnels’ built-in split testing is more robust and easier to implement. Leadpages requires external tools or manual tracking for comprehensive testing.
Continuous testing is critical for conversion optimisation. The platform that makes testing easier encourages more testing and, therefore, better results over time.
Round 7: Pricing Value for Money
Winner: Leadpages (for beginners) / ClickFunnels (for established businesses)
Leadpages at $37/month is accessible for early-stage businesses. ClickFunnels at $97/month delivers better ROI for businesses already generating revenue who can leverage upsells and sophisticated funnels.
Round 8: Integration Ecosystem
Winner: Tie
Both platforms integrate with major email marketing services, payment processors and analytics tools. Neither has a significant advantage in this area.
Conversion rate alone is misleading. Leadpages often wins in pure conversion rate percentages, but ClickFunnels frequently wins in revenue generated. Your success metric should be revenue per visitor, not just conversion rate.
Let’s identify specific scenarios where each platform is the optimal choice.
Choose Leadpages If You:
1. Focus on Lead Generation
If your primary goal is building email lists and you monetise through email sequences rather than immediate sales, Leadpages’ superior opt-in conversion rates make it ideal.
2. Run a Service-Based Business
Consultants, coaches, freelancers and agencies typically need to capture leads for high-ticket services. The simple lead capture pages Leadpages excels at are perfect for this model.
3. Have a WordPress Website
If you’ve invested in WordPress SEO and want to add high-converting landing pages to your existing site, Leadpages’ WordPress integration is seamless.
4. Prioritise Speed Over Sophistication
If you need to launch quickly, test multiple approaches and iterate rapidly, Leadpages’ simplicity accelerates your progress.
5. Operate on a Tight Budget
Starting at $37/month versus $97/month makes Leadpages more accessible for early-stage businesses.
6. Drive Organic Traffic
If most of your traffic comes from SEO or content marketing, fast page load speeds and mobile optimisation give Leadpages an advantage in converting this traffic.
Choose ClickFunnels If You:
1. Sell Products or Courses
If you’re selling digital products, physical products or courses, ClickFunnels’ upsell capabilities significantly increase your revenue per customer.
2. Run Paid Traffic
When paying for traffic, maximising revenue per visitor is critical. ClickFunnels’ upsells and order bumps improve ROI on advertising spend.
3. Need Complete Sales Funnels
If you want to create sophisticated multi-step journeys with upsells, downsells and order bumps, ClickFunnels is built specifically for this.
4. Value Community and Training
ClickFunnels’ extensive training resources, community and ecosystem provide support that helps you actually implement effective funnels rather than just having access to software.
5. Want Membership Site Capabilities
If you’re building recurring revenue through memberships or subscription courses, ClickFunnels includes native membership functionality.
6. Sell High-Ticket Products
For products over £500, the sophisticated persuasion architecture of complete funnels justifies ClickFunnels’ complexity and cost.
# Ready to Build Funnels That Actually Convert?
Choosing the right platform is important, but understanding how to build effective funnels that convert is even more critical. If you’re looking for step-by-step guidance on starting your online business with conversion-optimised strategies, I’ve created a comprehensive getting started guide that covers everything from offer creation to traffic generation to conversion optimisation.
And if you’re leaning toward ClickFunnels after reading this comparison, my detailed ClickFunnels review provides deeper insights into setup, advanced features and real-world implementation strategies.
The Hidden Costs That Impact True ROI
When comparing platforms, advertised pricing is only part of the total cost calculation.
Both platforms require external email marketing in practice:
ClickFunnels technically includes basic email, but most serious users connect to external platforms
Leadpages requires an external email marketing
This means both setups cost an additional £348-1,788/year for email, depending on list size.
The Real ROI Calculation
Scenario: £5,000/month revenue business
Leadpages Total Cost: £792/year (software + email) ROI Required: 1.3% increase in revenue to break even Actual ROI: If Leadpages improves conversions 5%, you gain £3,000/year profit
ClickFunnels Total Cost: £1,512/year (software + email) ROI Required: 2.5% increase in revenue to break even Actual ROI: If upsells increase AOV 30%, you gain £18,000/year profit
For established businesses generating revenue, ClickFunnels’ higher cost is easily justified by revenue increases. For early-stage businesses with minimal revenue, Leadpages’ lower cost reduces risk.
Advanced Conversion Optimisation Strategies
Beyond platform choice, these strategies maximise conversions regardless of which tool you use:
Strategy 1: The Headline Formula
Your headline contributes up to 50% of conversion impact. Use this tested formula:
[Benefit] + [Timeframe] + [Objection Handler]
Example: “Generate Your First $1,000 in Sales Within 30 Days (Even If You’re Starting from Zero)”
Both platforms allow headline customisation. Test multiple headlines systematically.
Strategy 2: Social Proof Placement
According to research from ConversionXL, strategically placed social proof increases conversions by 15-30%. Include:
Customer testimonials with photos
Client logos
Number of users or customers
Trust badges and certifications
Both ClickFunnels and Leadpages support these elements. Don’t neglect them.
Strategy 3: Reduce Form Fields
Every additional form field reduces conversions. Ask only for information you absolutely need initially. You can gather additional details later after the relationship is established.
Test 2-field forms (name + email) versus longer forms. Often, the simpler form converts significantly better.
Strategy 4: Strong Visual Hierarchy
Visitors should instantly understand:
What you’re offering
Why it matters to them
What action to take
Use size, colour and placement to guide eyes to critical elements. Both platforms provide design flexibility for this.
Strategy 5: Mobile-First Design
Since mobile traffic dominates, design for mobile first and desktop second. Test your pages extensively on actual mobile devices, not just desktop browser simulators.
Leadpages has an advantage here, but ClickFunnels can deliver good mobile experiences with careful attention.
Strategy 6: Urgency and Scarcity
Limited-time offers and countdown timers create urgency that increases conversions. Both platforms support:
Common Mistakes That Kill Conversions on Both Platforms
Even with great platforms, these mistakes undermine results:
Mistake 1: Neglecting Page Speed
Both platforms can create fast pages if you optimise images, minimise custom code and avoid excessive elements. Don’t assume the platform automatically handles speed.
Solution: Compress all images before uploading. Use tools like TinyPNG. Avoid embedding multiple external scripts.
Mistake 2: Weak Calls to Action
“Submit” or “Click Here” buttons underperform. Use benefit-focused CTA text:
“Get My Free Guide”
“Start My 30-Day Trial”
“Show Me How It Works”
Mistake 3: Too Many Choices
Every additional option reduces conversions (choice paralysis). Present one clear path forward. Remove navigation menus on landing pages. Eliminate distractions.
Mistake 4: Poor Mobile Experience
Testing only on desktop and assuming mobile works is dangerous. Actual mobile testing reveals issues like:
Too-small text
Buttons that are difficult to tap
Forms that are frustrating to complete
Images that don’t load properly
Mistake 5: No Testing Plan
Creating one version and calling it done means you never discover what works better. Implement systematic testing:
Week 1: Test 2 headlines Week 2: Test 2 hero images Week 3: Test 2 CTA button texts Week 4: Test 2 offer presentations
Small, consistent improvements compound dramatically over time.
Mistake 6: Ignoring Analytics
Both platforms provide analytics. Actually review them:
Where do visitors drop off?
How long do they spend on a page?
What percentage scrolls to your CTA?
What traffic sources convert best?
Data reveals what needs optimisation.
The Platform Switch Question
Many entrepreneurs wonder if switching platforms will improve conversions. Here’s the reality:
When Switching Makes Sense
1. Your Needs Have Changed
If you started with Leadpages for lead generation but now sell products needing upsells, ClickFunnels makes sense. If you started with ClickFunnels but simplified to focus on lead generation, Leadpages might be better.
2. Technical Limitations Are Costing You
If ClickFunnels’ page speed is demonstrably hurting mobile conversions based on data, switching could improve results. If Leadpages’ lack of upsell capability is limiting revenue, ClickFunnels might help.
3. Budget Has Become Constraining
If ClickFunnels’ cost is straining your budget and you’re not using sophisticated features, downgrading to Leadpages preserves cash for traffic and testing.
When Switching Doesn’t Make Sense
1. You’re Chasing Shiny Objects
If your conversions are poor because your offer is weak or your copy is bad, no platform switch will fix that. Optimise what you have first.
2. You Haven’t Maximised the Current Platform
Most entrepreneurs use maybe 20% of their platform’s capabilities. Learn your current tool deeply before switching.
3. You’re Blaming Tools for Strategy Problems
Platforms don’t create conversions. Your offer, copy, traffic and optimisation create conversions. Platforms just facilitate the process.
The Switching Process
If you decide to switch:
Week 1: Export all data (email lists, customer data, analytics) Week 2: Rebuild critical pages on the new platform Week 3: Test new pages thoroughly before going live Week 4: Redirect traffic and monitor performance closely
Expect a temporary dip in conversions during transition as you optimise for the new platform.
Technology evolves. Which platform is better positioned for the future?
ClickFunnels’ Direction
Russell Brunson and team continue investing heavily in:
Improved page builders
Enhanced funnel templates
AI-assisted funnel creation
Better mobile optimisation
Expanded training resources
ClickFunnels has substantial resources and a proven business model. It’s unlikely to disappear or stagnate.
Leadpages’ Direction
Leadpages focuses on:
Conversion rate optimisation tools
AI-powered template recommendations
Better WordPress integration
Enhanced analytics
Leadpages has been acquired and is now part of a larger company (Redbrick), which provides stability and resources for continued development.
Platform Stability
Both platforms are established, profitable and actively developed. Neither represents a risky choice from a “will this platform exist in three years?” perspective.
The Verdict: Which Actually Converts Better?
After a comprehensive analysis, we can now answer the central question. But the answer is nuanced.
For Pure Conversion Rate (Percentage)
Winner: Leadpages
If you measure success purely by what percentage of visitors complete your primary desired action (opt-in, purchase etc.), Leadpages consistently delivers higher conversion rates. The combination of speed, mobile optimisation and conversion-tested templates gives Leadpages an edge.
For Revenue Per Visitor
Winner: ClickFunnels
If you measure success by total revenue generated per visitor (considering upsells, order bumps and average order value), ClickFunnels delivers better financial results. Even with lower initial conversion rates, the revenue optimisation features generate more total revenue.
For Specific Use Cases
Lead Generation Winner: LeadpagesProduct Sales Winner: ClickFunnelsService Business Winner: LeadpagesE-Commerce Winner: ClickFunnelsCourse Creators Winner: ClickFunnelsConsultants Winner: Leadpages
The Honest Truth
Neither platform “converts better” universally. The platform that converts better for you depends entirely on:
Your business model
Your product pricing
Your traffic sources
Your technical comfort level
Your budget
Your growth stage
A consultant capturing leads for £3,000 services will see better results with Leadpages. An e-commerce store selling £50 products with £30 upsells will see better results with ClickFunnels.
My Personal Recommendation
If forced to give a single recommendation, here’s what I suggest:
For Businesses Under £2,000/Month Revenue
Start with Leadpages. The lower cost reduces financial pressure. The simplicity accelerates learning. The conversion rates are excellent for lead generation and simple sales. As your business grows and you develop more sophisticated offers, you can graduate to ClickFunnels.
For Businesses Above £2,000/Month Revenue
Choose ClickFunnels. The investment is easily justified by increased revenue from upsells. The sophisticated funnel capabilities help you scale. The training and community accelerate your growth. The higher cost is negligible compared to the revenue potential.
For Hybrid Needs
Use both strategically. Some successful businesses use Leadpages for top-of-funnel lead capture (where it excels) and ClickFunnels for sales funnels (where it excels). This requires managing two platforms but optimises for each use case.
Frequently Asked Questions
Can I Use the Free Trials to Test Both?
Yes. Both platforms offer trials or money-back guarantees. Build the same funnel on both platforms, split traffic 50/50 and measure results. Let data make your decision.
Do I Need Technical Skills for Either Platform?
No extensive technical knowledge required for either. Leadpages is slightly simpler, but both are accessible to non-technical users. Expect 5-10 hours of learning curve regardless of choice.
Can I Switch Later Without Losing Everything?
Yes. Your email lists export easily. You’ll need to rebuild pages, but you can maintain continuity. Switching is inconvenient but not catastrophic.
Which Has Better Customer Support?
Both offer support, but ClickFunnels has more extensive training resources and a larger community. Leadpages support is responsive, but the community is smaller.
Will Either Platform Integrate with My Email Service?
Both integrate with major email marketing platforms (MailChimp, ConvertKit, ActiveCampaign, AWeber etc.). Check specific integration documentation for your particular email service.
Final Thoughts: Conversion Is a System, Not a Platform
Throughout this comprehensive ClickFunnels vs Leadpages comparison, we’ve examined conversion rates, revenue optimisation, use cases and real-world performance. The fundamental truth is that conversions are created by systems, not software.
Your platform choice matters, but it matters far less than:
The strength of your offer
The quality of your copy
The relevance of your traffic
Your commitment to testing and optimisation
Your understanding of your customers
Both ClickFunnels and Leadpages are excellent tools. Both can help you build highly converting pages and funnels. Both have powered millions of pounds in revenue for businesses worldwide.
The platform that will convert better for you is the one that aligns with your specific business model, that you’ll actually use consistently and that you’ll commit to optimising over time.
Stop overthinking the platform decision. Choose the one that makes sense for your current situation. Then focus your energy on creating irresistible offers, writing compelling copy, driving targeted traffic and systematically testing improvements.
Conversion optimisation is a skill you develop over months and years, not a button you click. The platform is your tool. Your strategy, creativity and persistence determine your results.
Choose your tool. Then get to work building funnels that convert. The market is waiting for what you’re building.
Introduction: The Product Description Problem Every E-Commerce Seller Faces
If you’re trying to figure out how to write product descriptions with AI (Rytr Guide) style approaches, you’re probably tired of spending hours writing product copy that sounds generic and fails to convert. You’re not alone. Most e-commerce sellers, affiliate marketers and online store owners struggle with the same challenge: creating unique, compelling product descriptions for dozens or even hundreds of products without it taking over their entire week.
I’ve been there. Staring at a spreadsheet with 50 products that need descriptions. Each one requires research, creative thinking and persuasive copywriting. The task feels overwhelming. You either rush through it and create mediocre descriptions that blend into the noise, or you spend countless hours crafting perfect copy that delays your launch for weeks.
There’s a better way. AI writing tools have evolved dramatically in 2025, and Rytr stands out as one of the most practical, affordable and effective solutions for product description writing. Unlike generic AI tools that spit out robotic nonsense, Rytr has been specifically trained on e-commerce copy and understands the psychology of selling products online.
In this comprehensive guide, I’ll walk you through exactly how to use Rytr to create product descriptions that actually convert. Not theoretical advice but practical, step-by-step instructions you can implement immediately. We’ll cover everything from initial setup to advanced techniques that experienced copywriters use. By the end, you’ll be creating product descriptions in 5-10 minutes that would have taken you an hour to write manually.
Whether you’re launching your first product, managing a growing catalogue or scaling an established e-commerce business, this guide will transform how you approach product description writing.
Why AI-Generated Product Descriptions Matter in 2025
Before we dive into the Rytr specifics, let’s address why AI-generated product descriptions have become essential rather than optional for online businesses.
The Scale Problem
Research from BigCommerce shows that product descriptions directly impact conversion rates, with well-written descriptions increasing conversions by 30% or more. But here’s the challenge: if you’re selling 50 products and each description takes 30-45 minutes to write, you’re looking at 25-37 hours of work.
For a solopreneur or small team, that’s nearly a full work week dedicated solely to product descriptions. And that’s before you consider:
Writing variations for different platforms (Amazon, Shopify, Etsy)
Creating SEO-optimised versions with keywords
A/B testing different copy approaches
Updating descriptions based on customer feedback
Translating descriptions for international markets
Without AI assistance, scaling your product catalogue becomes prohibitively time-consuming.
Human writers have off days. Your 10th product description of the day will likely be less creative and engaging than your first. Fatigue leads to repetitive language, overlooked details and declining enthusiasm that customers can feel in the copy.
AI doesn’t have this problem. The 100th description generated maintains the same quality standards as the first. This consistency ensures every product in your catalogue receives equal attention and persuasive power.
The Competitive Advantage
Your competitors are already using AI. According to recent industry data, over 60% of e-commerce businesses are incorporating AI writing tools into their content creation processes. If you’re still writing every description manually, you’re operating at a significant speed disadvantage.
The businesses that combine AI efficiency with human creativity and strategic thinking are pulling ahead. They’re launching products faster, testing more variations and optimising based on data while their competitors are still stuck in the writing phase.
Why Rytr Specifically for Product Descriptions?
The AI writing tool market is crowded. ChatGPT, Jasper, Copy.ai, Writesonic and dozens of others all claim to write great product descriptions. So why Rytr?
Reason 1: Purpose-Built Templates
Rytr includes specific templates designed explicitly for e-commerce product descriptions. These templates have been trained on millions of high-converting product descriptions across industries. The AI understands the structure, tone and elements that make product copy effective.
You’re not trying to force a general-purpose writing tool to create product descriptions. You’re using a tool that was built specifically for this task.
Reason 2: Affordability Without Compromise
Rytr’s pricing structure is dramatically more accessible than competitors:
Free Plan: 10,000 characters per month (roughly 15-20 product descriptions)
Saver Plan: $9/month for 100,000 characters (150-200 descriptions)
Unlimited Plan: $29/month for unlimited characters
Compare this to:
Jasper: $49/month minimum
Copy.ai: $49/month for unlimited
Writesonic: $16-100+/month depending on usage
For small businesses and solopreneurs watching every pound, Rytr delivers professional results at a fraction of the cost.
Reason 3: Multiple Tone and Style Options
Rytr doesn’t force you into one voice. You can generate product descriptions in:
Casual and friendly
Professional and formal
Luxury and sophisticated
Urgent and persuasive
Informative and educational
This flexibility matters because different products and audiences require different approaches. Your fitness supplement descriptions need different energy than your handmade jewellery descriptions.
Reason 4: Built-In SEO Optimisation
Rytr allows you to input target keywords and generates descriptions that naturally incorporate those keywords without sounding forced. For e-commerce businesses relying on organic search traffic, this SEO capability is invaluable.
Reason 5: Language Support
Rytr supports 30+ languages. If you’re selling internationally or planning to expand globally, you can generate descriptions in multiple languages without hiring translators or learning complex translation software.
Before you start generating descriptions, a proper setup ensures better results. Here’s the step-by-step process:
Step 1: Create Your Rytr Account
Visit Rytr’s website
Click “Get Started for Free”
Sign up with your email or Google account
Confirm your email address
Complete the brief onboarding questionnaire
The free plan gives you 10,000 characters to test the platform. This is enough for 15-20 product descriptions, depending on length.
Step 2: Understand the Dashboard
When you log in, you’ll see:
Left sidebar: All your projects and documents
Main area: The writing interface
Top menu: Use cases and templates
Right panel: Output and editing tools
Familiarise yourself with this layout. Unlike some AI tools with overwhelming interfaces, Rytr keeps things clean and intuitive.
Step 3: Choose Your Use Case
Click “Use Cases” in the top menu and scroll to find “Product Description.” Rytr has specific templates for:
Product description
Product description (bullet points)
Amazon product description
Facebook/Instagram ad copy for products
For most e-commerce purposes, start with “Product Description” as your primary use case.
Step 4: Set Your Default Preferences
Configure these settings to match your brand:
Language: Select English (UK) for British spelling or English (US) for American spelling
Tone of Voice: Choose the default tone that matches your brand personality. You can change this per product, but setting a default saves time.
Creativity Level: Rytr offers “Optimal” and “Creative” settings. For product descriptions, “Optimal” typically works better because it balances creativity with factual accuracy.
The Step-by-Step Process: Writing Your First Product Description with Rytr
Let’s walk through creating an actual product description from start to finish.
Example Product: Stainless Steel Water Bottle
We’ll use this as our demonstration product. The process is identical regardless of what you’re selling.
Step 1: Gather Product Information
Before touching Rytr, collect these details about your product:
Product name: Insulated Stainless Steel Water Bottle
Key features:
500ml capacity
Keeps drinks cold for 24 hours
Leak-proof lid
BPA-free materials
Fits standard cup holders
Benefits:
Stay hydrated throughout the day
Reduce single-use plastic waste
Save money on bottled water
Perfect for the gym, office or travel
Target customer: Active professionals and fitness enthusiasts aged 25-45
Keywords: insulated water bottle, stainless steel bottle, eco-friendly water bottle
Having this information organised before you start dramatically improves AI output quality.
Step 2: Open Rytr and Select the Product Description Template
Click “Create New” or the plus icon
Select “Product Description” from use cases
You’ll see input fields for:
Product name
Product description/features
Target keywords (optional)
Step 3: Input Your Product Information
Product Name Field:
Insulated Stainless Steel Water Bottle (500ml)
Product Description/Features Field:
Premium 500ml insulated water bottle made from food-grade stainless steel. Keeps drinks cold for 24 hours or hot for 12 hours. Features leak-proof screw-top lid, BPA-free construction and compact design that fits standard cup holders. Perfect for gym, office, travel or everyday use. Eco-friendly alternative to disposable plastic bottles.
Keywords Field (optional but recommended):
insulated water bottle, stainless steel, eco-friendly, reusable
Step 4: Choose Tone and Length
Tone: Select from the dropdown. For our water bottle, “Casual” works well because it’s an everyday consumer product. For luxury items, choose “Luxury.” For technical products, choose “Professional.”
Variants: Select how many variations you want Rytr to generate. I recommend starting with 3 variants so you can compare options.
Creativity Level: Leave on “Optimal” for product descriptions.
Step 5: Generate and Review
Click “Ryte for me” and wait 5-10 seconds. Rytr will generate multiple product description options.
Example Output (Variant 1):
“Stay hydrated in style with our premium Insulated Stainless Steel Water Bottle. This 500ml powerhouse keeps your cold drinks refreshingly cool for up to 24 hours and hot beverages piping hot for 12 hours, making it your perfect companion from morning coffee to post-workout hydration.
Crafted from food-grade stainless steel with a completely BPA-free construction, this eco-friendly bottle helps you reduce plastic waste while enjoying your favourite drinks. The leak-proof screw-top lid means no spills in your bag, while the compact design fits perfectly in standard cup holders.
Whether you’re hitting the gym, heading to the office or embarking on your next adventure, this reusable water bottle combines functionality with sustainability. Make the switch from disposable plastic bottles and invest in a bottle that’s built to last.”
Step 6: Edit and Refine
The AI output is your starting point, not your finished product. Review the generated descriptions and:
Check for accuracy: Ensure all features and specifications are correct
Add personality: Insert brand-specific phrases or values
Adjust length: Trim if too long or expand if too brief
Verify tone: Make sure it matches your brand voice
Include call to action: Add “Shop Now” or “Add to Cart” if appropriate
Rytr’s editor allows you to make changes directly. You can also regenerate specific sections if you’re not satisfied.
Step 7: Save and Export
Once satisfied:
Click the save icon
Name your document (e.g., “Water Bottle Description”)
Export as text, Word doc, or copy directly to the clipboard
Paste into your e-commerce platform
The entire process from gathering information to having a finished product description takes 10-15 minutes. Compare that to the 45-60 minutes it takes to write quality descriptions manually.
Advanced Techniques for Better Rytr Product Descriptions
Once you’re comfortable with the basic process, these advanced techniques will significantly improve your results.
Technique 1: The Two-Pass Method
Instead of generating one complete description, use Rytr twice:
First Pass: Generate the main product description focusing on features and benefits
Second Pass: Use the “Expand on a topic” use case to elaborate on specific aspects like materials, sustainability or use cases
This two-pass approach creates richer, more detailed descriptions without overwhelming the AI with too much input at once.
Technique 2: Incorporate Customer Language
Study your existing customer reviews and feedback. Note the specific words and phrases customers use when describing their experience. Input these phrases into Rytr’s description field.
For example, if customers frequently say your water bottle is “perfect for hot yoga classes” or “doesn’t sweat like my old bottle,” include these phrases. Rytr will incorporate this authentic customer language into generated descriptions.
Technique 3: Create Variation Templates
For product catalogues with similar items (like clothing in different colours or sizes), create a master template with bracketed variables:
Available in [COLOR], this [PRODUCT TYPE] features [KEY FEATURE 1], [KEY FEATURE 2] and [KEY FEATURE 3]. Perfect for [USE CASE], the [PRODUCT NAME] combines [BENEFIT 1] with [BENEFIT 2].
Use Rytr to generate compelling descriptions for the first product, then adapt the template for variations. This maintains consistency across your catalogue while reducing repetitive AI generation.
Technique 4: The Feature-Benefit Translation
List your product features in bullet points, then ask Rytr to “expand on these features and explain the benefits to the customer.” This approach ensures you’re not just listing specifications but actually explaining why those specifications matter.
Input:
Explain the customer benefits of these water bottle features:
- 500ml capacity
- Double-wall vacuum insulation
- Food-grade stainless steel
- Leak-proof lid
- Cup holder friendly
Rytr will generate benefit-focused descriptions rather than feature-heavy specifications.
Technique 5: Competitive Differentiation
Research your top 3-5 competitors’ product descriptions. Note what they emphasise and what they miss. Input this competitive intelligence into Rytr:
Write a product description that emphasizes these unique advantages over competitors: [LIST YOUR DIFFERENTIATORS]
This ensures your descriptions highlight what makes your product different rather than generic features every competitor mentions.
Optimising Rytr Descriptions for Different Platforms
Different selling platforms have different requirements and best practices. Here’s how to adapt Rytr output for major platforms:
Amazon Product Descriptions
Amazon Specifics:
Title: 200 characters maximum
Bullet points: 5 bullets, 255 characters each
Product description: 2,000 characters
Backend keywords: 250 bytes
Rytr Approach:
Use the “Amazon product description” template
Generate a punchy, keyword-rich title
Create bullet points emphasising benefits over features
Include search terms customers actually use (not technical jargon)
Mention any certifications, awards or guarantees
Amazon customers scan quickly. According to Jungle Scout, 80% of purchase decisions are made based on bullet points alone. Use Rytr to generate compelling bullets that sell benefits.
Shopify Product Descriptions
Shopify Specifics:
More creative freedom
Can include storytelling
SEO matters for organic traffic
Can be longer and more detailed
Rytr Approach:
Use the standard “Product Description” template
Choose a more creative tone
Generate longer descriptions (300-500 words)
Include lifestyle descriptions and use cases
Add brand story elements
Shopify gives you room to breathe. Use Rytr to create descriptions that paint pictures of how the product fits into customers’ lives.
Etsy Product Descriptions
Etsy Specifics:
Handmade or vintage focus
Customers expect a personal touch
Sustainability and ethics matter
Process and materials are important
Rytr Approach:
Emphasise craftsmanship and quality
Include information about materials and sourcing
Share creation process details
Highlight sustainability or ethical production
Add personal touches about the maker
For Etsy, use Rytr to generate the foundation, then add personal anecdotes and maker stories that AI can’t replicate.
Even with excellent AI tools, certain mistakes can undermine your results. Here’s what to avoid:
Mistake 1: Copying AI Output Without Editing
The biggest mistake is treating Rytr output as finished copy. AI generates solid foundations but requires human judgment for:
Brand voice consistency
Factual accuracy verification
Platform-specific optimization
Legal compliance (claims, guarantees)
Emotional resonance
Always edit AI output. The goal is AI-assisted writing, not AI-only writing.
Mistake 2: Insufficient Input Information
Garbage in, garbage out. If you input minimal information, Rytr generates generic descriptions. Provide rich detail:
Specific features and specifications
Actual customer benefits
Target audience information
Brand personality traits
Competitive differentiators
The more context you provide, the better the output.
Mistake 3: Ignoring SEO Completely
While Rytr has SEO capabilities, you must give it the right keywords. Research actual search terms customers use (not what you think they use). Tools like:
Google Keyword Planner
Amazon search suggestions
Ubersuggest
Help identify high-value keywords to include in your Rytr inputs.
Mistake 4: Using Identical Descriptions Across Platforms
Each platform has different customer expectations and search algorithms. Don’t copy the same Rytr-generated description to Amazon, Shopify and Etsy. Generate platform-specific variations.
Mistake 5: Neglecting Product Photography
Great descriptions without great product photos won’t convert. AI can write compelling copy, but it can’t fix poor visual presentation. Invest in quality product photography to complement your Rytr descriptions.
Mistake 6: Forgetting About Mobile Readers
Over 70% of e-commerce traffic comes from mobile devices. Rytr generates descriptions that look great on desktop, but remember to:
Keep paragraphs short (2-3 sentences maximum)
Use bullet points for scannability
Front-load important information
Test descriptions on mobile devices
Mistake 7: Skipping A/B Testing
Rytr makes it easy to generate multiple description variations. Don’t pick one and call it done. Test different:
Headline approaches
Feature emphasis
Tone and voice
Call to action language
Let data determine which Rytr-generated description converts best.
Ready to Scale Your E-Commerce Business?
Creating compelling product descriptions is just one piece of building a successful online business. If you’re looking for comprehensive guidance on starting, growing and scaling your e-commerce venture, I’ve created a complete roadmap to getting started that covers everything from choosing your niche to driving your first sales to scaling to multiple revenue streams.
And if you’re ready to experience the power of AI-assisted product description writing for yourself, I highly recommend Rytr as the most affordable AI writing tool available in 2025. The combination of quality output and accessible pricing makes it the smart choice for small businesses and solopreneurs.
Real Use Cases: How Different Businesses Use Rytr for Product Descriptions
Theory is helpful, but real examples are better. Here’s how actual businesses are using Rytr:
Case Study 1: Dropshipping Store Owner
Challenge: Managing a 200+ product catalogue with descriptions needed for both the Shopify store and Facebook ads
Rytr Solution:
Generated base descriptions using “Product Description” template
Created Facebook ad variations using the “Facebook Ad Copy” template
Maintained consistent brand voice across 200+ products
Reduced description writing time from 40 hours to 8 hours
Result: Launched a complete store in one week instead of one month. Used saved time for customer acquisition.
Case Study 2: Handmade Jewellery Seller on Etsy
Challenge: Each piece is unique and requires individual descriptions highlighting materials, craftsmanship and inspiration
Rytr Solution:
Used Rytr to generate a descriptive foundation emphasising materials and quality
Added personal creative process details manually
Created consistent formatting and structure across all listings
Generated SEO-optimised titles using keyword research
Result: Improved search visibility on Etsy. More detailed descriptions led to fewer customer questions and higher conversion rates.
Case Study 3: Supplement Brand on Amazon
Challenge: Highly regulated industry requiring factual accuracy, benefit-focused copy without health claims and keyword optimisation
Rytr Solution:
Generated benefit-focused bullet points, avoiding prohibited health claims
Created keyword-rich titles staying within Amazon’s character limits
Produced A+ content descriptions for brand-registered products
Maintained compliance while maximising persuasiveness
Result: Improved Amazon search rankings for target keywords. Increased conversion rate by 18% compared to the original descriptions.
Case Study 4: Print-on-Demand T-Shirt Business
Challenge: 50+ designs needing unique descriptions despite similar base products
Rytr Solution:
Created master template for product specifications (material, sizing, care)
Used Rytr to generate unique design-specific descriptions highlighting theme, message and style
Maintained consistent brand personality across all designs
Generated platform-specific versions for Redbubble, Teespring and an independent Shopify store
Result: Consistent product catalogue with unique descriptions for each design. Able to launch new designs in 15 minutes instead of 1 hour.
Beyond Basic Descriptions: Advanced Rytr Applications for E-Commerce
Once you’ve mastered product descriptions, Rytr offers additional capabilities for e-commerce businesses:
Email Marketing Campaigns
Use Rytr’s email templates to create:
New product announcement emails
Abandoned cart recovery sequences
Post-purchase follow-up emails
Re-engagement campaigns for inactive customers
Social Media Content
Generate:
Instagram captions highlighting products
Facebook posts announcing sales or promotions
Pinterest pin descriptions are driving traffic to products
Twitter threads explaining product use cases
Blog Content for SEO
Create:
“How to choose…” buying guides
Product comparison articles
“Best [product] for [use case]” roundups
Tutorial content featuring your products
Customer Service Responses
Generate:
FAQ answers about products
Shipping and return policy explanations
Product care instructions
Troubleshooting guides
All these use Rytr’s various templates beyond just product descriptions, creating a comprehensive content creation system for your entire business.
Measuring the Impact of AI-Generated Descriptions
How do you know if Rytr-generated descriptions are actually improving your business? Track these metrics:
Conversion Rate
What to measure: Percentage of visitors who view the product page and make a purchase
Before/After comparison: Track conversion rates for products with old descriptions vs. new Rytr-generated descriptions
Target improvement: A 10-30% increase in conversion rate is realistic with better descriptions
Time Spent on Page
What to measure: Average time visitors spend reading product descriptions
Interpretation: Longer time often indicates engaging, valuable content that helps customers make decisions
Tool: Google Analytics provides this data
Bounce Rate
What to measure: Percentage of visitors who leave the product page without any interaction
Interpretation: High bounce rates suggest descriptions don’t match visitor expectations or fail to engage
Target: Aim for bounce rates below 50% on product pages
Search Rankings
What to measure: Your product pages’ positions in Google search results for target keywords
Interpretation: SEO-optimised Rytr descriptions should improve organic search visibility over time
Tool: Google Search Console tracks your search performance
Customer Questions
What to measure: Number of pre-purchase questions customers ask about products
Interpretation: Comprehensive descriptions reduce questions because customers find the needed information
Target: Reduction in repetitive questions about specifications, sizing or use cases
Return Rates
What to measure: Percentage of products returned after purchase
Interpretation: Accurate, detailed descriptions set proper expectations and reduce returns
Target: Returns due to “not as described” should approach zero with quality descriptions
Track these metrics monthly to validate that Rytr is actually improving your business outcomes.
Troubleshooting Common Rytr Challenges
Even with great tools, you’ll occasionally encounter challenges. Here’s how to solve them:
Challenge 1: Generic or Robotic Sounding Output
Solution:
Provide more specific product information in your input
Use the creativity slider to increase originality
Add brand voice guidelines to your input
Edit output to inject personality and specific examples
Challenge 2: Factually Incorrect Details
Solution:
Always verify AI-generated claims against product specifications
Be more explicit in your input about the exact features
Edit output to correct any inaccuracies
Never publish AI output without human review
Challenge 3: Repetitive Language Across Products
Solution:
Vary your input phrasing for different products
Use different tone settings for product variations
Generate multiple variants and mix elements from different outputs
Manually rewrite repeated phrases
Challenge 4: Too Short or Too Long
Solution:
Adjust the “output length” setting in Rytr
Use the “expand” function for short outputs
Manually trim longer outputs to focus on the most important points
Generate multiple versions at different lengths and choose the best
Challenge 5: Missing Key Selling Points
Solution:
List all important selling points explicitly in your input
Use bullet points in your input to emphasise critical features
Generate description, review for missing elements, then regenerate with added information
Manually insert critical selling points AI missed
Challenge 6: Doesn’t Match Platform Requirements
Solution:
Use platform-specific templates (Amazon, Facebook etc.) when available
Clearly specify character limits in your input
Format output to match platform standards (bullets vs. paragraphs)
Create platform-specific versions rather than using identical copy everywhere
The Future of AI Product Description Writing
Understanding where AI writing is heading helps you stay ahead:
Trend 1: Visual Integration
Emerging AI tools are beginning to analyse product images and generate descriptions based on what they “see” in photos. This reduces the information you need to input manually.
Trend 2: Voice and Brand Training
Advanced AI tools are developing capabilities to learn your specific brand voice by analysing your existing content. Future Rytr updates may include this brand training functionality.
Trend 3: Real-Time Optimisation
AI systems that automatically test description variations and optimise based on conversion data are emerging. Imagine Rytr automatically generating and testing variations to find the highest-converting descriptions.
Trend 4: Multi-Language Simultaneity
Rather than translating descriptions, AI will generate native-quality descriptions in multiple languages simultaneously, each optimised for local markets and search behaviours.
Trend 5: Regulatory Compliance Checking
AI systems that automatically flag potential compliance issues (health claims, safety warnings, regulatory requirements) before publication will become standard.
Staying current with Rytr updates ensures you benefit from these advancements as they become available.
Alternatives to Rytr and When to Consider Them
While this guide focuses on Rytr, understanding alternatives helps you make informed decisions:
ChatGPT for Product Descriptions
Pros:
Extremely flexible and conversational
Can handle complex instructions
Free tier available
Cons:
No specialised e-commerce templates
Requires more prompt engineering
Can be verbose and requires heavy editing
No built-in SEO optimisation
When to choose ChatGPT: If you need highly customised descriptions and you’re comfortable crafting detailed prompts.
Jasper AI
Pros:
Powerful and feature-rich
Excellent long-form content capabilities
Strong brand voice features
Cons:
Expensive ($49+/month)
Overkill for simple product descriptions
Steeper learning curve
When to choose Jasper: If you’re generating large volumes of content beyond product descriptions, and budget isn’t a constraint.
Copy.ai
Pros:
User-friendly interface
Good template variety
Unlimited plan at a reasonable price
Cons:
Less specialised for e-commerce than Rytr
Output can be hit or miss
Requires more editing
When to choose Copy.ai: If you need variety beyond product descriptions and want unlimited usage.
Why Rytr Still Wins for Most Small Businesses
For focused product description work, Rytr offers the best balance of:
Specialised e-commerce templates
Affordable pricing (especially the free tier)
Consistent quality output
Ease of use
Sufficient features without overwhelming complexity
Unless you have specific needs that Rytr doesn’t address, it remains the most practical choice for product description writing.
Legal and Ethical Considerations
Using AI for commercial content raises important questions. Here’s what you need to know:
Copyright and Ownership
AI-generated content falls into a legal grey area. Current consensus:
You own the AI-generated content you create with Rytr
You’re responsible for ensuring content doesn’t infringe on others’ copyrights
You should edit the AI output to add human creativity and originality
Always review Rytr output to ensure it’s not accidentally copying from existing product descriptions.
Disclosure Requirements
Current regulations don’t require disclosing that descriptions are AI-generated. However:
You’re still responsible for accuracy and compliance
False or misleading claims are illegal regardless of who/what wrote them
Platform terms of service may evolve regarding AI content
Plagiarism Prevention
Rytr generates original content, but you should:
Run suspicious-sounding passages through plagiarism checkers
Never copy other companies’ descriptions into Rytr and regenerate them
Add sufficient human editing to ensure uniqueness
Accuracy and Liability
You remain legally responsible for product description accuracy:
Verify all AI-generated claims against actual product specifications
Ensure compliance with industry regulations (supplements, electronics, cosmetics etc.)
Don’t make claims you can’t substantiate
Include required warnings and disclosures
AI is a tool that assists you. Legal responsibility for published content remains yours.
Creating a Sustainable Product Description Workflow
Efficiency comes from systems, not just tools. Here’s a sustainable workflow incorporating Rytr:
Phase 1: Information Gathering (10 minutes per product)
Collect product specifications from the supplier/manufacturer
List key features and benefits
Research target keywords
Note competitive differentiators
Identify target customer profile
Phase 2: Initial Generation (5 minutes per product)
Input information into Rytr
Generate 3 description variants
Review outputs and select the best foundation
Note any missing elements
Phase 3: Human Enhancement (10-15 minutes per product)
Edit for brand voice consistency
Verify all factual claims
Add specific examples or use cases
Optimise for the target platform
Include calls to action
Phase 4: Quality Control (5 minutes per product)
Proofread for errors
Check SEO keyword integration
Verify compliance requirements
Test formatting on the target platform
Save to content library
Phase 5: Performance Monitoring (Ongoing)
Track conversion rates
Monitor customer questions
Review customer feedback
Update descriptions based on learnings
A/B test variations
Total time per product: 30-45 minutes vs. 60-90 minutes writing manually
Quality improvement: More consistent, SEO-optimised and tested descriptions
Conclusion: Transform Your Product Description Process Today
Throughout this comprehensive guide, we’ve explored every aspect of How to Write Product Descriptions with AI (Rytr Guide) methodology. From initial setup to advanced techniques, from platform-specific optimisation to troubleshooting common challenges, you now have everything you need to transform your product description writing process.
The fundamental truth is this: AI tools like Rytr don’t replace human creativity and strategic thinking. They amplify it. They handle the mechanical aspects of writing, freeing you to focus on strategy, positioning and the human touches that make your products stand out.
Small businesses and solopreneurs face a choice. You can continue writing every product description manually, spending hours on tasks that AI can handle in minutes. Or you can embrace AI assistance, reclaim your time and redirect that energy toward growing your business, acquiring customers and improving your products.
Rytr makes this choice easy. With a free tier that’s genuinely useful and paid plans that cost less than a single hour of professional copywriting, the return on investment is immediate and obvious. The question isn’t whether you can afford to use AI for product descriptions. The question is whether you can afford not to.
Start small. Use Rytr’s free plan to generate descriptions for your next 10-20 products. Compare the time investment to your previous manual process. Evaluate the quality and conversion rates. The data will speak for itself.
Your competitors are already using AI. The businesses that will dominate e-commerce in the coming years are those that effectively combine AI efficiency with human creativity and strategic insight. The tools are available. The techniques are proven. The only thing standing between your current workflow and dramatically improved efficiency is the decision to start.
Stop spending hours on product descriptions that could be generated in minutes. Stop delaying product launches because writing copy takes too long. Stop accepting generic descriptions because you don’t have time to make them great.
Start using Rytr today and transform how you write product descriptions forever.
Finding the Best Sales Funnel Software for Small Business in 2025 shouldn’t feel like you need an MBA and a tech degree just to make an informed decision. Yet here we are, drowning in options that all promise to revolutionize your business while charging anywhere from £0 to £300+ per month. The truth? Most small businesses don’t need half the features these platforms offer and many can’t afford the price tags attached to the “industry leaders.”
I’ve spent weeks researching and analyzing sales funnel software specifically from a small business perspective. Not from the viewpoint of a Fortune 500 company with unlimited budgets and a dedicated marketing team. But from the perspective of a small business owner who’s wearing multiple hats, watching every penny and needs tools that actually work without requiring a computer science degree.
In this comprehensive guide, we’ll cut through the marketing hype and examine seven sales funnel platforms that small businesses are actually using successfully in 2025. We’ll look at real pricing, actual learning curves, genuine limitations and honest recommendations for different business scenarios. By the end, you’ll know exactly which platform fits your specific situation and budget.
Whether you’re a solopreneur, a small team or a growing business that’s outgrown basic tools, this guide will help you choose wisely and avoid expensive mistakes that could set your business back months or even years.
What Is Sales Funnel Software and Why Does Your Small Business Need It?
Before we dive into specific platforms, let’s establish what sales funnel software actually does and why it matters for small businesses.
A sales funnel is the journey your potential customer takes from first discovering your business to making a purchase. Sales funnel software helps you create, manage and optimize that journey. Think of it as a guided path that:
Captures attention (through landing pages and lead magnets)
Builds interest (through compelling content and value delivery)
Creates desire (through demonstrations of benefits and social proof)
Motivates action (through clear calls to action and smooth checkout processes)
Why Small Businesses Struggle Without Funnel Software
According to research from Salesforce, businesses that actively manage their sales funnels see conversion rates up to 300% higher than those relying on basic websites alone. For small businesses operating on thin margins, that difference between 1% conversion and 3% conversion can literally determine whether you thrive or merely survive.
Without proper funnel software, small businesses typically:
Lose leads because they have no systematic way to capture contact information
Waste traffic by sending visitors to generic websites instead of targeted conversion pages
Miss follow-up opportunities because they lack automated email sequences
Struggle to scale because every sale requires manual intervention
Can’t measure effectively because they don’t have proper tracking and analytics
Sales funnel software solves these problems by providing a structured system for converting strangers into customers predictably and repeatedly.
What Small Businesses Actually Need in Funnel Software
Not all features are created equal when you’re running a small business. Here’s what truly matters:
Essential Features
1. Landing Page Builder You need the ability to create professional-looking pages quickly without hiring a designer. Drag-and-drop functionality is non-negotiable for small businesses without technical teams.
2. Email Marketing Integration Your funnel software should either include email marketing or integrate seamlessly with your existing email platform. The money is in the follow-up and small businesses can’t afford to let leads go cold.
3. Payment Processing Direct integration with Stripe and PayPal means you can accept payments without complicated technical setup or additional monthly fees for shopping cart software.
4. Basic Analytics You need to see what’s working and what isn’t. Conversion rates, traffic sources and revenue tracking are essential. Advanced attribution modeling? Not so much.
5. Mobile Responsiveness Over 60% of web traffic comes from mobile devices. Your funnels must look good and work properly on smartphones and tablets.
Nice-to-Have Features
1. A/B Testing The ability to test different headlines, images or layouts to see what converts better. Important but not essential when you’re just starting.
2. Membership Area Useful if you’re selling courses or subscription content but not necessary for many small businesses.
3. Affiliate Program Management Helpful for scaling through partners but most small businesses won’t use this initially.
4. Webinar Hosting Valuable for certain business models but adds complexity many small businesses don’t need.
Features You Probably Don’t Need Yet
1. Advanced Automation Complex behavioral triggers and multi-step workflows sound impressive but small businesses rarely need them until they’ve mastered the basics.
2. CRM Functionality Full customer relationship management is overkill unless you’re managing complex sales cycles with multiple touchpoints.
3. Team Collaboration Tools If you’re a solopreneur or a small team, you don’t need elaborate permission systems and workflow approvals.
Understanding what you actually need prevents you from paying for bloated software packages that do 100 things when you only need 10.
The 7 Best Sales Funnel Software Options for Small Businesses
Let’s examine each platform in detail, covering pricing, strengths, weaknesses and ideal use cases.
1. Systeme.io: The Best Budget Option
Starting Price: Free (yes, actually free) Best For: Bootstrapped small businesses and solopreneurs
What It Offers
Systeme.io has become the darling of budget-conscious small business owners in 2025 and for good reason. It’s an all-in-one platform that includes:
Sales funnel builder
Email marketing (unlimited sends)
Course hosting
Membership sites
Affiliate program management
Blog functionality
The Free Plan Reality
Unlike platforms with restrictive “free trials,” Systeme.io offers a genuinely usable free plan:
Up to 2,000 contacts
3 sales funnels
Unlimited email sends
1 course
Unlimited file storage
This isn’t a gimmick. Small businesses are running real operations on this free plan and only upgrading when their growth justifies it.
Pricing Tiers
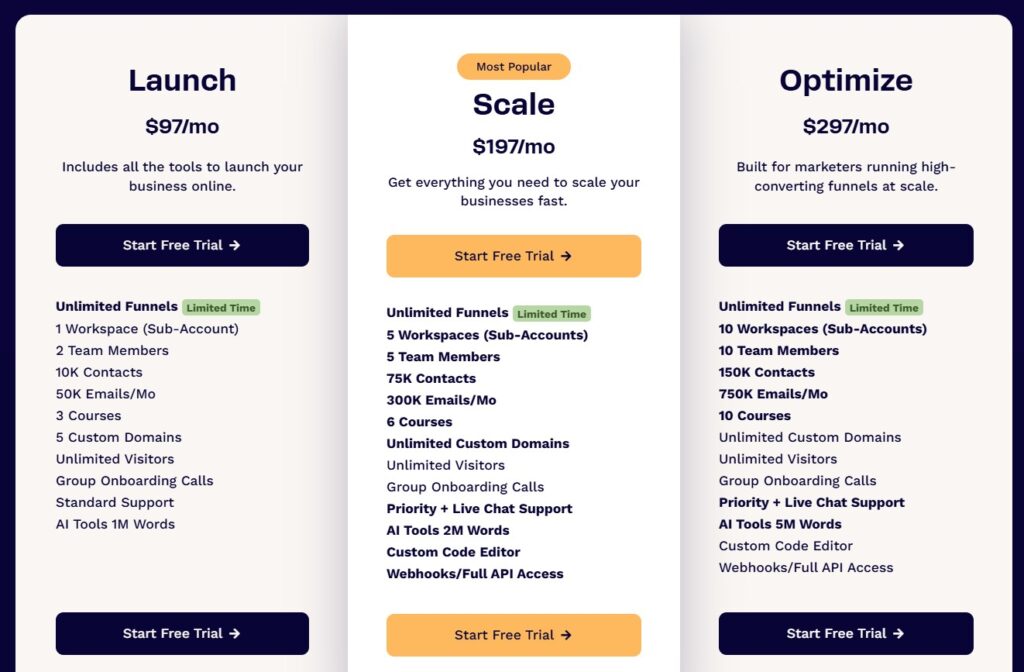
Startup Plan: $27/month
5,000 contacts
10 funnels
Removes Systeme.io branding
Evergreen webinars
Webinar Plan: $47/month
10,000 contacts
50 funnels
Advanced webinar features
Unlimited Plan: $97/month
Unlimited everything
Priority support
Strengths for Small Business
Cost Effectiveness: Start free and scale affordably. Even at $97/month for unlimited, you’re paying less than most competitors charge for basic plans.
All-in-One Approach: You’re not piecing together separate tools for email, funnels, courses and payments. Everything lives in one dashboard with one login.
Simplicity: The interface is straightforward. You won’t find overwhelming menus with dozens of advanced features you’ll never use. For small business owners who need to move fast, this simplicity is valuable.
Included Email Marketing: Most funnel builders charge extra for email or force you to use external email providers. Systeme.io includes robust email marketing with automation at no additional cost.
Limitations
Design Flexibility: The templates are functional but not as polished as premium platforms. You can customize colors, fonts and layouts but you won’t have pixel-perfect control.
Template Selection: Fewer pre-built templates compared to ClickFunnels or Leadpages. You’ll spend more time building from scratch or adapting generic templates.
Brand Perception: Some entrepreneurs feel Systeme.io lacks the prestige of “name brand” platforms. For small businesses focused on results over appearances, this shouldn’t matter.
Who Should Choose Systeme.io
Solopreneurs and very small teams
Businesses operating on minimal budgets
Service providers, consultants and coaches
Digital product sellers
Anyone validating a business idea before major investment
Starting Price: $97/month Best For: Established small businesses with proven offers
What It Offers
ClickFunnels pioneered the sales funnel software category and remains the most recognized name in the space. The platform includes:
Visual funnel builder
Extensive template library
Shopping cart functionality
One-click upsells and order bumps
Basic email automation
Affiliate management
Pricing Reality
Basic Plan: $97/month
20 funnels
1 website
3 courses
10,000 contacts
Pro Plan: $297/month
100 funnels
3 websites
15 courses
25,000 contacts
Advanced features
Strengths for Small Business
Proven Templates: ClickFunnels offers hundreds of templates across dozens of industries. These aren’t just pretty pages, they’re based on funnels that have generated millions in revenue.
Education and Community: The ClickFunnels ecosystem includes extensive training resources, a massive Facebook community and regular virtual events. For small business owners who value learning and support, this ecosystem is valuable.
One-Click Upsells: The ability to offer additional products immediately after purchase without requiring customers to re-enter payment information can significantly increase average order value.
Reliability: ClickFunnels has been around since 2014. It’s stable, established and unlikely to disappear overnight. For small businesses betting their revenue on a platform, this stability matters.
Limitations
Cost: At $97/month minimum, ClickFunnels is expensive for early-stage small businesses. You’re paying for the brand name and ecosystem as much as the software.
No Email Marketing: You’ll need a separate email platform or upgrade to ClickFunnels’ email add-on for an additional fee. This increases total cost and creates another system to manage.
Complexity: The platform has evolved to include so many features that small businesses often feel overwhelmed. The learning curve is steeper than simpler alternatives.
Page Load Speed: ClickFunnels pages can load slowly, which impacts conversion rates and SEO. This is a known issue the company has worked to address but it remains a consideration.
Who Should Choose ClickFunnels
Small businesses generating $5,000+ per month in revenue
Product sellers with upsells and order bumps
Entrepreneurs who value community and training
Businesses willing to invest in proven templates
Companies already using ClickFunnels-specific training programs
Who Should Skip It
Pre-revenue or very early stage businesses
Budget-conscious solopreneurs
Businesses needing extensive custom design
Companies requiring included email marketing
If you’re interested in learning more about how ClickFunnels performs in real-world use, I’ve created a detailed ClickFunnels review that covers everything from setup to advanced features.
3. Leadpages: The Landing Page Specialist
Starting Price: $37/month Best For: Small businesses focused primarily on lead generation
What It Offers
Leadpages specializes in creating high-converting landing pages and lead capture forms. The platform includes:
Landing page builder with 200+ templates
Pop-up and alert bar creation
A/B testing
Lead magnet delivery
Basic integrations
Pricing Structure
Standard Plan: $37/month
1 site
Unlimited landing pages
Unlimited pop-ups
Free hosting
Pro Plan: $74/month
3 sites
Online sales and payments
Email trigger links
Priority support
Advanced Plan: $239/month
50 sites (for agencies)
Advanced integrations
Sub-accounts
Strengths for Small Business
Focused Expertise: Leadpages does one thing exceptionally well, landing pages. The templates are research-backed and optimized for conversions.
Speed: You can create and publish a landing page in 10-15 minutes. For small businesses that need to move quickly, this speed is valuable.
Templates Across Industries: With over 200 templates covering dozens of industries, you’ll likely find something closely matching your needs.
WordPress Integration: If you already have a WordPress website, Leadpages integrates seamlessly. You can host lead capture pages within your existing site structure.
Limitations
Not a Complete Funnel Builder: Leadpages excels at the top of the funnel (lead capture) but lacks features for the middle and bottom (nurture sequences and complete sales funnels).
Requires External Email Platform: You must connect MailChimp, ConvertKit or another email service provider. This adds cost and complexity.
No Payment Processing: You can’t sell products directly through Leadpages. You’ll need additional e-commerce software.
Limited Automation: Basic trigger links exist but Leadpages isn’t designed for sophisticated automation workflows.
Starting Price: $99/month Best For: Growing small businesses ready for integrated marketing
What It Offers
Kartra positions itself as a complete marketing platform rather than just funnel software. It includes:
Sales funnel builder
Email marketing with advanced automation
Membership site hosting
Video hosting
Help desk and ticketing system
Calendar and appointment booking
Affiliate management
Pricing Options
Starter Plan: $99/month
2,500 leads
15,000 emails/month
20 products
2 membership sites
Growth Plan: $189/month
12,500 leads
125,000 emails/month
100 products
5 membership sites
Professional Plan: $429/month
25,000 leads
250,000 emails/month
200 products
10 membership sites
Strengths for Small Business
True All-in-One: Kartra genuinely includes everything a digital business needs. You can replace 5-7 separate tools with Kartra alone.
Advanced Automation: The automation builder rivals dedicated marketing automation platforms. You can create complex workflows based on behavior, purchases and engagement.
Video Hosting: Built-in video hosting with analytics means you don’t need YouTube or Vimeo. This is particularly valuable for course creators and video marketers.
Helpdesk Included: The built-in support ticket system is rare among funnel builders. Small businesses selling products or services can manage customer support without additional software.
Limitations
Price: At $99/month minimum, Kartra is expensive for early-stage businesses. The pricing increases significantly as your list grows.
Overwhelming: The sheer number of features can paralyze small business owners. You might feel pressure to use everything when you only need a fraction.
Steeper Learning Curve: With more features comes more complexity. Expect to invest significant time learning the platform.
Overkill for Simple Needs: If you just need basic funnels and email marketing, Kartra provides far more than necessary.
Who Should Choose Kartra
Small businesses already generating consistent revenue
5. GetResponse: The Email Marketer’s Funnel Builder
Starting Price: $15/month Best For: Small businesses prioritizing email marketing with funnel capabilities
What It Offers
GetResponse started as an email marketing platform and evolved to include funnel building. It offers:
Email marketing with automation
Landing page builder
Webinar hosting
Sales funnels (called “Conversion Funnels”)
Marketing automation workflows
E-commerce integration
Pricing Tiers
Email Marketing Plan: $15/month
Email marketing only
No funnels
Marketing Automation Plan: $49/month
Conversion funnels
Automation builders
Webinars
Ecommerce Marketing Plan: $99/month
Everything in Marketing Automation
E-commerce features
Web push notifications
Strengths for Small Business
Email Marketing Foundation: If email is your primary marketing channel, GetResponse’s email capabilities are top-tier with excellent deliverability.
Webinar Hosting: Built-in webinar functionality is rare and valuable for coaches, consultants and educators.
Conversion Funnel Templates: The pre-built funnel templates cover common scenarios and integrate seamlessly with email sequences.
Established Platform: GetResponse has operated since 1998. It’s proven, stable and unlikely to surprise you with sudden changes.
Limitations
Funnels Feel Secondary: The funnel builder was added later and doesn’t feel as natural as email marketing does within the platform.
Design Tools Are Basic: The landing page and funnel page builders lack the polish of dedicated funnel platforms.
Pricing Jumps: To access funnels, you jump from $15 to $49/month. That’s a significant increase for small businesses.
Learning Curve for Funnels: If you’re familiar with GetResponse for email, the funnel builder requires separate learning. It’s not intuitive.
Who Should Choose GetResponse
Small businesses already using GetResponse for email
Companies prioritizing email deliverability
Webinar-based businesses
Marketers comfortable with the platform
Who Should Skip It
Businesses wanting funnel-first platforms
Companies needing sophisticated funnel design
Users wanting simplicity
Brands requiring the latest funnel innovations
6. Unbounce: The Conversion Optimization Expert
Starting Price: $90/month Best For: Small businesses with traffic that needs optimizing
What It Offers
Unbounce focuses specifically on landing page creation and conversion rate optimization:
Landing page builder
Pop-ups and sticky bars
A/B testing
Dynamic text replacement
AI-powered optimization
Pricing Structure
Launch Plan: $90/month
500 conversions/month
1 domain
20 landing pages
Optimize Plan: $135/month
1,000 conversions/month
5 domains
Unlimited landing pages
Accelerate Plan: $225/month
2,500 conversions/month
10 domains
Unlimited landing pages
Scale Plan: $575/month
5,000+ conversions/month
Strengths for Small Business
Conversion Optimization Tools: Unbounce includes sophisticated A/B testing and AI-powered optimization that can significantly improve conversion rates.
Dynamic Text Replacement: Automatically customize landing page content based on the visitor’s search terms or ad campaigns. This increases relevance and conversions.
Professional Templates: The templates are research-backed and designed specifically for conversions rather than aesthetics alone.
Speed: Unbounce pages load quickly, which improves both user experience and SEO rankings.
Limitations
Price: At $90/month minimum, Unbounce is expensive relative to what it offers. You’re paying specifically for optimization features.
Not a Complete Funnel Builder: Unbounce excels at landing pages but doesn’t provide complete funnel sequences or payment processing.
Conversion-Based Pricing: Unlike most platforms charging by contacts or pages, Unbounce charges by conversions. High-converting businesses face increasing costs.
Requires External Tools: You need separate email marketing, payment processing and automation tools.
Who Should Choose Unbounce
Small businesses with paid traffic budgets
Companies focused on conversion rate optimization
Marketers running multiple ad campaigns
Businesses with existing email and payment systems
Who Should Skip It
Early-stage businesses with minimal traffic
Companies wanting complete funnel solutions
Budget-conscious solopreneurs
Businesses uncomfortable with technical optimization
Non-Technical (Need Maximum Simplicity): → Systeme.io or Leadpages
Somewhat Technical (Comfortable Learning): → ClickFunnels or GetResponse
Very Technical (Want Advanced Control): → Kartra, Unbounce or Instapage
Decision Factor 4: Your Team Size
Solopreneur: → Systeme.io or Leadpages
2-5 Person Team: → ClickFunnels, GetResponse or Kartra
6+ Person Team or Agency: → Kartra, Instapage or ClickFunnels Pro
Decision Factor 5: Your Paid Traffic Budget
No Paid Traffic Yet: → Systeme.io, ClickFunnels or Kartra
Under $1,000/month in Ads: → Leadpages, ClickFunnels or GetResponse
$1,000 to $5,000/month in Ads: → Unbounce, ClickFunnels or Leadpages
$5,000+/month in Ads: → Unbounce or Instapage
## Ready to Build Your First Sales Funnel?
Choosing the right software is just the first step. Actually building and launching effective sales funnels requires strategy and structure. If you’re looking for step-by-step guidance on starting your online business with sales funnels that actually convert, I’ve created a comprehensive guide to getting started that covers everything from choosing your niche to creating your first funnel to driving your initial traffic.
The Hidden Costs You Must Consider
When comparing funnel software, the advertised monthly price is only part of the total cost equation. Small businesses often overlook these additional expenses:
External Email Marketing
Platforms like ClickFunnels and Leadpages require separate email providers:
MailChimp: $0-350+/month depending on list size
ConvertKit: $9-79+/month
ActiveCampaign: $29-149+/month
If your funnel software doesn’t include email marketing, add this cost to your calculations.
Payment Processing Fees
All platforms charge payment processing fees when you sell products:
Stripe: 2.9% + 30p per transaction
PayPal: 2.9% + 30p per transaction
On $10,000 in monthly revenue, you’ll pay approximately $300 in processing fees regardless of platform.
Domain Names
Most funnel software requires you to connect a custom domain:
Domain registration: $10-15/year
Multiple domains for different funnels: $10-15/year each
Email Service Overages
Platforms with email marketing often charge overages when you exceed included contacts or sends. A list growing from 5,000 to 6,000 contacts might trigger a $20-50/month price increase.
Additional Team Members
Some platforms charge per user:
ClickFunnels: $0 (included in base price)
Kartra: $0 (included in base price)
Instapage: Additional fees for team members on certain plans
Training and Courses
While not technically required, many small businesses invest in training:
ClickFunnels courses and certifications: $1,000-3,000
Let’s calculate the real first-year cost of two different setups for a small business with 3,000 contacts:
Setup A: Systeme.io
Systeme.io Startup Plan: $27 × 12 = $324
Domain name: $15
Payment processing: $0 (variable based on sales)
Total: $339/year
Setup B: ClickFunnels + ConvertKit
ClickFunnels Basic: $97 × 12 = $1,164
ConvertKit (3,000 contacts): $29 × 12 = $348
Domain name: $15
Payment processing: $0 (variable based on sales)
Total: $1,527/year
That’s a $1,188 difference in the first year. For small businesses watching every pound, this difference is substantial.
Common Mistakes Small Businesses Make When Choosing Funnel Software
Mistake 1: Choosing Based on Hype Rather Than Needs
ClickFunnels has masterful marketing. Their case studies show entrepreneurs making millions. Their community is passionate and vocal. But that doesn’t mean ClickFunnels is right for your specific business.
Better approach: Evaluate platforms based on your actual needs, budget and business model rather than which one has the best marketing.
Mistake 2: Overbuying Features You’ll Never Use
Paying for advanced automation, webinar hosting, helpdesk systems and affiliate management sounds impressive. But if you’re a solopreneur selling coaching services, you probably won’t use 80% of these features.
Better approach: Start with the simplest platform that meets your core needs. You can always upgrade later if you outgrow it.
Mistake 3: Underestimating the Learning Curve
Every platform requires time to learn. Small business owners often underestimate how long it takes to become proficient. The result? They pay for software they’re not effectively using.
Better approach: Choose a platform with your technical comfort level in mind. A simpler tool you actually use beats a sophisticated tool that intimidates you.
Mistake 4: Not Testing Before Committing
Most platforms offer free trials or money-back guarantees. Small businesses often skip the testing phase and commit based on reviews alone.
Better approach: Sign up for trials. Build an actual funnel. Test the workflow. Experience the interface before making a financial commitment.
Mistake 5: Ignoring Integration Requirements
You might love a platform until you realize it doesn’t integrate with your existing email provider, CRM or other essential tools. Discovering integration limitations after purchase is frustrating and costly.
Better approach: Make a list of your existing tools and verify integration capabilities before choosing funnel software.
Mistake 6: Falling for “Lifetime Deal” Offers
AppSumo and similar platforms occasionally offer lifetime deals on funnel software. These seem tempting but often come with significant limitations and uncertain futures.
Better approach: Stick with established platforms with proven track records and sustainable business models. The money you save on a lifetime deal might not be worth the risk if the platform disappears or stops updating.
Real Small Business Success Stories
Let’s look at how real small businesses are using these platforms successfully:
Case Study 1: Online Coaching Business Using Systeme.io
Sarah runs a career coaching practice. She uses Systeme.io’s free plan to:
Capture leads with a “Resume Template” lead magnet
Nurture leads with a 5-email sequence
Sell a $297 coaching package through a simple sales funnel
Results: 150 email subscribers, 8% conversion rate, $2,376 in monthly revenue, £0 in software costs.
Case Study 2: Course Creator Using ClickFunnels
Marcus sells online courses teaching photography. He uses ClickFunnels Basic to:
Run webinar funnels to attract students
Offer upsells and payment plans
Manage affiliates who promote his courses
Results: $12,000 in monthly revenue, 40% of sales from upsells, $97/month in software costs, positive ROI on ClickFunnels investment.
Case Study 3: Local Service Business Using Leadpages
Jane owns a home organizing service. She uses Leadpages to:
Create landing pages for Google Ads campaigns
Capture leads for free consultations
Build her email list for seasonal promotions
Results: 50 qualified leads per month, $37/month in software costs, 20% booking rate from leads.
Case Study 4: Digital Product Seller Using Kartra
Alex sells productivity templates and mini-courses. He uses Kartra to:
Host multiple courses
Run sophisticated email sequences
Manage customer support tickets
Process payments and handle refunds
Results: $8,000 in monthly revenue, 2,000 email subscribers, all business operations in one platform, $99/month in software costs.
These examples demonstrate that success isn’t about which platform costs the most or has the most features. Success comes from choosing appropriate tools and using them consistently.
The 90-Day Action Plan After Choosing Your Platform
Once you’ve selected your funnel software, here’s a realistic implementation timeline for small businesses:
Days 1-7: Foundation Setup
Day 1: Create account and complete basic setup Day 2-3: Watch platform tutorials and orientation Day 4: Connect domain name Day 5: Set up payment processing (Stripe/PayPal) Day 6: Explore templates and choose starting points Day 7: Plan your first funnel on paper
Days 8-30: First Funnel Launch
Week 2: Build simple opt-in funnel
Create landing page
Set up thank-you page
Configure email delivery
Test entire process
Week 3: Create lead magnet and welcome sequence
Develop valuable lead magnet
Write 3-5 email welcome sequence
Set up automation
Week 4: Drive initial traffic
Share on social media
Email existing contacts
Publish blog content
Test paid traffic (if budget allows)
Days 31-60: First Sales Funnel
Week 5-6: Create product or offer
Define offer clearly
Set pricing
Create sales copy
Develop supporting materials
Week 7: Build sales funnel
Create sales page
Set up order form
Configure thank-you page
Test purchase process
Week 8: Launch and promote
Drive traffic to sales funnel
Monitor conversions
Gather feedback
Days 61-90: Optimize and Scale
Week 9: Analyze data
Review conversion rates
Identify drop-off points
Collect customer feedback
Week 10: Make improvements
Update copy based on feedback
Improve design elements
Test different headlines
Week 11: Scale what works
Increase traffic to converting funnels
Add upsells or order bumps
Expand to additional products
Week 12: Plan next quarter
Evaluate results against goals
Decide whether platform still fits
Plan additional funnels
This timeline is realistic and achievable for small businesses dedicating 5-10 hours per week to funnel building and optimization.
Questions to Ask Before Making Your Final Decision
Before you commit to any platform, honestly answer these questions:
What is my absolute maximum monthly budget for funnel software? Be realistic. Don’t stretch beyond what your business can afford.
Do I need email marketing included or do I already have a solution? This significantly impacts which platforms make sense.
How technical am I willing to get? Be honest about your comfort level with technology.
What is my primary business model? Lead generation, e-commerce, digital products and service businesses have different needs.
Do I need course hosting or membership functionality? Not all platforms include this and it’s expensive to add separately.
Am I running paid traffic or relying on organic? High-traffic businesses benefit more from conversion optimization features.
How quickly do I need to launch? Some platforms are faster to learn than others.
Will I need team collaboration features? Solopreneurs don’t need what small teams require.
What existing tools must integrate with my funnel software? Verify compatibility before committing.
Am I willing to switch platforms later if needed? Some entrepreneurs stay with wrong-fit platforms because switching feels overwhelming.
Your answers will point you toward the right choice for your specific situation.
Can I Switch Platforms Later Without Losing Everything?
Yes, but it requires effort. Your email list can be exported and imported to new platforms. Your funnel pages will need to be rebuilt, though many platforms allow you to replicate designs. Payment processing follows you (Stripe and PayPal work with all platforms).
Switching is easier than most fear but it does take time. Start with the platform that makes sense now and accept that switching later is possible if your needs change.
Do I Really Need Sales Funnel Software or Can I Use a Regular Website?
Regular websites work for brand awareness and information sharing. But if your goal is to convert visitors into customers predictably, funnel software provides significant advantages:
Focused, distraction-free pages optimized for one action
Built-in email capture and follow-up systems
Split testing capabilities
Analytics specific to conversion goals
Pre-built templates based on proven strategies
According to research from HubSpot, dedicated landing pages convert at rates 5-10 times higher than generic website pages. For small businesses where every customer matters, this difference is substantial.
Can I Use Free Tools Instead of Paid Platforms?
Yes, but with significant limitations. You could theoretically piece together:
WordPress for hosting (free)
Elementor for page building (free version)
MailChimp for email marketing (free up to 500 contacts)
PayPal for payments (free account, transaction fees apply)
The challenges with this approach:
You’re managing multiple platforms with multiple logins
Technical complexity increases significantly
No unified analytics or tracking
You’ll spend more time on technical issues than marketing
Updates and compatibility problems are common
For small businesses where time is precious, the cost of paid platforms is usually justified by the time saved and headaches avoided.
How Long Does It Take to See Results?
Realistic timeline for small businesses:
Week 1-2: Learning platform and building first funnel
Week 3-4: Generating initial traffic and collecting first leads
Month 2: First sales from follow-up sequences
Month 3: Optimizing based on data
Month 4-6: Consistent results and scaling
Most small businesses see meaningful results within 90 days if they execute consistently. The platform itself doesn’t determine success—your offer, your marketing and your persistence do.
What’s the Minimum Traffic I Need for Funnels to Work?
Quality matters more than quantity. A funnel converting at 10% only needs 10 visitors to generate one customer. Rather than obsessing over traffic volume, focus on:
Attracting your ideal customers
Creating compelling offers
Building trust through value delivery
Making clear calls to action
That said, you’ll get better optimization data with more traffic. Aim for at least 100-200 visitors per month to each funnel to gather meaningful insights.
The Bottom Line: My Honest Recommendations
After analyzing seven platforms, here’s what I genuinely recommend for different small business scenarios:
Best Overall Value for Most Small Businesses: Systeme.io
For the majority of small businesses, Systeme.io offers the best combination of features, affordability and ease of use. The free plan is genuinely usable and the paid plans are affordable as you grow. Unless you have specific needs that Systeme.io can’t meet, start here.
Best for Established Businesses with Proven Offers: ClickFunnels
If you’re already generating $5,000+ per month in revenue and you want premium templates, a strong community and proven funnel strategies, ClickFunnels justifies its price. You’re paying for polish, brand recognition and an ecosystem that supports your growth.
Best for Email-First Businesses: GetResponse
If email marketing is your primary strategy and you want solid funnel capabilities added, GetResponse provides excellent email deliverability with adequate funnel building. The webinar functionality is a bonus for certain business models.
Best for Simple Lead Capture: Leadpages
If you primarily need landing pages to capture leads and you already have email marketing sorted, Leadpages does this one thing exceptionally well at a reasonable price.
Best for Advanced Users Ready to Consolidate: Kartra
If you’re comfortable with technology, you’re generating consistent revenue and you want to replace 5-7 separate tools with one platform, Kartra provides incredible value despite its higher price.
Best for Heavy Paid Traffic Users: Unbounce or Instapage
If you’re spending $3,000+ monthly on advertising and conversion rate optimization will significantly impact your bottom line, the specialized capabilities of Unbounce or Instapage become worth their premium prices.
Final Thoughts: The Choice That Matters Most
Throughout this guide, we’ve examined the Best Sales Funnel Software for Small Business (2025) from every angle, pricing, features, limitations and real-world applications. The truth is, every platform on this list can help you build a successful small business if you use it consistently and strategically.
The software you choose matters far less than what you do with it. A mediocre funnel that’s actually live and generating leads beats a “perfect” funnel that never launches. A simple landing page collecting emails consistently beats an elaborate funnel that’s still in development.
Choose a platform that fits your budget, matches your technical comfort level and meets your core needs. Then commit to building, launching and optimizing your funnels rather than perpetually researching alternatives.
The best time to choose your sales funnel software was yesterday. The second-best time is right now. Stop researching. Make a decision. Start building.
Your small business success is waiting on the other side of action.
Is Systeme.io Good for Beginners? If you’re standing at the starting line of your online business journey, staring at the overwhelming sea of tools and platforms, this question has probably been keeping you up at night. And honestly, I don’t blame you. The market is flooded with platforms promising to make building an online business “easy” while charging you a small fortune and requiring a computer science degree to operate.
I’ve spent considerable time researching Systeme.io because I wanted to give you an answer that isn’t wrapped in affiliate hype or false promises. What I found surprised me in the best possible way. But before I tell you whether Systeme.io is actually good for beginners, let me be clear about something: I’m not here to sell you a dream. I’m here to help you make an informed decision about whether this platform fits your specific situation.
In this comprehensive guide, we’ll dig into everything you need to know about Systeme.io from a beginner’s perspective. We’ll cover the real learning curve, the actual costs, what you can build without technical skills and whether the platform will grow with you as your business expands. By the end, you’ll know exactly whether Systeme.io is good for beginners like you.
What Exactly Is Systeme.io?
Before we assess whether Systeme.io is suitable for beginners, let’s establish what it actually is. Systeme.io is an all-in-one online business platform created by Aurelien Amacker, a French entrepreneur who got tired of paying for multiple subscriptions to run his online business. He built Systeme.io to consolidate everything into one affordable platform.
Think of it as the Swiss Army knife of online business tools. Instead of subscribing to separate services for email marketing, sales funnels, course hosting, membership sites and affiliate program management, Systeme.io bundles everything together. This consolidation is precisely why it catches the attention of beginners who are often working with limited budgets and even more limited patience for technical complexity.
The platform launched in 2018 and has since grown to serve over 300,000 users worldwide. It’s available in multiple languages and operates on a freemium model, meaning you can actually start using it without paying a penny. This free tier is not a gimmicky 14-day trial that pressures you into a paid plan. It’s a permanent free option that allows you to build a real business while you’re learning.
Let me paint a picture of the typical beginner’s experience. You decide to start an online business. You’re excited and motivated. Then you start researching what you need:
A website builder (WordPress, Wix, Squarespace?)
An email marketing platform (MailChimp, ConvertKit, ActiveCampaign?)
A sales funnel builder (ClickFunnels, Kartra, Leadpages?)
A course hosting platform if you’re selling courses (Teachable, Thinkific, Kajabi?)
A payment processor (Stripe, PayPal, both?)
An automation tool (Zapier to connect everything?)
Each tool has its own login, its own learning curve, its own monthly fee and its own limitations. You quickly realize that you’ll be spending £100-300+ per month before you’ve made your first sale. Worse, you’ll spend weeks just figuring out how to connect everything together.
This is where the all-in-one platform concept becomes attractive. But here’s the critical question: does consolidating everything into one platform actually make things easier for beginners or does it just create a different kind of complexity?
Breaking Down Systeme.io for Complete Beginners
The Dashboard: Your Command Center
When you first log into Systeme.io, you’re greeted with a clean, straightforward dashboard. Unlike some platforms that bombard you with options and features, Systeme.io uses a sidebar navigation that organizes everything into logical categories. You’ll see sections for:
Contacts: Your email list and subscriber management
Campaigns: Your email sequences and broadcasts
Funnels: Your sales pages and conversion pathways
Courses: Your online course content (if applicable)
Blog: Your content marketing hub
Affiliate Program: Tools to recruit and manage affiliates
Automation Rules: Your workflow automation
For a beginner, this organization makes sense because it mirrors the actual workflow of building an online business. You collect contacts, you communicate with them through campaigns, you sell to them through funnels and you might create courses or blog content. Everything follows a logical progression.
Compare this to platforms like ClickFunnels, which while powerful, can feel like walking into a professional recording studio when all you want to do is record a simple podcast. The sheer number of advanced features can paralyze beginners rather than empower them.
The Learning Curve: Gentle Slope or Steep Cliff?
Let’s address the elephant in the room. Every platform has a learning curve. The question is whether that curve is manageable for someone with zero technical experience.
With Systeme.io, the learning curve is genuinely gentle for several reasons:
1. Built-in Templates
Systeme.io provides pre-built templates for virtually everything you might want to create. Need a sales funnel? There are templates. Want to create an opt-in page? Template. Building a webinar funnel? Template. These aren’t just bare-bones starting points either. They’re professionally designed and follow proven conversion principles.
This matters enormously for beginners because you’re not staring at a blank canvas wondering where to start. You can launch with a template and customize it as your confidence grows. According to research from the Baymard Institute, users who start with templates are 3.5 times more likely to complete their projects than those starting from scratch.
2. Drag-and-Drop Editor
The funnel and page builder in Systeme.io uses a drag-and-drop interface. You don’t write code. You don’t mess with CSS. You literally click on an element and drag it where you want it. Want to add a button? Drag and drop. Need a video? Drag and drop. Want to change the layout? Drag and drop.
I won’t pretend it’s as polished as some premium builders, but for beginners, the simplicity is actually an advantage. There are fewer ways to break things and fewer options to get overwhelmed by.
3. Helpful Documentation and Community
Systeme.io provides extensive documentation, video tutorials and a Facebook community where users help each other. As a beginner, you’ll inevitably hit points where you’re not sure how to do something. The availability of help resources makes a massive difference in whether you push through or give up.
The Systeme.io blog also publishes regular tutorials and case studies that show you real examples of how other users are building their businesses. This social proof is invaluable for beginners who need reassurance that they’re on the right track.
Can You Actually Build a Real Business on the Free Plan?
This is where Systeme.io genuinely stands out for beginners. The free plan isn’t a trial. It’s a permanent option that includes:
Up to 2,000 contacts
Unlimited email sends
3 sales funnels
1 course
1 blog
Unlimited file storage
Let me be clear about what this means: you can build and launch a legitimate online business without spending a penny on software. You can collect email subscribers, nurture them with email campaigns, sell them a product through a sales funnel and even host a course if that’s your business model.
The 2,000 contact limit sounds restrictive until you realize that most beginners struggle to get their first 100 subscribers. By the time you’re approaching 2,000 subscribers, you should be making money and upgrading to a paid plan will be an easy decision.
Compare this to ClickFunnels, which starts at $97 per month with a 14-day trial. Or ActiveCampaign, which starts at $29 per month but becomes expensive quickly as your list grows. For a beginner with no income and possibly limited savings, starting with zero monthly overhead is not just attractive, it’s potentially the difference between getting started and staying stuck in analysis paralysis.
The Features That Matter Most to Beginners
Not all features are created equal when you’re just starting out. Let’s focus on the core capabilities that beginners actually need and how Systeme.io handles them.
Email Marketing: The Foundation of Every Online Business
If I could only choose one tool for a beginner to master, it would be email marketing. Your email list is the only audience you truly own. Social media platforms can ban you. Google can change its algorithm. But your email list is yours.
Systeme.io’s email marketing functionality is straightforward:
List Management: You can create multiple lists to segment your audience
Email Campaigns: Create one-off broadcast emails to your list
Email Sequences: Set up automated email series that send on a schedule
Personalization: Use tags to customize emails for different subscribers
Analytics: See open rates and click rates for every email
For a beginner, this covers everything you need. You won’t find the advanced behavioral triggers that platforms like ActiveCampaign offer but honestly, you don’t need them yet. Master the basics first. Send valuable content consistently. Build trust with your audience. The fancy stuff can wait.
One limitation to be aware of: Systeme.io’s email editor is functional but basic. If you want to create elaborate email designs with complex layouts, you might find it limiting. But here’s a secret that experienced marketers know and beginners often miss: plain text emails or simple HTML emails often outperform elaborate designs anyway. People want helpful content, not fancy graphics.
Sales Funnels: Turning Visitors into Customers
A sales funnel is simply a series of pages designed to guide a visitor toward a specific action, typically a purchase. The classic example is:
Landing Page: Captures the visitor’s email in exchange for something valuable
Thank You Page: Confirms their signup and provides the promised value
Sales Page: Presents your paid offer
Order Form: Collects payment information
Confirmation Page: Confirms the purchase and sets expectations
Systeme.io includes a funnel builder that lets you create these step-by-step journeys without coding. You can visualize your entire funnel on one screen and see how the pages connect. This visual approach helps beginners understand the logic of online selling.
The platform includes funnel templates for common scenarios:
Lead Magnet Funnel: Grow your email list
Sales Page Funnel: Sell a single product
Webinar Funnel: Host automated or live webinars
Product Launch Funnel: Build anticipation for a new product
Membership Funnel: Recruit ongoing members
Each template is pre-built and ready to customize. You add your own copy, images and branding. This template approach accelerates your progress enormously because you’re not trying to figure out what pages you need. The template shows you the proven structure and you fill in your unique details.
Course Hosting: Share Your Knowledge
Many beginners want to create and sell online courses. Systeme.io includes a course hosting feature that lets you:
Upload video lessons
Create text-based lessons
Add quizzes and assessments
Drip content on a schedule
Track student progress
The course interface is clean and student-friendly. It’s not as feature-rich as dedicated course platforms like Teachable but it’s completely adequate for most courses. And remember, you’re getting this course hosting included with your sales funnels and email marketing at no extra cost.
One significant advantage for beginners: you can create a course on Systeme.io even on the free plan. Most dedicated course platforms charge monthly fees from day one. With Systeme.io, you can build your course, test it with a small group and validate your idea before committing to any ongoing expenses.
Pricing: What Happens When You Outgrow the Free Plan?
Let’s talk money. Eventually, if you’re building successfully, you’ll need to upgrade. Here’s what Systeme.io charges:
Startup Plan: $27/month
Up to 5,000 contacts
10 sales funnels
Unlimited courses
Affiliate program management
Evergreen webinars
Remove Systeme.io branding
Webinar Plan: $47/month
Up to 10,000 contacts
50 sales funnels
Everything in Startup plus advanced webinar features
Unlimited Plan: $97/month
Unlimited contacts
Unlimited funnels
Unlimited everything
Priority support
For perspective, ClickFunnels charges $97/month for its basic plan and $297/month for its full-featured plan. ActiveCampaign charges $29/month to start but that price increases significantly as your contact list grows, often reaching $100-200/month once you pass a few thousand subscribers.
Systeme.io’s pricing is transparent and predictable. You know exactly what you’ll pay at each tier. There are no surprise price increases when your list grows. The Unlimited plan at $97/month stays at $97/month whether you have 10,000 contacts or 100,000 contacts.
This pricing structure is particularly beginner-friendly because:
You start free: No upfront investment required
Upgrades are milestone-based: You only upgrade when your business has grown to need more capacity
The cost is justified by revenue: By the time you need to upgrade, you should be making money that justifies the expense
It’s cheaper than piecing together separate tools: Even at $97/month, you’re saving money compared to buying separate tools for email, funnels, courses and automation
The Honest Drawbacks You Should Know
I promised you honesty and that means addressing the limitations. Systeme.io is excellent for beginners but it’s not perfect. Here are the genuine drawbacks you should consider:
Design Flexibility Is Limited
If you’re a designer or you have very specific aesthetic requirements, Systeme.io’s templates and builder might feel restrictive. The customization options are adequate but not extensive. You can change colors, fonts, layouts and spacing but you won’t have pixel-perfect control.
For most beginners, this limitation is actually a blessing in disguise. It forces you to focus on your message and your offer rather than obsessing over design details that rarely impact conversions as much as you think they will. But if design is critically important to you, you should know this going in.
The Editor Can Feel Basic
The drag-and-drop editor works well but it doesn’t have all the bells and whistles of premium builders. You won’t find fancy animations, complex grid layouts or advanced design elements. It’s functional and clean but not fancy.
Again, for beginners, this simplicity can be advantageous. You’re less likely to waste hours playing with design features when you should be writing compelling copy and making your first sales.
Some Advanced Marketing Features Are Missing
If you’re coming from an advanced marketing automation platform, you might notice that Systeme.io lacks some sophisticated features like:
Complex behavioral automation triggers
Advanced split testing for every element
Detailed attribution tracking
Native integration with every possible third-party tool
For beginners, these missing features are largely irrelevant. You’ll be focused on building your email list, creating your first product and making your first sales. The advanced features become important later, and by that time, you’ll have the knowledge and revenue to choose whether Systeme.io still fits your needs or whether you need to graduate to more advanced tools.
The Community and Support Are Growing But Not Massive
Compared to massive platforms like WordPress or ClickFunnels, Systeme.io’s community and support ecosystem are smaller. You’ll find helpful resources and responsive support but you won’t find thousands of third-party tutorials, plugins and service providers.
For some beginners, this smaller ecosystem feels reassuring because there’s less noise and fewer contradictory opinions. For others who want extensive hand-holding, the smaller community might feel limiting.
Real Use Cases: What Beginners Are Building with Systeme.io
Theory is one thing. Real-world application is what matters. Here are legitimate business models that beginners are building successfully on Systeme.io:
Affiliate Marketing Blogs
Many beginners start with affiliate marketing because it requires no product creation. You promote other people’s products and earn commissions. With Systeme.io, you can:
Build a blog to attract organic search traffic
Create opt-in funnels to capture email subscribers
Nurture your list with valuable email content
Promote affiliate products through email campaigns and dedicated sales funnels
The free plan is perfect for this model because you’re not selling your own product initially. You’re building your audience and earning affiliate commissions while learning.
Digital Product Sellers
If you have expertise in any area, you can create and sell digital products like ebooks, templates, courses or coaching programs. Systeme.io lets you:
Host your course or digital product
Build sales funnels to sell it
Collect payment directly (Systeme.io integrates with Stripe and PayPal)
Deliver the product automatically after purchase
Email customers with updates and additional offers
Service Providers and Coaches
Consultants, coaches and service providers can use Systeme.io to:
Build a professional landing page
Capture leads through an opt-in funnel
Nurture leads with email sequences
Book appointments (through integration with scheduling tools)
Sell coaching packages or consulting services
Membership Sites and Communities
If you want to build a recurring revenue membership, Systeme.io provides:
Membership site hosting
Drip content release on a schedule
Member management
Recurring payment processing
Exclusive member communications
Comparing Systeme.io to Other Beginner-Friendly Platforms
Context matters. To truly understand whether Systeme.io is good for beginners, we should compare it to alternatives.
Systeme.io vs. ClickFunnels
ClickFunnels is the 800-pound gorilla of sales funnel builders. It’s powerful, popular and expensive. Here’s how they compare for beginners:
ClickFunnels Advantages:
More polished interface
Larger community and more third-party resources
More template variety
Better split testing capabilities
Systeme.io Advantages:
Free plan (ClickFunnels has no free option)
Much more affordable ($27/month vs. $97/month)
Includes email marketing (ClickFunnels doesn’t)
Simpler interface for beginners
Includes course hosting (ClickFunnels doesn’t)
Verdict for Beginners: Unless you have a substantial budget from day one, Systeme.io is the smarter choice. You can build the same essential funnels and you get email marketing and course hosting included. You sacrifice some polish and advanced features but you save thousands of pounds in your first year.
Systeme.io vs. ConvertKit + Teachable
Some beginners consider piecing together specialized tools. A common combination is ConvertKit for email marketing and Teachable for course hosting. Let’s compare:
ConvertKit + Teachable:
ConvertKit: $15/month for up to 300 subscribers (increases with list size)
Teachable: $29/month basic plan or 10% transaction fees on free plan
Combined cost: $44/month minimum
Separate logins and learning curves for each platform
Systeme.io:
$0 to start
$27/month for Startup plan when you need it
Single login and unified interface
Includes sales funnels in addition to email and courses
Verdict for Beginners: Systeme.io is more beginner-friendly and more affordable. The unified platform means less complexity and lower costs. You only consider splitting into specialized tools once you’ve validated your business and need advanced features.
Systeme.io vs. Kajabi
Kajabi is a premium all-in-one platform similar to Systeme.io but positioned for established businesses. It starts at $149/month.
Kajabi Advantages:
More sophisticated design options
Better brand customization
Advanced analytics
Better reputation among high-ticket coaches
Systeme.io Advantages:
Free plan to start
Much more affordable at every tier
Easier learning curve
Perfectly adequate for validating your business idea
Verdict for Beginners: Kajabi is overkill and overpriced for beginners. If you have $149/month to invest before making any revenue, you could use that money for paid traffic to test your offers faster. Start with Systeme.io and graduate to Kajabi only if your business outgrows Systeme.io’s capabilities.
The Integration Question: Does Systeme.io Play Nice with Other Tools?
Even with an all-in-one platform, you might need to connect external tools occasionally. How does Systeme.io handle integrations?
The honest answer: adequately but not extensively. Systeme.io offers native integrations with essential services like:
Stripe (payment processing)
PayPal (payment processing)
Zapier (connects to 3,000+ other apps)
Webhooks (for custom integrations)
Through Zapier, you can connect Systeme.io to virtually any other tool you might need. Common integrations include:
Facebook Lead Ads
Google Sheets
Calendly (appointment scheduling)
Zoom (webinar hosting)
Slack (notifications)
The Zapier integration is a double-edged sword for beginners. On one hand, it provides massive flexibility. On the other hand, it’s another tool to learn and it incurs an additional monthly cost if you exceed Zapier’s free tier.
My recommendation for beginners: use Systeme.io’s built-in features as much as possible. Only integrate external tools when you have a specific need that Systeme.io can’t fulfill. This keeps your tech stack simple and your costs low.
Mobile Experience: Can You Run Your Business from Your Phone?
Most beginners want some mobile flexibility. Life is busy and the ability to check stats, respond to subscribers or make quick updates from your phone is valuable.
Systeme.io offers a mobile-responsive web interface but no dedicated mobile app. You can access your account from your phone’s browser and perform most tasks but the experience is optimized for desktop.
What works well on mobile:
Checking statistics and analytics
Reading and responding to affiliate applications
Viewing contact information
Sending broadcast emails (if you keep them simple)
What’s challenging on mobile:
Building or editing funnels (the drag-and-drop editor is awkward on small screens)
Creating detailed email sequences
Editing course content
Reality check for beginners: You’ll want a laptop or desktop computer for the actual building work. Your phone is fine for monitoring and quick tasks but serious business building requires a proper keyboard and screen. This is true regardless of which platform you choose.
How Long Does It Take to Learn Systeme.io?
This is the question every beginner really wants answered. If you dedicate focused time to learning Systeme.io, here’s a realistic timeline:
Day 1-2: Basic Orientation (2-3 hours)
Set up your account
Explore the dashboard
Watch the official “Getting Started” tutorial
Understand the key sections (Contacts, Campaigns, Funnels)
Week 1: First Funnel (5-8 hours)
Choose a funnel template
Customize the landing page with your copy
Set up your opt-in form
Create a simple thank-you page
Connect your domain (if you have one)
Test your first funnel
Week 2: Email Marketing Basics (4-6 hours)
Create your first email list
Write and send a broadcast email
Set up a basic email sequence
Learn about tags and segmentation
Review email analytics
Week 3-4: Sales Funnel and Payment (6-10 hours)
Create a sales page
Add a product with pricing
Connect Stripe or PayPal
Build a complete sales funnel
Test the entire buying process
Month 2: Advanced Features (10-15 hours)
Explore automation rules
Set up affiliate program (if applicable)
Create a course (if applicable)
Experiment with additional funnels
Optimize based on initial data
Total time investment to competency: 30-45 hours over 2 months
This is completely reasonable for beginners. You’re not trying to master rocket science. You’re learning to use software that’s specifically designed to be accessible. Compare this to learning WordPress, which can easily require 80-100 hours to achieve similar competency when you factor in hosting, themes, plugins and security.
The key is consistency. Spending 30 minutes per day learning Systeme.io will get you further than sporadic 3-hour sessions once a week. Build momentum by accomplishing small tasks daily.
After researching how beginners use Systeme.io, I’ve identified several common mistakes that slow progress:
Mistake 1: Obsessing Over Design Before Testing
Beginners often spend weeks making their pages “perfect” before launching. They tweak colors, fonts and layouts endlessly. The problem? None of this matters until you have traffic. No amount of design polish will help if your offer isn’t compelling or if you have no visitors.
Better approach: Use a template, add your essential content and launch. Get real feedback from real visitors. Optimize based on data, not assumptions.
Mistake 2: Building Everything Before Validating Anything
Some beginners want to build their entire course, all their funnels and a complete email sequence before making their first sale. This is backwards.
Better approach: Build the minimum viable funnel. Create a compelling offer page and a simple opt-in. Drive some traffic. Make some initial sales. Then build additional content based on what your early customers tell you they need.
Mistake 3: Ignoring Email List Building
Beginners sometimes focus exclusively on their sales pages while neglecting email list building. This is shortsighted. Your email list is your most valuable asset.
Better approach: Make email capture your primary goal initially. Build trust with consistent valuable emails. Then present offers to your engaged email list. This approach has a higher conversion rate than cold traffic to sales pages.
Mistake 4: Expecting Overnight Results
No platform, including Systeme.io, will generate automatic income. The tool is just that, a tool. Your success depends on your strategy, your offer, your marketing and your persistence.
Better approach: Set realistic expectations. Plan for 3-6 months of consistent effort before meaningful income. Focus on leading indicators (email subscribers, engagement rates, website traffic) rather than revenue in your first months.
Mistake 5: Not Using Available Support Resources
Systeme.io provides tutorials, documentation and a community. Beginners who struggle often do so in isolation instead of seeking help.
Better approach: When stuck, first check the Systeme.io knowledge base. Join the Facebook community. Ask questions. Learn from others who have already solved the problems you’re facing.
Want to Start Your Online Business the Right Way?
If you’re feeling inspired but also a bit overwhelmed, that’s completely normal. Starting an online business involves more than just choosing the right software. You need a clear strategy and step-by-step guidance.
I’ve created a comprehensive guide to starting your online business that covers everything from choosing your niche to creating your first offer to driving your initial traffic. If you’re looking for a proven path forward, that’s the best place to start.
And if you decide Systeme.io is the right platform for your business, you can learn more about how Systeme.io delivers on its promises and how to use it effectively.
The Verdict: Is Systeme.io Actually Good for Beginners?
After this comprehensive analysis, we can now definitively answer the central question: Is Systeme.io Good for Beginners?
Yes, Systeme.io is exceptionally good for beginners, and here’s why:
The Compelling Reasons
1. Zero Financial Risk
The permanent free plan means you can start building without spending a penny. This removes the financial pressure that causes many beginners to quit before they’ve given themselves a real chance.
2. Consolidated Complexity
Instead of managing multiple tools with multiple logins, you have everything in one place. This reduces technical overwhelm significantly.
3. Gentle Learning Curve
The interface is intuitive and the templates provide helpful starting points. You’re not staring at blank canvases wondering what to build.
4. Room to Grow
The paid plans provide increasing capacity as your business expands. You won’t outgrow Systeme.io the moment you start succeeding.
5. Honest Value Proposition
Unlike platforms that nickel-and-dime you with add-ons and increasing fees, Systeme.io’s pricing is transparent and affordable at every stage.
If aesthetic perfection is your priority, you might feel constrained by the design options.
2. Not the Most Feature-Rich
Advanced marketers who need sophisticated automation and extensive integrations might find it limiting.
3. Smaller Ecosystem
The community and third-party support are growing but not as extensive as platforms like WordPress or ClickFunnels.
The Bottom Line
For beginners who are:
Working with limited budgets
Looking for simplicity over sophistication
Focused on fundamentals rather than advanced tactics
Willing to learn and grow with a platform
Building affiliate sites, courses, digital products or service-based businesses
Systeme.io is arguably the best all-in-one platform available in 2025.
You’re not sacrificing essential functionality. You’re not taking on crippling monthly expenses. You’re not drowning in unnecessary complexity. You’re getting a solid, capable platform that does exactly what most beginners need it to do: help you build and launch your online business.
The question isn’t whether Systeme.io is good enough. The question is whether you’ll actually use it consistently to build something real. The tool is ready. The platform is capable. The only variable is you and your willingness to show up, do the work and persist through the inevitable challenges that every beginner faces.
Taking Action: Your Next Steps
If you’ve decided that Systeme.io aligns with your needs and goals, here’s your immediate action plan:
Step 1: Create Your Free Account
Visit Systeme.io and sign up for the free plan. It takes about 2 minutes and requires no credit card.
Step 2: Complete the Setup Wizard
Follow the initial setup prompts to configure your account basics.
Step 3: Choose Your First Project
Decide whether you’re building:
An email list building funnel
A sales funnel for a digital product
A course
A membership site
Pick one. Don’t try to build everything at once.
Step 4: Select a Template
Browse the template library and choose a funnel template that matches your project.
Step 5: Customize and Launch
Spend a few hours customizing the template with your content. Don’t aim for perfection. Aim for done. Launch it even if it feels incomplete.
Step 6: Drive Initial Traffic
The best platform in the world is useless without visitors. Start driving traffic through:
Organic social media
SEO-optimized blog content
Guest posting
Participation in online communities
Small paid traffic tests (when budget allows)
Step 7: Learn and Iterate
Track what happens. How many visitors? How many opt-ins? What’s your conversion rate? Learn from the data and make improvements.
Final Thoughts: The Real Question You Should Be Asking
After reading 3,000+ words analyzing whether Systeme.io is good for beginners, I want to leave you with a perspective shift.
The question “Is Systeme.io good for beginners?” is actually less important than the question “Will I consistently use the tools available to me to build a real business?”
I’ve seen beginners succeed with basic tools because they were consistent, strategic and persistent. I’ve seen others fail with the most expensive, sophisticated platforms because they lacked clarity, commitment or consistency.
Systeme.io gives you everything you need to build a profitable online business. The free plan alone is more capable than tools that existed just five years ago at any price. The paid plans are affordable and provide room to scale.
The tool is ready. The platform is waiting. The only question that matters is: will you actually do the work?
If you’re the kind of person who shows up, learns, adapts and persists through challenges, then Systeme.io is absolutely good for beginners like you. It will serve you well for months or potentially years as you build, grow and eventually succeed in your online business journey.
Now stop researching and start building. Your future business is waiting for you to take the first step.
One of the biggest myths about affiliate marketing is that you need money to get started. I see this misconception everywhere, people convinced they need to buy expensive courses, pay for fancy websites or invest in paid advertising before they can earn their first commission. But here’s the truth I’ve learned through my own experience and watching countless others succeed: you absolutely can figure out how to start affiliate marketing with $0 budget. It won’t be easy and it will require more time and creativity than if you had money to invest, but it’s completely possible. In this guide, I’ll show you the exact steps to launch your affiliate marketing business without spending a single pound, including the free tools you’ll use, how to get traffic without ads and the realistic timeline you should expect.
Why Starting with $0 Is Actually Possible (And Sometimes Better)
Let me start by addressing the elephant in the room: yes, having money to invest makes things faster and easier. You can buy tools, pay for advertising and outsource tasks you don’t want to do. But starting with zero budget has some surprising advantages that people rarely talk about.
You learn the fundamentals deeply. When you can’t throw money at problems, you’re forced to understand how affiliate marketing actually works. You learn SEO instead of relying on paid ads. You develop content creation skills instead of hiring writers. These skills become assets that compound over time.
You avoid expensive mistakes. Many beginners waste thousands on courses they never finish, tools they don’t need and ads that don’t convert. Starting with $0 means you can’t make these costly errors. You build slowly and only invest money once you’re making money.
You prove the concept before investing. Getting your first affiliate commission with zero investment proves that your strategy works. Then, when you do have money to invest, you’re scaling something proven rather than gambling on unproven ideas.
You build genuine content. Without money for ads, you’re forced to create content that provides real value to attract organic traffic. This builds trust and authority that paid traffic alone never achieves.
The catch? It takes longer. Where someone with a budget might see results in 30 to 60 days, the $0 approach might take 3 to 6 months. But if you’re willing to exchange time for money upfront, you can absolutely succeed.
Before we dive into the how-to, let’s establish realistic expectations. I don’t want to sugarcoat this or make false promises.
Timeline:
Month 1: You’ll be setting up and creating initial content. Don’t expect earnings.
Month 2: You might get your first clicks, probably no sales yet.
Month 3: Possibly your first commission (£10 to £50 range).
Months 4-6: Earnings will be modest, maybe £50 to £200/month if you’re consistent.
Months 7-12: This is where momentum builds. £200 to £1,000+/month becomes realistic.
Time Investment: With zero budget, you’re trading time for money. Plan to invest:
10 to 15 hours per week minimum
More is better, especially in the first 90 days
Consistent effort matters more than occasional marathons
What You’ll Be Doing:
Creating content (blog posts, videos, social media)
Learning SEO and keyword research
Engaging in communities
Testing and optimising
Building an email list
Responding to comments and messages
What Won’t Happen:
Overnight success or “passive income” in the first month
Thousands of pounds in earnings in your first 90 days
Completely hands-off automation from day one
Going viral by accident
If these expectations sound reasonable and you’re willing to commit, let’s get into the practical steps.
Step 1: Choose Your Niche (The Right Way)
Your niche is the topic area you’ll focus on. This decision matters more than almost anything else because it determines your audience, competition level and earning potential.
The Three Criteria for a Good $0 Budget Niche
Criterion 1: You have genuine knowledge or interest. You’ll be creating lots of content, so pick something you can talk about extensively. Don’t choose “make money online” just because it’s popular if you have zero experience. Choose something you actually know about or are genuinely willing to learn deeply.
Criterion 2: Products exist that you can promote. Go to Amazon Associates, ClickBank or ShareASale and search for products in your potential niche. If you find multiple products with decent commission rates, that’s a green light.
Criterion 3: You can compete with free traffic methods. Some niches are so competitive that ranking in Google or getting social media traction is nearly impossible without a budget. Look for niches where:
Long-tail keywords (3+ words) have low competition
Questions are being asked on Reddit, Quora and forums
YouTube has some coverage, but isn’t completely saturated
Based on these criteria, here are niches that work well with zero budget:
Home office productivity (standing desks, ergonomic chairs, productivity apps) Budget travel (backpacking gear, travel apps, budget accommodation) Sustainable living (eco-friendly products, zero waste, sustainable fashion) Pet care for specific breeds (equipment, food, training resources) Beginner fitness at home (home workout equipment, fitness apps, nutrition) Remote work tools (software, equipment, time management) Hobby-specific gear (photography for beginners, gardening, crafts)
Notice these are specific enough to target but broad enough to have multiple products to promote.
How to Validate Your Niche Idea
Before committing, spend 2-3 hours researching:
Keyword research using free tools like Google Keyword Planner, AnswerThePublic or Ubersuggest’s free tier. Can you find 20+ keywords with search volume under 1,000 per month? That’s your sweet spot.
Affiliate programs by searching “[your niche] affiliate programs” and checking Amazon Associates. Can you find at least 10 products to promote?
Content gaps by Googling your keywords and reading the top 10 results. Can you create better, more helpful content than what exists?
If you get three “yes” answers, proceed with that niche.
According to Neil Patel’s guide to niche selection, the most successful affiliate marketers focus on niches they have a personal connection to, as authenticity becomes your competitive advantage when you can’t compete on budget.
Step 2: Choose Free-Friendly Affiliate Programs
Not all affiliate programs are created equal when you have zero budget. Some require approved websites, minimum traffic levels or probationary periods. Here are the best options for absolute beginners.
Amazon Associates
Commission Rate: 1% to 10% depending on category Payment Threshold: £25 Cookie Duration: 24 hours
Why It’s Good for $0 Budget:
Accepts complete beginners
Millions of products to promote
People trust Amazon and buy readily
Easy to get approved
Limitations:
Low commission rates in most categories
Short cookie window means you only earn if they buy within 24 hours
Must generate at least 3 sales within 180 days to stay active
How to Use It: Amazon works best when you’re reviewing physical products or creating buying guides. The conversion rate is high because people already trust Amazon, even if the commission is low.
ClickBank
Commission Rate: 50% to 75% on digital products Payment Threshold: £10 Cookie Duration: 60 days
Why It’s Good for $0 Budget:
No approval needed
High commission rates
Longer cookie duration
Low payment threshold
Limitations:
Many low-quality products
Refund rates can be high
Less brand trust compared to Amazon
How to Use It: ClickBank works for digital products like courses, ebooks and software. Choose products with low refund rates (under 5%) and good gravity scores (showing others are successfully promoting them).
ShareASale
Commission Rate: Varies widely (5% to 30% typically) Payment Threshold: £50 Cookie Duration: Varies by merchant
Why It’s Good for $0 Budget:
Reputable brands
Good commission rates
Professional network
Many merchants accept beginners
Limitations:
Application process (not instant approval)
Higher payment threshold
Need to apply to individual merchants
How to Use It: ShareASale is excellent for niche-specific products. Search by category and apply to 5-10 merchants relevant to your niche.
High-Ticket Affiliate Programs (Advanced)
Once you have some content and authority, consider:
Web hosting (Bluehost, HostGator): £50 to £100+ per sale
SaaS tools (Systeme.io, ConvertKit): 30% to 60% recurring commissions
Online courses (Teachable, Thinkific): 30% to 50% commissions
These require more established platforms but offer significantly better earnings per conversion.
Step 3: Set Up Your Free Platform
You need somewhere to publish content. Here are your genuinely free options:
Option 1: Medium (Easiest to Start)
Cost: £0 Best For: Writers who want to start immediately
Medium is a blogging platform where you can publish articles for free. You don’t need to build a website or worry about hosting.
Pros:
Start publishing in 5 minutes
Built-in audience who might discover your content
Clean, professional design
No technical knowledge needed
Cons:
You don’t own the platform
Limited customization
Harder to build a branded business
Medium’s algorithm controls visibility
How to Use It: Create a free account, start publishing quality content targeting long-tail keywords and include your affiliate links (with proper disclosure). Focus on solving specific problems.
Option 2: Blogger (Google’s Free Platform)
Cost: £0 Best For: People wanting their own site without cost
Blogger is Google’s free blogging platform. You get a subdomain (yourname.blogspot.com) and basic website functionality.
Pros:
Completely free hosting
Owned by Google (won’t disappear)
Some SEO benefits from Google
Basic but functional
Cons:
Looks dated compared to modern sites
Limited customization
Subdomain isn’t as professional
Fewer features than paid platforms
How to Use It: Set up your blog, choose a simple template and start publishing content. You can upgrade to a custom domain later if you start earning.
Option 3: YouTube (Best for Video Creators)
Cost: £0 Best For: People comfortable on camera or creating screen recordings
YouTube is ideal if you prefer video content over written articles.
Pros:
Massive built-in audience
Google owns it (shows up in search)
People trust video reviews
Can build an audience faster than blogging
Cons:
Need to be on camera or create engaging screen content
Requires video editing skills (basic but still a learning curve)
Takes 1,000 subscribers before you can monetise with ads (though affiliate links work immediately)
How to Use It: Create product review videos, comparison videos, tutorial content or “best of” roundups. Include affiliate links in the description with clear disclosure.
Option 4: Social Media (Facebook, Instagram, TikTok, Pinterest)
Cost: £0 Best For: Building audience through engaging social content
You can build an entire affiliate business on social media without a website.
Pros:
Completely free
Fast audience growth potential
Engaging, visual content
Multiple platforms to leverage
Cons:
Platform algorithm changes can kill your reach
Don’t own your audience
Harder to rank in Google
Each platform requires different content styles
How to Use It: Choose one platform to start, create valuable niche-specific content consistently and include affiliate links in your bio or posts (where allowed). Pinterest and TikTok offer particularly good organic reach in 2025.
My Recommendation: Start with whichever platform matches your natural strengths. If you love writing, choose Medium or Blogger. If you’re comfortable on video, go with YouTube. If you’re visual and social, choose Instagram or TikTok. You can always expand to multiple platforms once the first is working.
Step 4: Create Your First Content
Now comes the most important part: creating content that attracts people and converts them into buyers.
The Types of Content That Convert Best
Product Reviews: Deep dive into a specific product, covering features, pros, cons, who it’s for and who it’s not for. These convert extremely well because people searching for reviews have buying intent.
Comparison Articles: “Product A vs Product B” or “Best [products] for [specific use case].” These capture people in the decision-making phase.
Tutorial Content: “How to [solve problem] using [product].” Shows the product in action and provides value beyond just selling.
Buying Guides: “Ultimate Guide to Buying [product category].” Comprehensive content that establishes authority and naturally includes multiple affiliate links.
Problem/Solution Posts: Identify a specific problem your audience has and present a product as part of the solution.
The Content Creation Process (With $0)
Step 1: Keyword Research (30 minutes)
Use free tools:
Google Keyword Planner (requires a Google Ads account, but you don’t have to run ads)
AnswerThePublic (shows questions people ask)
Google autocomplete (type your topic and see what Google suggests)
Reddit search (find actual questions in relevant subreddits)
Find keywords with:
100 to 1,000 monthly searches
Low competition (when you Google them, you see forums, old articles or weak content ranking)
Clear buying intent (words like “best,” “review,” “vs,” “worth it”)
Step 2: Content Outline (15 minutes)
Google your target keyword and open the top 5 results. Note:
What subtopics do they all cover?
What questions do they answer?
What’s missing that you could add?
Create an outline that covers everything they do plus at least one unique angle they don’t.
Step 3: Write or Record (2-3 hours)
For written content, aim for 1,500 to 2,500 words. For video, 8 to 15 minutes.
Include:
Personal experience, if possible (even if limited)
Specific details and examples
Honest pros and cons
Clear recommendation
Proper affiliate disclosure
Use free AI writing tools if helpful:
ChatGPT (free tier) for outlines and research
Grammarly (free) for editing
Hemingway App (free) for readability
Step 4: Optimize for SEO (30 minutes)
Include the target keyword in the title, the first paragraph and 2-3 headings
Add keyword variations naturally throughout
Use descriptive subheadings (H2, H3 tags)
Keep paragraphs short (2-4 sentences)
Add a meta description if your platform allows it
Step 5: Add Affiliate Links (15 minutes)
Insert affiliate links naturally in context
Use 2-4 links per article (don’t spam)
Make link text descriptive (“check current price on Amazon” not “click here”)
More content means more opportunities to rank, get traffic and earn commissions. With $0 budget, volume becomes your advantage.
According to HubSpot’s content marketing research, businesses publishing 16+ blog posts per month get 3.5x more traffic than those publishing 0-4 posts, demonstrating how volume creates compounding returns.
Step 5: Drive Free Traffic
Content alone won’t make you money. You need people to see it. Here’s how to get traffic without spending on ads.
SEO (Search Engine Optimization)
Timeline: 2-6 months to see significant results Effort: High upfront, compounds over time
SEO is the process of ranking your content in Google so people find it when searching.
How to Do It for Free:
Target long-tail keywords with low competition
Create comprehensive content better than current top results
Optimize on-page elements (title, headings, meta description)
Build internal links between your articles
Get backlinks by guest commenting, forum participation and creating link-worthy content
Be patient as Google takes 2-6 months to fully index and rank new content
Email 1 (Immediate): Deliver the lead magnet and set expectations
Email 2 (Day 2): Share helpful tip related to your niche
Email 3 (Day 4): Tell a story about a problem you solved
Email 4 (Day 7): Recommend a specific product that helps (affiliate link)
Email 5 (Day 10): Answer common objections about the product
Then weekly emails mixing value and promotion (80% value, 20% promotion).
Backlinko’s email marketing guide demonstrates that email lists built through authentic value provision convert at significantly higher rates than lists built through aggressive tactics.
Step 7: Track and Optimize
You can’t improve what you don’t measure. Here’s what to track with free tools:
Traffic Tracking
Google Analytics (free)
Install on your blog/website
Track visitor numbers, sources and behavior
See which content performs best
YouTube Analytics (built-in)
Watch time, click-through rates and demographics
See which videos drive most engagement
Social Media Insights (built-in on all platforms)
Track reach, engagement and follower growth
Identify best-performing content types
Affiliate Performance
Affiliate Dashboard
Check clicks and conversion rates weekly
Identify which content drives sales
Note which products convert best
Spreadsheet Tracking
Track earnings per content piece
Calculate ROI on time invested
Identify patterns in successful content
What to Optimize
After 30-60 days of content creation, analyze:
Content performance: Which posts get the most traffic? Create more like those.
Traffic sources: Which channels drive most visitors? Double down on those.
Conversion rates: Which posts drive sales? Optimize those further and create similar content.
Products: Which affiliate products convert best? Focus more on promoting those.
Keywords: Which keywords rank fastest? Target similar difficulty levels.
Here’s a realistic roadmap for starting affiliate marketing with $0 budget:
Days 1-7: Foundation
Choose your niche (Day 1-2)
Research affiliate programs (Day 3)
Set up free platform (Day 4)
Create lead magnet (Day 5-6)
Set up email service (Day 7)
Days 8-30: Content Sprint
Publish 2-3 pieces of content per week (8-12 total)
Focus on product reviews and comparison articles
Set up Google Analytics/Search Console
Join 5-10 Facebook groups in your niche
Create Pinterest account and first 10 pins
Days 31-60: Traffic Building
Continue publishing 2-3 pieces weekly (16-24 total pieces now)
Answer 3-5 questions daily on Reddit/Quora
Share content in Facebook groups (when genuinely helpful)
Create 20+ Pinterest pins
Start YouTube if video-comfortable (or continue doubling down on written content)
Engage with all comments on your content
Days 61-90: Optimization
Continue content creation (30+ pieces total by day 90)
Analyze what’s working in Google Analytics
Double down on best-performing traffic sources
Update and improve top-performing content
Build internal links between related articles
Start basic email sequence to list
Celebrate first commission (likely happens in this window)
Expected Results by Day 90:
30-50 pieces of content published
1,000-5,000 monthly pageviews
20-100 email subscribers
1-10 affiliate sales (£50-£500 total earnings)
Clear sense of what’s working to scale in months 4-6
When to Invest Money (After Proving Concept)
Once you’ve made your first £100-£500 in affiliate commissions with $0 investment, you’ve proven the concept works. Now strategic investments accelerate growth:
First £50: Custom domain name (£10-15/year) and upgrade to better hosting or platform
First £100: Premium email marketing tool to scale your list
First £500: Paid keyword research tools like Ahrefs or SEMrush
First £1,000: Outsource content creation to scale volume while maintaining quality
First £3,000: Begin testing paid traffic (Facebook/Google ads) to scale what’s working
But don’t skip the $0 phase. Learning to succeed without money teaches you skills that compound when you do have budget.
Ready to Build Your Online Business the Right Way?
Starting with $0 budget is challenging but completely doable. If you want a comprehensive roadmap covering not just affiliate marketing but building a sustainable online business from scratch, visit my complete getting started guide where I walk you through every step in detail.
Real Talk: The Mindset You Need
Let me be brutally honest about what it takes to succeed at how to start affiliate marketing with $0 budget.
You’ll work harder than people with budgets. They can pay for traffic and tools. You’re trading time for money.
You’ll question whether it’s working. Weeks will pass with zero sales. That’s normal. Most people quit here.
You’ll be tempted by shortcuts. Ignore them. Sustainable success comes from consistent value creation, not tricks.
You’ll see others making more, faster. They likely invested money you don’t have. Don’t compare their month 3 with paid ads to your month 3 with $0.
You’ll need discipline over motivation. Motivation fades after week 2. Discipline keeps you publishing content on week 8 when you’ve made £0.
But here’s what makes it worth it: when you earn your first commission without spending a penny, you’ve proven something powerful. You’ve built a real skill that can scale. You’ve created something from nothing.
That first £20 commission feels better than £200 you spent £1,000 in ads to generate. Because it’s pure proof that you can do this.
Final Thoughts
Learning how to start affiliate marketing with $0 budget isn’t about finding a hack or secret loophole. It’s about understanding fundamentals, providing genuine value and being more consistent than everyone who quits after 30 days. You have everything you need to start right now. Free platforms, free tools, free traffic methods and free education through articles like this. The only investment required is your time and commitment. Start with one platform, create one piece of valuable content and take the first step today. Your first commission might be months away, but the only way to get there is to begin. Every successful affiliate marketer started exactly where you are now, staring at a blank page wondering if this will work. The difference between those who succeed and those who don’t isn’t talent or luck. It’s simply refusing to quit before the compound effect kicks in. So choose your niche, create your first piece of content and commit to the 90-day plan. I’ll be here supporting you along the way.
Best AI Writing Tools for Affiliate Marketing: 7 Tools That Actually Convert in 2025
If you’re building an affiliate marketing business, you already know that content is everything. You need blog posts, product reviews, email sequences, social media captions and ad copy. The problem? Creating all that content takes forever. That’s where AI writing tools come in. But here’s what nobody tells you: not all AI writers are created equal and most aren’t optimized for affiliate marketing specifically. After testing dozens of platforms over the past year, I’ve narrowed down the best AI writing tools for affiliate marketing that actually help you write content that converts, not just content that exists. In this guide, I’ll show you exactly which tools are worth your money and how to use them to scale your affiliate business without sacrificing quality.
Why Affiliate Marketers Need AI Writing Tools
Let’s be real about what affiliate marketing requires from a content perspective. You’re not just writing one or two articles and calling it done. Successful affiliate marketers are consistently producing:
Product reviews that need to be detailed, honest and helpful
Comparison articles that require research and balanced analysis
Email sequences that nurture leads and promote offers without being pushy
Social media posts across multiple platforms with different tones and formats
Landing page copy that converts visitors into clicks
SEO-optimized blog posts that rank in Google and drive organic traffic
Doing all of this manually is exhausting. Even experienced writers struggle to produce more than 2 to 3 high-quality articles per week while maintaining a full-time job or other responsibilities.
AI writing tools change the game by:
Speeding up the writing process by 3 to 5 times
Generating first drafts that you can edit and refine
Overcoming writer’s block when you’re staring at a blank page
Maintaining consistency across multiple content pieces
Scaling content production without hiring a full writing team
But here’s the critical point: AI tools are assistants, not replacements. The best affiliate content still requires human insight, personal experience and strategic thinking. AI handles the heavy lifting while you focus on the parts that matter most, your unique perspective and strategic positioning.
What Makes a Good AI Writing Tool for Affiliate Marketing?
Before I share my top picks, let’s establish what actually matters when choosing an AI writer for affiliate work:
Content Quality and Natural Language
The AI needs to produce text that sounds human, not robotic. Google’s algorithms are getting better at detecting AI-generated content that lacks depth or originality. You need tools that create readable, engaging copy that provides real value.
SEO Optimization Features
Affiliate marketing lives or dies on organic traffic. Your AI tool should help with:
Keyword integration that sounds natural
Meta descriptions that drive clicks
Content structure optimized for search engines
Heading hierarchy that makes sense
Versatility Across Content Types
You’re not just writing blog posts. You need:
Long-form articles (1,500+ words)
Product descriptions
Email copy
Social media captions
Ad copy
Landing page content
Affiliate-Friendly Output
Some AI tools are trained on generic content. The best ones for affiliate marketing understand:
Product comparison structures
Review formats that convert
How to present pros and cons fairly
Call-to-action placement
Disclosure requirements
Cost Effectiveness
You’re probably not making thousands per month yet. The tool needs to fit your budget while providing enough usage to actually help you scale.
Ease of Use
If you’re spending hours learning the tool instead of creating content, it’s not worth it. The interface should be intuitive with a reasonable learning curve.
The 7 Best AI Writing Tools for Affiliate Marketing in 2025
After extensive testing with real affiliate content, here are my top recommendations ranked by overall value for affiliate marketers.
1. Rytr: Best Overall Value for Affiliate Marketers
Pricing: Free plan available, Premium at $9/month, Unlimited at $29/month
Why It’s Great for Affiliates:
Rytr consistently surprises me with how well it understands affiliate marketing content. Unlike some AI tools that produce generic fluff, Rytr generates content that actually sounds like something a real person would write.
Key Features:
40+ use cases including product descriptions, blog outlines and email content
SEO analyzer built in to optimize for search engines
Plagiarism checker to ensure originality
Multiple tone options (casual, professional, convincing, etc.)
Support for 30+ languages
Chrome extension for writing anywhere
What Makes It Special:
Rytr’s “Product Description” template is specifically designed for e-commerce and affiliate content. You input basic product details and it generates compelling descriptions that highlight benefits, not just features.
The blog post workflow is particularly strong. You can:
Generate an outline based on your topic
Expand each section with detailed content
Optimize for specific keywords
Check for plagiarism
Download or copy the final piece
Real Example:
I tested Rytr by asking it to write a review intro for a standing desk. The output:
“If you’ve been working from home and dealing with back pain, you’re not alone. After spending eight hours hunched over my laptop at a regular desk, I knew something had to change. That’s when I discovered the FlexiDesk Pro standing desk, and honestly, it’s transformed my entire workday. In this review, I’ll share my honest experience after using it for three months, including what I love, what could be better and whether it’s worth the investment.”
That’s usable content with minimal editing. It has personality, addresses pain points and sets expectations for the review.
Limitations:
The free plan is quite limited (10,000 characters per month, which is roughly 2,500 words). For serious affiliate marketers, you’ll need at least the Premium plan.
The AI occasionally produces repetitive content if you’re generating multiple pieces on similar topics. You’ll need to provide varied inputs to get diverse outputs.
Best For: Beginners to intermediate affiliate marketers who need affordable, versatile AI assistance across multiple content types.
Ready to Scale Your Affiliate Content Production?
Rytr offers the best balance of affordability, quality and features specifically useful for affiliate marketing. Check out my detailed Rytr review and tutorial to see exactly how I use it to create converting affiliate content.
2. Jasper AI: Most Powerful for Long-Form Content
Pricing: Creator plan at $49/month, Pro at $125/month
Why It’s Great for Affiliates:
Jasper (formerly Jarvis) is the heavyweight champion of AI writing tools. It’s more expensive but delivers higher-quality long-form content with better context retention.
Key Features:
Boss Mode for long-form content (up to 3,000 words in one document)
50+ templates including AIDA, PAS and other copywriting frameworks
SEO mode powered by Surfer SEO integration
Brand voice customization
Team collaboration features
Jasper Chat for conversational AI assistance
What Makes It Special:
Jasper’s Boss Mode is where it shines for affiliate content. Unlike basic AI writers that lose context after a few paragraphs, Boss Mode maintains coherence across entire articles.
The Surfer SEO integration is incredibly valuable. It analyzes top-ranking pages for your target keyword and suggests:
Ideal word count
Keywords to include
Content structure
Heading suggestions
This makes creating SEO-optimized affiliate content much faster.
Real Example:
I used Jasper to write a 2,000-word comparison article on “Best Budget Laptops for Students.” With the SEO mode active, it suggested related keywords I hadn’t considered and structured the content to match what was already ranking well. The first draft was about 70% ready to publish after my edits.
Limitations:
Jasper is expensive. If you’re not making at least $500 to $1,000 per month from affiliate marketing, the $49+ monthly cost will eat significantly into your profits.
The learning curve is steeper than simpler tools like Rytr. You’ll spend time figuring out which templates work best for your content types.
Best For: Established affiliate marketers making $1,000+ per month who need high-quality long-form content and can leverage the SEO integration.
3. Copy.ai: Best for Short-Form and Social Content
Pricing: Free plan available, Pro at $49/month
Why It’s Great for Affiliates:
Copy.ai excels at short-form content, making it perfect for social media promotion, email subject lines and ad copy, all critical for driving traffic to your affiliate content.
Key Features:
90+ templates for different content types
Blog post workflow for longer content
Social media post generator for multiple platforms
Email subject line generator
Product description templates
Freestyle mode for open-ended writing
What Makes It Special:
The social media content generator understands platform-specific requirements. Generate an Instagram caption and it’ll include hashtag suggestions. Create a Twitter post and it’ll keep it under character limits with engaging hooks.
For affiliate marketers promoting content across multiple social channels, this saves hours of repurposing time.
Real Example:
I needed to promote a blog post about productivity apps across Instagram, Facebook and Twitter. Copy.ai generated platform-specific posts in under two minutes:
Instagram: Engaging caption with emoji and hashtag strategy Facebook: Longer narrative style with question to drive comments Twitter: Punchy thread with clear value proposition
Each maintained the core message but adapted to platform norms.
Limitations:
Long-form content isn’t Copy.ai’s strength. While they’ve added blog post features, tools like Jasper and Rytr handle comprehensive articles better.
The free plan is very limited (2,000 words per month), so you’ll likely need the Pro plan.
Best For: Affiliate marketers who focus heavily on social media traffic and need to create lots of promotional content across multiple platforms.
4. Writesonic: Best for SEO-Focused Affiliate Content
Pricing: Free trial, Unlimited at $20/month, Business at $19/month (per 100,000 words)
Why It’s Great for Affiliates:
Writesonic is laser-focused on SEO, making it ideal for affiliate marketers who rely primarily on organic search traffic.
Key Features:
Article Writer 5.0 with one-click article generation
Built-in SEO optimization
Sonic Editor for real-time editing
Product descriptions specifically for Amazon listings
Landing page copy generator
Integration with Surfer SEO and SEMrush
What Makes It Special:
The Article Writer 5.0 can generate entire articles from just a topic and keywords. You provide:
Topic/title
Keywords to target
Desired tone
Article length
It researches the topic using real-time web data and creates a structured article with intro, body sections and conclusion.
Neil Patel’s guide to AI-powered SEO emphasizes that tools integrating real-time data and SEO analysis provide significant advantages for organic traffic growth.
Real Example:
I tested the Article Writer with “Best Noise Cancelling Headphones Under $200.” Within three minutes, it produced a 1,500-word article with:
Intro explaining why noise cancelling matters
5 product recommendations with features
Comparison table structure
Buying guide section
FAQ section
Conclusion with CTA
About 60% of it was usable with editing. The structure was solid and it included relevant information I would have researched manually.
Limitations:
While fast, the content can feel formulaic if you don’t customize the inputs. Multiple articles on similar topics will have similar structures.
The quality varies depending on how much information exists online about your topic. Niche or newer products get weaker coverage.
Best For: SEO-focused affiliate marketers who publish high volumes of product reviews and comparison articles.
5. ChatGPT Plus: Best for Versatility and Customization
Pricing: Free version available, ChatGPT Plus at $20/month
Why It’s Great for Affiliates:
ChatGPT isn’t specifically designed for affiliate marketing, but its conversational interface and flexibility make it incredibly useful once you learn to prompt it effectively.
Key Features:
GPT-4 access (much better than GPT-3.5)
Conversational interface for iterative improvements
Image generation with DALL-E
Web browsing capability (when enabled)
Plugin ecosystem for extended functionality
Custom instructions for consistent outputs
What Makes It Special:
The conversational nature means you can refine outputs in real time. If the first draft isn’t quite right, you can say “make it more casual” or “add more specific examples” and it adjusts.
For affiliate marketers, this is valuable because you can:
Start with an outline request
Expand each section individually
Request specific angles or perspectives
Ask it to rewrite sections that don’t work
Generate multiple variations of headlines or CTAs
Real Example:
I used ChatGPT to create an email sequence promoting a fitness affiliate product:
Me: “Write a 3-email welcome sequence for someone who just downloaded my free workout plan. I want to provide value first, then introduce my affiliate recommendation for home gym equipment in email 3.”
ChatGPT generated three emails with distinct purposes, appropriate delays and a natural progression from value to offer. I edited for my voice and specific details, but the structure and flow were excellent.
Limitations:
No built-in SEO tools or templates like purpose-built writing software. You need to know what to ask for.
The free version (GPT-3.5) produces noticeably lower-quality content than GPT-4. For serious affiliate work, the $20/month Plus subscription is necessary.
Requires learning prompt engineering to get consistently good results. There’s a skill to asking questions that produce useful outputs.
Best For: Experienced affiliate marketers comfortable with AI who want maximum flexibility and don’t mind crafting effective prompts.
6. Surfer AI: Best for Data-Driven SEO Content
Pricing: Starts at $29/month (requires Surfer SEO subscription)
Why It’s Great for Affiliates:
Surfer AI combines content generation with deep SEO analysis, creating articles specifically optimized to rank for your target keywords.
Key Features:
Generates articles based on SERP analysis
Automatic keyword integration
Content structure matching top-ranking pages
Real-time content score
Plagiarism detection
Integration with Jasper and other tools
What Makes It Special:
Surfer AI analyzes the top 10 to 50 pages ranking for your target keyword and creates content that matches their structure, depth and keyword usage while being original.
For affiliate keywords with high competition, this data-driven approach helps level the playing field against established sites.
Real Example:
Target keyword: “best standing desks for small spaces”
Surfer AI analyzed competitors and generated an article including:
Optimal word count (2,200 words based on competitor average)
Specific subtopics competitors covered (dimensions, weight capacity, price ranges)
Related keywords to include naturally
Image suggestions
FAQ section with questions people are asking
The result was a content blueprint that matched what Google expects for that keyword.
Limitations:
Requires separate Surfer SEO subscription, making it expensive combined with the AI add-on.
Works best for informational content. Product-specific reviews with personal experience still need significant manual input.
Best For: Serious affiliate marketers targeting competitive keywords who need every SEO advantage.
7. Frase: Best for Research-Heavy Affiliate Content
Pricing: Basic at $15/month, Team at $115/month
Why It’s Great for Affiliates:
Frase excels at research and content briefs, making it valuable when you’re writing about products you haven’t personally used but need to cover comprehensively.
Key Features:
AI research assistant that summarizes top-ranking content
Automatic content brief generation
Question research from forums and searches
Outline builder based on competitor analysis
AI writing assistant
Content optimization scoring
What Makes It Special:
The research capability is Frase’s standout feature. It scrapes and summarizes information from top-ranking articles, saving hours of manual research.
For affiliate marketers covering multiple products in emerging categories, this research speed is invaluable.
Real Example:
I needed to write about smart home security systems—a topic I hadn’t researched deeply. Frase:
Identified the top 20 ranking articles
Extracted key points from each
Organized information by topic clusters
Suggested questions people ask about the topic
Generated a content outline
Provided AI-written sections for each outline point
Within 30 minutes, I had comprehensive research and a solid draft to refine with my perspective.
Limitations:
The AI writing quality isn’t as strong as Jasper or Rytr. You’ll use Frase more for research and structure than final content generation.
The interface has a learning curve. Plan to spend time understanding how to maximize the tool.
Best For: Affiliate marketers who need to cover topics quickly without extensive personal experience or who write in multiple niches requiring significant research.
How to Choose the Right AI Writing Tool for Your Affiliate Business
With all these options, how do you decide? Here’s a decision framework:
Consider Your Budget
Under $20/month: Rytr Unlimited ($29) or ChatGPT Plus ($20) offer the best value. Start with ChatGPT if you’re comfortable learning prompts; choose Rytr if you want ready-made templates.
$20 to $50/month: Add Writesonic or Jasper Creator to your toolkit. The SEO features justify the cost if you’re publishing consistently.
$50+ per month: You’re at a revenue level where premium tools like Jasper Pro or Surfer AI make sense. You need the advanced features and volume capacity.
Evaluate Your Content Volume
1 to 5 articles per month: Free or low-tier plans work fine. Consider ChatGPT free version or Rytr free plan.
5 to 15 articles per month: Invest in a mid-tier plan like Rytr Unlimited or Writesonic. You’ll max out free plans quickly.
15+ articles per month: You need unlimited plans like Jasper or Copy.ai Pro. Volume discounts and team features become important.
Assess Your SEO Knowledge
SEO beginner: Choose tools with built-in optimization like Writesonic or Surfer AI. They’ll guide you toward better practices.
SEO intermediate: Rytr or Jasper with manual optimization works well. You know what to look for and can refine AI outputs.
SEO advanced: Surfer AI or Frase let you leverage data-driven insights you already understand how to implement.
Match Content Types to Tools
Primarily long-form blog posts: Jasper, Writesonic or Rytr
Lots of social media promotion: Copy.ai or Rytr
Email marketing heavy: Jasper or ChatGPT for sequence creation
Product-focused reviews: Writesonic or Rytr with e-commerce templates
Research-intensive topics: Frase or Surfer AI
According to HubSpot’s content marketing statistics, marketers using AI tools report 12 hours saved per week on content creation, with the time savings increasing when tools match specific workflow needs.
Best Practices for Using AI Writing Tools in Affiliate Marketing
Having the right tool is only half the battle. Here’s how to use AI writing tools effectively without sacrificing quality or authenticity:
Always Add Personal Experience
AI can’t replace your unique perspective. After AI generates content:
Add personal anecdotes about using products
Include specific details AI wouldn’t know
Share lessons you learned
Add your honest opinion, even if it differs from the AI draft
Example: AI might write: “This blender is powerful and efficient.”
You add: “When I tested this blender with frozen fruit, it pulverized everything in under 30 seconds without the motor straining, something my previous $50 blender couldn’t handle.”
The personal detail makes it real and trustworthy.
Fact-Check Everything
AI makes mistakes. Before publishing:
Verify product specifications
Check prices on actual merchant sites
Confirm features and availability
Test affiliate links
Validate any statistics or studies mentioned
Never publish AI-generated affiliate content without verification. One wrong detail destroys credibility.
AI gives you a starting point but not the finish line:
Add relevant internal links to your other content
Insert affiliate links strategically (not just at the end)
Include comparison tables or visual elements
Add unique images or screenshots
Write custom meta descriptions
Maintain Your Brand Voice
AI tends toward generic professional tone. Customize outputs to match how you actually communicate:
Adjust formality level
Add humor if that’s your style
Include personality quirks
Use phrases you commonly use
Remove overly formal constructions
Most AI tools let you set tone preferences, but you’ll still need to do manual refinement.
Use AI for Outlines and Research, Write Criticals Yourself
Let AI handle:
Initial outlines and structure
Background research and information gathering
First drafts of sections
Meta descriptions and titles
Write yourself:
Personal experiences with products
Unique insights or strategies
The core recommendation and reasoning
Honest pros and cons
The conclusion and call to action
This hybrid approach produces content that’s efficient to create but authentically yours.
Combine Multiple AI Tools
Don’t limit yourself to one tool. Many successful affiliate marketers use:
Frase or Surfer for initial research and outlines
Rytr or Jasper for first draft content generation
ChatGPT for refining specific sections or creating variations
Copy.ai for social media promotion
Each tool has strengths. Use the right tool for each part of your workflow.
Always Include Proper Disclosures
Whether AI-assisted or fully human-written, affiliate content requires:
Clear disclosure that you earn commissions
FTC-compliant language
Honest assessment of products
Transparency about your experience level
Don’t let AI accidentally remove or weaken your disclosure language. This is non-negotiable.
Need a Complete Strategy for Building Your Affiliate Business?
AI tools speed up content creation, but they’re just one piece of the puzzle. If you’re looking for a comprehensive guide covering niche selection, traffic strategies, conversion optimization and more, check out my complete getting started roadmap.
Common Mistakes to Avoid with AI Writing Tools
I’ve made these mistakes so you don’t have to:
Publishing AI Content Without Editing
The Mistake: Generating content and publishing it immediately without review.
Why It’s Bad: AI makes factual errors, produces awkward phrasing and often includes generic statements that don’t add value.
The Fix: Treat AI output as a first draft. Always edit for accuracy, flow and value.
Over-Relying on AI for Product Recommendations
The Mistake: Letting AI choose which products to recommend without your input.
Why It’s Bad: AI doesn’t know which products have good affiliate programs, strong conversion rates or reliable merchants. It might recommend products you can’t actually promote or that have terrible commission structures.
The Fix: You select the products strategically. Use AI to write about them, not choose them.
Ignoring Google’s Helpful Content Guidelines
The Mistake: Producing high volumes of AI content without adding sufficient expertise, experience or unique value.
Why It’s Bad: Google’s algorithms increasingly prioritize content demonstrating E-E-A-T (Experience, Expertise, Authoritativeness, Trustworthiness). Pure AI content often lacks these signals.
The Fix: Add personal experience, original research, unique insights and clear expertise to every piece.
Using the Same Prompts Repeatedly
The Mistake: Finding one prompt that works and using it for every article without variation.
Why It’s Bad: Produces repetitive, formulaic content that sounds robotic across your site.
The Fix: Vary your prompts, approaches and instructions to the AI for each piece of content.
Neglecting to Update AI-Generated Content
The Mistake: Publishing AI content and never revisiting it.
Why It’s Bad: Product details change, prices update, new alternatives emerge and affiliate links expire.
The Fix: Schedule quarterly reviews of your AI-generated content to ensure accuracy and relevance.
The Future of AI Writing in Affiliate Marketing
As we move through 2025, AI writing tools continue evolving rapidly. Here’s what’s on the horizon:
More personalization: AI will better match your specific writing style with less manual editing required.
Enhanced fact-checking: Built-in verification of product details, prices and specifications directly from merchant sites.
Voice and video integration: AI tools that can generate scripts for video reviews or podcast episodes, not just written content.
Better understanding of affiliate strategy: AI trained specifically on high-converting affiliate content rather than general marketing copy.
Real-time performance optimization: AI suggesting content updates based on actual conversion data from your affiliate dashboard.
The tools are getting better, but the fundamental principle remains: AI amplifies human creativity and strategy; it doesn’t replace them.
Making Your Decision
You don’t need every tool on this list. Most affiliate marketers succeed with just one or two AI writing assistants combined with their own effort and insight.
My recommendation for most people starting out: begin with Rytr or ChatGPT Plus. Both offer strong value at reasonable prices and handle the core content types you need.
As you grow and your needs become more specialized, consider adding:
Jasper for higher-quality long-form content
Copy.ai for social media promotion
Surfer AI or Frase for competitive SEO content
But start simple, master one tool and expand only when you’ve proven you can monetize the content you’re already creating.
Final Thoughts on the Best AI Writing Tools for Affiliate Marketing
The best AI writing tools for affiliate marketing are the ones that fit your specific workflow, budget and content needs. There’s no universal “best” because your situation is unique. What matters most isn’t which tool you choose but how effectively you use it to create valuable, honest content that genuinely helps your audience make informed decisions.
AI writing tools won’t make you a successful affiliate marketer by themselves. They’re accelerators, not magic solutions. You still need to:
Choose profitable niches and products
Drive traffic to your content
Build trust with your audience
Test and optimize your approach
Stay consistent over months and years
But when used strategically, AI writing tools can dramatically reduce the time investment required to build a successful affiliate business. They let you focus on strategy, relationships and optimization rather than spending all your time staring at blank pages.
Start with one tool, learn it thoroughly and let it help you scale your content production without sacrificing the authenticity that makes affiliate marketing work.
If you’re researching sales funnel software, you’ve probably come across ClickFunnels. It’s one of the most popular funnel builders out there, and for good reason, it’s powerful, feature-rich and used by thousands of online businesses. But here’s the thing that stops most people in their tracks: the price. When you look at ClickFunnels pricing 2025, you might experience a bit of sticker shock, especially if you’re just starting out.
In this comprehensive guide, I’ll break down every ClickFunnels plan, compare what you actually get for your money and help you decide if it’s worth the investment for your specific situation. No fluff, no sales pitch, just honest analysis based on real research.
Understanding ClickFunnels: What Are You Actually Paying For?
Before we dive into the pricing, let’s quickly establish what ClickFunnels actually does. This context matters because the price makes more sense when you understand what you’re getting.
ClickFunnels is an all-in-one sales funnel platform that lets you:
Build sales funnels without coding or hiring a developer
Host landing pages on their servers (no separate hosting needed)
Process payments through integrated payment gateways
Manage email marketing with built-in automation
Create membership sites for courses or exclusive content
Run affiliate programs to recruit others to promote your products
Split test pages to optimise conversion rates
Track analytics to see what’s working and what’s not
The idea behind ClickFunnels is that instead of piecing together five or six different tools (website builder, email platform, payment processor, membership plugin, etc.), you get everything in one place. This integration is the main value proposition and why the pricing is higher than simple landing page builders.
According to the Entrepreneur’s guide to sales funnel software, integrated platforms like ClickFunnels can significantly reduce the technical complexity of running an online business, though they come at a premium compared to DIY solutions.
ClickFunnels Pricing Structure: The Three Main Plans
As of 2025, ClickFunnels offers three primary pricing tiers. Let me break down each one in detail. Please note that their pricing structures do often change.
Starter Plan: $97/Month
This is ClickFunnels’ entry-level plan, and frankly, it’s pretty limited. Here’s what you get:
Core Features:
20 funnels
1 website
1 domain
10,000 contacts
Unlimited courses
Unlimited workflows (automation)
Unlimited pages
What This Means in Practice:
The Starter plan is designed for someone who’s just testing ClickFunnels or running a very simple business. You can build up to 20 different funnels, which sounds like a lot but can actually fill up quickly if you’re creating separate funnels for different products, lead magnets or promotions.
The 1 website limitation is significant. If you want to build an actual website (not just standalone funnel pages), you’re limited to one. The 1 domain limitation means you can only connect one custom domain to ClickFunnels. If you run multiple businesses or want separate domains for different projects, you’ll need to upgrade.
The 10,000 contacts limit refers to your email list size. Once you hit that number, you’ll need to upgrade or start removing old contacts.
Who This Plan Is For:
Honestly? Very few people. At $97/month, this plan is too expensive for absolute beginners who aren’t making money yet and too limited for established businesses. It exists mainly as a stepping stone to get people into the ClickFunnels ecosystem.
If you’re in this category, you might want to consider whether a platform like Systeme.io (starting at $27/month with more generous limits) makes more sense for your current stage.
Pro Plan: $297/Month
This is where ClickFunnels starts to make sense for serious businesses. The Pro plan is their most popular tier and includes:
Everything in Starter, plus:
Unlimited funnels
3 websites
3 domains
25,000 contacts
API access
Priority support
Additional Features:
Advanced funnel features
More template options
Enhanced analytics
Better integration capabilities
What This Means in Practice:
The jump from 20 funnels to unlimited is huge. Now you can create as many funnels as you need without worrying about hitting a limit. This is essential if you’re testing different offers, running multiple campaigns or serving different customer segments.
The increase to 25,000 contacts gives you more breathing room as your email list grows. For context, a list of 25,000 engaged subscribers can generate substantial revenue if you’re providing value and promoting relevant offers.
The 3 websites and 3 domains allows you to run multiple brands or separate your business units. For example, you might have one site for your main business, one for a side project and one for a partner brand.
API access is critical if you want to connect ClickFunnels to other tools in your business stack. This opens up possibilities for custom integrations with CRMs, analytics platforms or other software.
Established online businesses already making $5,000+ per month
Course creators with multiple products
Agencies managing client funnels
Businesses with growing email lists (10,000+ subscribers)
Companies that need custom integrations
If you’re making less than $3,000/month consistently, the $297 price tag will eat into your profits significantly. You need to be at a revenue level where this is a reasonable business expense, not a financial stretch.
Funnel Hacker Plan: $497/Month
This is ClickFunnels’ premium tier, designed for high-volume businesses and power users.
Everything in Pro, plus:
Unlimited websites
Unlimited domains
200,000 contacts
Priority template requests
Funnel Flix access (training library)
Follow-up funnels (advanced automation)
What This Means in Practice:
The jump to unlimited websites and domains is game-changing for agencies or entrepreneurs running multiple brands. You can create as many distinct web properties as you want without additional cost.
The 200,000 contact limit accommodates substantial list growth. If you have a list this size and are emailing regularly, you’re likely running a seven-figure business.
Funnel Flix is ClickFunnels’ training vault, with courses on marketing, sales, traffic and business building. While useful, this shouldn’t be the primary reason you upgrade, the practical features matter more.
Follow-up funnels refer to ClickFunnels’ advanced email automation features. You can create sophisticated sequences based on customer behaviour, purchase history and engagement levels.
Who This Plan Is For:
The Funnel Hacker plan is for:
Businesses making $15,000+ per month consistently
Marketing agencies managing multiple clients
Companies with large email lists (100,000+ subscribers)
Enterprises needing unlimited scale
Businesses requiring advanced automation
If you’re not in one of these categories, you’re probably overpaying with this plan. The features are powerful but only necessary at a certain scale.
What’s NOT Included: Hidden Costs to Consider
Here’s something most ClickFunnels reviews don’t emphasise enough: the subscription price is just the starting point. There are several additional costs you need to budget for.
Transaction Fees
ClickFunnels doesn’t charge transaction fees on top of your subscription, which is good. However, you’ll still pay standard payment processor fees to Stripe or PayPal (typically 2.9% plus 30 cents per transaction). This is unavoidable with any platform.
Email Marketing Limits and Overage Charges
While ClickFunnels includes email marketing, there are limits based on your contact count. If you exceed your plan’s contact limit, you’ll need to:
Upgrade to the next tier
Pay overage fees (rates vary)
Delete contacts to get back under the limit
The overage charges can add up quickly if you’re not paying attention to your list size.
Your ClickFunnels subscription includes hosting for your funnels, but you still need to purchase your domain name separately (typically $10 to $15 per year through registrars like Namecheap or GoDaddy). If you’re on the Starter plan with only 1 domain slot, you’ll need to upgrade to connect additional domains.
Professional Template Customisation
While ClickFunnels provides templates, you might want custom design work to make your funnels stand out. Professional funnel design can cost anywhere from $500 to $5,000+, depending on complexity.
Third-Party Integrations
Some advanced integrations require third-party tools that charge their own fees. For example:
Zapier (for connecting to apps) starts at $19.99/month
Advanced CRMs like HubSpot or Salesforce have their own pricing
SMS marketing tools (if you add text messaging) cost extra
Traffic Costs
ClickFunnels can’t generate traffic for you. You’ll need to budget for:
Facebook Ads
Google Ads
Solo ads
Content marketing tools
SEO tools
This is often the biggest ongoing expense for funnel-based businesses and can range from a few hundred to tens of thousands per month, depending on your goals.
ClickFunnels vs Competitors: Price Comparison
Let’s put ClickFunnels pricing in context by comparing it to alternatives.
ClickFunnels vs Systeme.io
Systeme.io Pricing:
Free plan: $0 (up to 2,000 contacts)
Startup: $27/month
Webinar: $47/month
Unlimited: $97/month
What You Get: Systeme.io offers similar core features (funnels, email marketing, courses, automation) at a fraction of the cost. The trade-off? Less polish, fewer templates and a smaller support community.
Verdict: For beginners or bootstrappers, Systeme.io offers better value. ClickFunnels makes sense when you need the advanced features and have the budget.
ClickFunnels vs Kartra
Kartra Pricing:
Starter: $119/month
Silver: $229/month
Gold: $549/month
What You Get: Kartra is similar to ClickFunnels in scope, an all-in-one platform with funnels, email, membership sites and more. Kartra includes built-in video hosting and helpdesk features that ClickFunnels lacks.
Verdict: Kartra sits in the middle ground, more expensive than budget options but comparable to ClickFunnels. The choice often comes down to interface preference and specific feature needs.
What You Get: Leadpages focuses specifically on landing pages and lead generation. It doesn’t include email marketing, courses or membership sites. You’ll need to piece together other tools.
Verdict: Leadpages is much cheaper but less comprehensive. It works if you already have other tools and just need landing pages.
Understanding the evolution of sales funnel software helps place where ClickFunnels fits in the competitive landscape and why their pricing reflects a premium positioning.
Real-World Scenarios: Is ClickFunnels Worth It for You?
Let’s look at specific situations to help you determine if ClickFunnels makes financial sense.
Scenario 1: You’re Just Starting Out (Making $0 to $500/Month)
Recommendation: ClickFunnels is too expensive at this stage.
Why: When you’re not making consistent revenue, spending $97 to $297 per month is unsustainable. That money could go toward paid traffic or product development instead.
Better Option: Start with Systeme.io’s free plan or $27/month Startup plan. Build your funnel, prove your concept and generate revenue first. Once you’re making $2,000+ per month consistently, then consider ClickFunnels.
Scenario 2: You’re Making $2,000 to $5,000/Month
Recommendation: ClickFunnels Starter might work but evaluate carefully.
Why: At this revenue level, the $97/month Starter plan is affordable (about 2 to 5% of revenue). However, the limitations might frustrate you quickly.
Better Option: Either stick with a cheaper platform until you hit $5,000/month or skip Starter and go straight to Pro if the features justify the cost for your business model.
Scenario 3: You’re Making $5,000 to $15,000/Month
Recommendation: ClickFunnels Pro ($297/month) starts to make sense.
Why: At this revenue level, $297/month represents about 2 to 6% of your monthly income. You likely need the scalability, unlimited funnels and larger contact limits that Pro provides.
Key Consideration: Calculate your customer acquisition cost and lifetime value. If ClickFunnels’ features help you convert better or serve customers more effectively, the ROI justifies the cost.
Scenario 4: You’re Making $15,000+/Month
Recommendation: ClickFunnels Funnel Hacker ($497/month) may be worthwhile.
Why: At this level, you need robust automation, unlimited scale and can benefit from advanced features. The $497 cost is under 4% of revenue and the efficiency gains justify it.
Key Consideration: At this revenue level, also consider whether hiring a developer to build custom solutions might offer better long-term value and flexibility.
Scenario 5: You’re an Agency
Recommendation: Funnel Hacker plan if managing multiple clients.
Why: The unlimited domains and websites allow you to manage all clients under one account. The cost can be built into your client retainers.
Better Option: Consider ClickFunnels’ agency-specific plans if available or negotiate custom pricing for high-volume use.
Beyond the features list, there are intangible benefits to ClickFunnels that justify the higher price for some users:
Community and Ecosystem
ClickFunnels has cultivated one of the largest communities in the online marketing space. When you subscribe, you gain access to:
Active Facebook groups with 100,000+ members
Regular virtual events and webinars
Funnel Hacking Live (annual conference)
Shared funnel templates from successful marketers
This community can be incredibly valuable for networking, learning and troubleshooting.
Proven Templates
ClickFunnels templates are based on millions of dollars in actual funnel performance. Russell Brunson (ClickFunnels founder) and his team have tested these structures extensively. You’re not just getting a design, you’re getting a proven conversion framework.
Support and Resources
ClickFunnels provides extensive documentation, video tutorials and support resources. For non-technical users, this educational component saves countless hours of trial and error.
Brand Recognition
There’s also something to be said for brand credibility. When you tell other marketers or potential partners that you use ClickFunnels, it signals a certain level of seriousness and investment in your business.
Are these intangibles worth hundreds of dollars per month? That depends on your situation and how much you value these benefits.
Common Objections and Counterpoints
Let me address the most common complaints about ClickFunnels pricing:
“It’s Too Expensive”
Counterpoint: Compared to what? If you pieced together separate tools for landing pages ($50/month), email marketing ($100/month for 25,000 contacts), membership sites ($50/month), payment processing and automation, you’d easily spend $200 to $300 monthly anyway.
The question isn’t whether ClickFunnels is expensive in absolute terms—it’s whether the integrated experience and time savings justify the cost compared to the DIY approach.
“There Are Cheaper Alternatives”
Counterpoint: This is absolutely true. Systeme.io, GetResponse and others offer similar functionality at lower prices. The trade-off is usually:
Less polished interface
Smaller template library
Smaller community
Fewer integrations
Less robust support
For many people, these trade-offs are worth the savings. For others, ClickFunnels’ premium experience justifies the premium price.
“I Don’t Need All Those Features”
Counterpoint: You’re probably right. Most users utilise maybe 30% of ClickFunnels’ capabilities. However, as your business grows, having those features available without switching platforms is valuable.
That said, if you know you’ll never need courses, membership sites or advanced automation, you’re definitely overpaying for features you won’t use.
“I Can Build Funnels for Free with WordPress”
Counterpoint: You technically can, but it requires:
Technical knowledge (or money to hire developers)
Multiple plugins that may conflict
Separate email marketing tool
Payment gateway integration
Ongoing maintenance and updates
Separate hosting costs
The “free” option often ends up costing more in time and frustration than paying for an integrated solution. However, if you enjoy the technical aspects and have the skills, WordPress can absolutely work.
If you decide ClickFunnels is right for you, here are ways to reduce your costs:
Start with Annual Billing
ClickFunnels offers discounts for annual payments. While this requires a larger upfront investment, you’ll save 15 to 20% compared to monthly billing. For the Pro plan, this could mean saving $600+ per year.
Use the Free Trial Strategically
ClickFunnels typically offers a 14-day free trial. Use this time to:
Build your core funnels completely
Test all features you need
Import your contacts
Set up automations
By the time the trial ends, you should have everything ready to launch immediately, maximising your return from day one of paid membership.
Take Advantage of Bonuses
ClickFunnels often runs promotions offering free months, bonus training or discounts. Watch for these during major launches or holidays.
Maximise Your Plan Limits
If you’re on the Starter plan, fully utilise all 20 funnels before upgrading. On Pro, use all 3 domains and websites. Get maximum value from what you’re paying for.
Clean Your Contact List Regularly
Keeping your contact count down saves money. Regularly remove:
Unengaged subscribers (haven’t opened in 6+ months)
Bounced email addresses
Duplicate contacts
Obvious spam signups
A smaller, engaged list is more valuable and costs less than a bloated list full of dead contacts.
Split Costs with Partners
If you’re running multiple businesses with a partner, consider sharing a Funnel Hacker account to split the cost. Just ensure you’re not violating ClickFunnels’ terms of service.
When to Upgrade Your ClickFunnels Plan
Knowing when to move from one tier to the next isn’t always obvious. Here are the signs it’s time to upgrade:
From Starter to Pro:
You’ve created 15+ funnels and need more
Your contact list exceeds 8,000 (leaving buffer room)
You need to connect a second or third domain
You’re hitting technical limitations with Starter features
You need API access for custom integrations
From Pro to Funnel Hacker:
You’re managing 3+ separate brands or businesses
Your contact list exceeds 20,000
You need advanced automation capabilities beyond basic sequences
You’re an agency managing multiple client accounts
The cost represents less than 3% of monthly revenue
Important: Don’t upgrade just because you can afford it. Upgrade when you’re actually using the features that justify the higher price.
Before you commit to ClickFunnels pricing, consider these questions and alternatives:
Do you need an all-in-one solution? If you already have email marketing sorted with another tool you love, maybe you just need a landing page builder like Leadpages or Unbounce.
Are you comfortable with tech? If yes, WordPress with plugins like Thrive Suite or Elementor might give you more control at lower cost.
Are you just testing an idea? Use a free or low-cost tool like Systeme.io to validate your concept before investing in premium software.
Do you have a developer? Custom-built funnels on your own infrastructure give you ultimate control and potentially lower long-term costs, though higher upfront investment.
Want to See the Full ClickFunnels Picture?
I’ve created an in-depth review covering everything about ClickFunnels—features, pros, cons and real-world testing. Check out my complete ClickFunnels review to see if this platform aligns with your business goals.
Making Your Decision: A Framework
Here’s a simple framework to help you decide:
Step 1: Calculate Your Break-Even Point
How many additional sales per month would you need to cover the ClickFunnels cost? For the Pro plan at $297/month:
If your product is $30, you need 10 extra sales
If your product is $100, you need 3 extra sales
If your product is $1,000, you need 1 extra sale every 3 months
If ClickFunnels’ features help you achieve that increase through better conversion rates or saved time, it pays for itself.
Step 2: Audit Your Current Tool Stack
List everything you currently pay for:
Website hosting: $___
Email marketing: $___
Landing page builder: $___
Membership plugin: $___
Payment processing: $___
Course platform: $___
Add it up. If you’re paying close to ClickFunnels’ price already and could consolidate, the decision becomes clearer.
Step 3: Evaluate Your Technical Skills and Time
Be honest about your abilities and available time. If setting up WordPress, connecting APIs and troubleshooting technical issues sounds miserable, paying for an integrated solution that “just works” is worth the premium.
Step 4: Consider Your Growth Trajectory
Where will your business be in 6 months? 12 months? If you’re on a strong growth path, investing in scalable infrastructure now prevents the headache of migrating platforms later.
Step 5: Test and Decide
Use the free trial to build a real funnel with real traffic. Measure actual results, not hypothetical projections. Let data inform your decision.
Final Thoughts on ClickFunnels Pricing 2025
Understanding ClickFunnels pricing 2025 comes down to context. The numbers, $97, $297 and $497 per month, seem high in isolation. But when you consider what you’re getting, compare it to alternatives and evaluate it as a percentage of revenue rather than an absolute cost, the picture becomes clearer.
For absolute beginners making little to no money, ClickFunnels is overpriced. You’re better off starting with more affordable alternatives and upgrading once you’ve proven your concept.
For established businesses making $5,000+ per month, ClickFunnels starts to make sense. The time savings, integrated features and proven frameworks can accelerate growth in ways that justify the investment.
For high-volume businesses and agencies making $15,000+ monthly, ClickFunnels often pays for itself through efficiency gains alone.
The key is being honest about where you are right now, not where you hope to be. Build on the platform that matches your current reality, not your aspirations.
Need Help Deciding What’s Right for Your Online Business?
The bottom line: ClickFunnels is a premium tool with premium pricing. It delivers real value but only if you’re at a stage where you can leverage what it offers. Don’t buy it to look successful, buy it when you’re ready to use it effectively.
Make your decision based on numbers, not emotions. Track your results, optimize what works and scale intelligently. That’s how you build a sustainable online business, regardless of which tools you choose.
Opinion City, an Illinois-based marketing research firm founded in 2017, serves as a liaison between its members and other research firms. It suggests paying survey websites like Panda Research and Ipsos so people may earn money and contribute priceless market research data.
But for this GPT site, that’s about all. Truth be told, not much is known about the company to the general public. The majority of this information was gleaned from Opinion City reviews that other personal finance websites had posted. And for anyone wanting to make money by taking surveys in their leisure time, it should be the first warning sign.
Every shady program advertises that they can make you money without any real work on your side. But is this actually a viable means of generating real income? Not at all.
However, the appeal of not having to lift a finger while earning lots of money seems to attract unknowing victims quite frequently. That said, it’s understandable to be wary of websites like Opinion City.
If you’re new to online business, the term “sales funnel” might sound complicated or intimidating. I get it, I felt the same way when I started. But here’s the truth: building your first sales funnel doesn’t have to be overwhelming, especially when you use the right tool. In this guide, I’ll walk you through exactly how to build your first sales funnel with Systeme.io, step by step, with no confusing jargon and no BS. Whether you’re selling a product, building an email list, or promoting an affiliate offer, this tutorial will show you how to create a working funnel from scratch, even if you’ve never done this before.
What Exactly Is a Sales Funnel?
Before we dive into the how-to, let’s quickly cover what a sales funnel actually is.
A sales funnel is simply the journey someone takes from discovering your business to becoming a customer. Think of it as a path that guides people through different stages:
Awareness – They find out you exist (through social media, Google, ads, etc.)
Interest – They visit your landing page and learn what you offer
Decision – They decide whether your offer is right for them
Action – They sign up, purchase, or take whatever action you want them to take
The “funnel” shape represents how many people move through each stage. Lots of people might see your content (top of funnel) but fewer will actually purchase (bottom of funnel).
A good sales funnel makes this journey smooth and automatic. Instead of manually following up with every person, your funnel does the work for you with landing pages, email sequences and automated follow-ups.
I’ve researched and tested multiple funnel builders and I keep coming back to Systeme.io for beginners. Here’s why:
It’s All-in-One: Unlike ClickFunnels or other platforms that require you to connect third-party email services, Systeme.io includes everything: funnel builder, email marketing, course hosting, automation and even affiliate program management. Everything works together seamlessly.
Free Plan Available: You can start building funnels completely free. The free plan includes up to 2,000 contacts and unlimited funnels. No credit card required.
Simple Interface: Systeme.io is designed for beginners. The drag-and-drop editor is intuitive and you don’t need any coding or design skills.
Affordable Pricing: When you’re ready to upgrade, paid plans start at just $27/month (compared to ClickFunnels at $97/month minimum).
I’m not saying Systeme.io is perfect for everyone, but for your first funnel, it’s hard to beat. If you want to see my full breakdown of features and pricing, check out my detailed Systeme.io review.
Before You Begin: What You’ll Need
Before building your funnel, gather these essentials:
A Systeme.io account (free or paid)
A clear goal – What action do you want people to take? (Download a lead magnet, buy a product, book a call?)
Your offer – What are you giving away or selling?
Basic copy – Headlines, bullet points and a call-to-action
Optional: Images – You can use free stock photos from sites like Unsplash or create graphics on Canva
Don’t worry about having everything perfect. You can always improve your funnel later. The goal right now is to get something live and working.
Systeme.io will ask what you want to build (choose “sales funnel”) and what type of business you have. This helps customize your dashboard but don’t stress about these answers—you can build any type of funnel regardless of what you select.
Once you’re in your dashboard, take a moment to look around. On the left sidebar, you’ll see sections for Funnels, Email Marketing, Automation and more. We’ll mainly focus on the Funnels section today.
Step 2: Choose Your Funnel Type
Now let’s create your first funnel.
Click “Funnels” in the left sidebar
Click “Create” in the top right
Give your funnel a name (this is just for your reference—visitors won’t see it)
Click “Create”
You’ll now see your empty funnel with options to add steps. A funnel “step” is simply a page in your funnel. For a basic lead generation funnel, you’ll typically have two steps:
Step 1: Squeeze Page (landing page where visitors enter their email)
Step 2: Thank You Page (confirmation page after they submit)
For a sales funnel, you might have additional steps like:
Landing page
Checkout page
Order confirmation page
Upsell page
Let’s start simple with a two-step lead generation funnel. You can always add complexity later.
Your landing page is where the magic happens. This is where you convince visitors to take action.
Add Your First Funnel Step
In your funnel builder, click “Add a step”
Select “Squeeze page” from the templates
Choose a template you like (don’t overthink this—pick one and move forward)
Click “Select template”
Systeme.io will load the template into the page builder. Now you’re looking at a drag-and-drop editor where you can customize everything.
Customize Your Landing Page
Here’s what to focus on:
Headline: This is the most important element. Your headline should clearly communicate the benefit of your offer. Instead of “Free Guide” try something like “Download the Free Guide That Shows You How to Get Your First 1,000 Email Subscribers in 30 Days.”
Subheadline: Support your main headline with additional details or benefits.
Bullet Points: List 3-5 specific benefits someone will get from your offer. For example:
Discover the exact email template that converts at 47%
Learn the one mistake that kills most email campaigns
Get the free tools I use to automate everything
Call-to-Action Button: Your button text matters. Instead of generic “Submit” try action-oriented text like “Send Me the Guide” or “Get Instant Access.”
Form Fields: For your first funnel, only ask for what you absolutely need. Usually that’s just an email address. You can ask for a name too, but every additional field reduces conversions. Keep it simple.
Editing in Systeme.io
To edit any element:
Click on it
Edit the text directly or use the settings panel on the right
Adjust colors, fonts and sizing using the style options
Drag elements to reposition them
Add new elements by clicking the “+” button
According to research on landing page best practices, keeping your page focused with one clear goal and minimal distractions significantly improves conversion rates.
Pro tip: Remove the navigation menu from your landing page if the template includes one. You want people focused on one action—signing up—not clicking around to other pages.
Step 4: Create Your Thank You Page
After someone submits their email, they need to know what happens next. That’s what your thank you page does.
Go back to your funnel overview
Click “Add a step”
Choose “Thank you page” template
Select and customize
Your thank you page should:
Confirm the action: “Success! Check your email for your free guide.”
Set expectations: “You’ll receive your guide in the next 5 minutes. Also watch for my weekly emails with tips on [topic].”
Provide next steps: Give them something else to do while they’re still engaged. This could be:
Follow you on social media
Join your Facebook group
Check out a related blog post
Watch a welcome video
Optional: Make an offer: Some marketers use the thank you page to present a low-cost offer (called a “tripwire”). This works but isn’t necessary for your first funnel.
This is where Systeme.io really shines compared to basic funnel builders. The email marketing is built right in.
Create Your Email List
Go to “Contacts” in the left sidebar
Click “Lists”
Click “Create” to make a new list
Name it something like “Lead Magnet Subscribers”
Connect Your Funnel to the List
Now we need to tell Systeme.io to add people to this list when they submit the form on your landing page.
Go back to your funnel
Click on your squeeze page to edit it
Click on the form element
In the settings panel, find “Tag or List”
Select the list you just created
Save
Now anyone who fills out your form will automatically be added to your email list.
Create Your Welcome Email Sequence
Learning to write effective email sequences is crucial for online business success. Neil Patel’s guide to email marketing provides excellent fundamentals for beginners.
Let’s set up a simple 3-email welcome sequence:
Go to “Email Marketing” in the left sidebar
Click “Campaigns”
Click “Create”
Choose “Follow-up email campaign”
Email 1 (Send immediately):
Subject: “Here’s your [free offer] + what’s next”
Deliver the promised lead magnet
Introduce yourself briefly
Set expectations for future emails
Include a question to encourage replies
Email 2 (Send after 2 days):
Subject: “The #1 mistake people make with [topic]”
Provide valuable content related to your niche
Share a story or case study
Link to a relevant blog post or resource
Email 3 (Send after 5 days):
Subject: “How I [achieved specific result]”
Share your journey or experience
Soft pitch your main offer or service
Ask if they have questions
To set up the automation:
Create each email using the email editor
Set the trigger to “Added to list: [your list name]”
Set the timing for each email (immediate, +2 days, +5 days)
Activate the campaign
Step 6: Connect a Payment Processor (Optional)
If you’re selling something in your funnel, you’ll need to connect a payment processor.
Systeme.io integrates with:
Stripe
PayPal
Razorpay
To connect Stripe (most common):
Go to “Settings” in the left sidebar
Click “Payment gateways”
Click “Connect Stripe”
Follow the prompts to authorize the connection
Then, when creating a sales page in your funnel:
Add a “Checkout” step to your funnel
Create a product in Systeme.io (go to “Products” section)
Set your price and details
Link the checkout page to your product
Stripe’s documentation offers detailed guidance on accepting payments online if you need more help with this step.
Before you send traffic to your funnel, you need to test it thoroughly. Nothing is worse than discovering broken links or missing emails after you’ve already promoted it.
Run Through the Entire Funnel
Click “View” on your landing page to see it live
Fill out the form with a test email (use your own email)
Check that you’re redirected to the thank you page
Confirm you received the welcome email
Click all links to verify they work
If you have a checkout, do a test purchase (use Stripe test mode)
Check These Specific Things
Does the landing page look good on mobile? (Check using your phone)
Are all images loading properly?
Is the form submitting correctly?
Are emails arriving in the inbox (not spam)?
Are email links working?
Is the thank you page redirecting properly?
Fix any issues before moving to the next step.
Step 8: Launch and Monitor
Your funnel is built and tested. Now it’s time to get traffic.
Get Your Funnel URL
In your funnel overview, click the link icon next to your squeeze page
Copy the URL (it’ll look like: yourusername.systeme.io/funnel-name)
Optional: Set up a custom domain for a more professional look
Drive Traffic to Your Funnel
Now you need to get people to your landing page. Here are the best strategies for beginners:
Free Traffic Methods:
Share on social media (Instagram, Facebook, LinkedIn, Twitter)
Post in relevant Facebook groups (provide value, don’t spam)
Answer questions on Reddit and Quora (include your link where appropriate)
Pinterest (create pins linking to your landing page)
YouTube videos (include link in description)
Guest posting on blogs
SEO-optimized blog posts linking to your funnel
Paid Traffic Methods (when you’re ready):
Facebook Ads
Instagram Ads
Google Ads
Pinterest Ads
Solo ads (buying email traffic)
Start with free methods while you test and optimize your funnel. Once you’re converting at a decent rate, then consider paid traffic.
Monitor Your Results
Systeme.io provides analytics for your funnel. To view stats:
Go to your funnel overview
Click “Statistics”
Review key metrics:
Visitors to each page
Conversion rate (what % of visitors submit the form)
Click-through rates in your emails
Pay attention to these numbers and make improvements based on what you learn. If your conversion rate is below 20%, test different headlines or offers.
Common Mistakes to Avoid
I’ve made plenty of mistakes building funnels. Here are the ones to avoid:
Asking for too much information: Only collect what you absolutely need. Each additional form field reduces conversions by about 10%.
No clear call-to-action: People should know exactly what to do next. Make your buttons obvious and use action-oriented text.
Overcomplicating it: Your first funnel doesn’t need to be elaborate. Simple works. Get something live and improve it over time.
Not testing on mobile: Over 60% of traffic comes from mobile devices. If your funnel looks broken on phones, you’re losing half your potential leads.
Forgetting to deliver the lead magnet: If you promise a free guide, make sure it actually arrives in their inbox immediately. Broken promises destroy trust.
Not following up: The money is in the follow-up. Don’t just collect emails and ignore them. Send valuable content consistently.
Ignoring analytics: You can’t improve what you don’t measure. Check your stats weekly and make data-driven decisions.
Scale what works: Once you have a funnel converting well, focus on increasing traffic. This is where paid ads and advanced SEO come in.
If you’re feeling stuck on what to do next or need guidance on building your entire online business strategy, I’ve created a comprehensive guide at right here . It covers everything from choosing your niche to scaling your income.
Final Thoughts
Learning how to build your first sales funnel with Systeme.io is one of the most valuable skills for online business. You now have a complete, automated system for capturing leads and nurturing them into customers. This funnel will work for you 24/7, even while you sleep.
Remember, your first funnel doesn’t need to be perfect. The goal is to get it live, test it with real traffic and improve it over time. I’ve built dozens of funnels and I’m still learning and optimizing. That’s the fun part—there’s always room to improve and grow.
Start simple, stay consistent and focus on providing real value to your audience. If you do that, the conversions will follow.
If you haven’t already, grab your free Systeme.io account and start building. The best time to start was yesterday. The second best time is right now. You’ve got this.
If you’re building an online business, you’ve probably heard that “the money is in the list.” But when you’re just starting out, email marketing feels overwhelming. Which platform should you use? How do you build a list? What do you even send to people? This complete beginner’s guide to Email Marketing with Systeme.io will answer all these questions and show you exactly how to set up professional email campaigns without technical headaches or expensive software.
I’ve researched email marketing extensively and Systeme.io stands out as the perfect platform for beginners. Unlike complex tools that require weeks to learn or expensive platforms that drain your budget before you make a single sale, Systeme.io combines simplicity with powerful features at prices anyone can afford. You can literally start for free and build a real email marketing system that generates revenue.
By the end of this guide, you’ll understand exactly how to use Systeme.io for email marketing, from capturing your first subscriber to creating automated sequences that sell while you sleep. This isn’t theory. It’s a practical roadmap you can implement today.
Quick note: This guide assumes you’re completely new to email marketing. If you’re migrating from another platform, the principles still apply, but setup will be faster since you already understand the basics.
Why Email Marketing Matters for Your Business
Before diving into the technical how-to, let’s understand why email marketing is crucial for online business success.
Email Owns Your Audience
Social media platforms can disappear, change algorithms or ban your account overnight. You don’t own your Instagram followers or Facebook fans. But you own your email list. Nobody can take those contacts away from you.
When you have someone’s email address, you can reach them directly anytime. No algorithm decides whether they see your message. No platform changes that limit your reach. You have direct access to their inbox.
Email Converts Better Than Other Channels
Email marketing consistently delivers the highest ROI of any marketing channel. Studies show email generates $36 to $42 for every dollar spent. Compare that to social media or paid ads and email wins dramatically.
Why? Because email is personal. People check their inbox multiple times daily and messages feel more intimate than public social posts. When someone gives you their email, they’re inviting you into their personal space. That trust translates to higher conversion rates.
Once you set up email automation, it works 24/7 without ongoing effort. New subscribers automatically receive your welcome sequence. Customers get post-purchase follow-ups. People who abandon carts receive reminders. All automatically.
This automation means you can build a business that generates revenue even when you’re sleeping, on vacation or focused on other projects.
Email Builds Relationships
Consistent email communication builds relationships with your audience over time. They get to know your voice, trust your recommendations and become loyal customers who buy repeatedly.
One-time customers are nice. Loyal fans who buy everything you create are business-changing. Email marketing creates those relationships.
Why Choose Systeme.io for Email Marketing
Dozens of email marketing platforms exist. So why Systeme.io specifically for beginners?
It’s Genuinely Affordable
Most email platforms charge based on subscriber count. As your list grows, costs explode. ConvertKit charges $29/month for 1,000 subscribers. Mailchimp starts free but quickly becomes expensive. ActiveCampaign begins at $29/month for 500 subscribers.
Systeme.io includes unlimited email sending on all plans, even the free one. You’re not penalized for growing your list. The free plan supports 2,000 contacts with unlimited emails. The Startup plan is $27/month for 5,000 contacts. That’s revolutionary pricing.
It’s All-in-One
Traditional email platforms only do email. You still need separate tools for landing pages, sales funnels, course hosting and payment processing. Systeme.io includes everything in one platform.
You can create opt-in pages to capture emails, set up automated sequences, sell products, deliver courses and manage affiliates all in one place. This integration eliminates the complexity and cost of connecting multiple tools.
It’s Beginner-Friendly
Systeme.io’s interface is straightforward. You don’t need technical skills or design experience. The drag-and-drop builders make creating emails and automation simple enough for complete beginners.
Complex platforms like ActiveCampaign or Infusionsoft offer powerful features but require weeks of learning. Systeme.io balances power with simplicity, letting you start fast while growing into advanced features over time.
It Includes Automation
Email automation is essential for modern online business. Systeme.io includes visual automation builders on all plans. You can create sophisticated workflows that segment subscribers based on behavior and send targeted messages automatically.
Many affordable email platforms charge extra for automation or limit it severely. Systeme.io includes robust automation even on the free plan.
Let’s walk through the complete setup process step by step.
Step 1: Create Your Systeme.io Account
Visit Systeme.io and sign up for a free account. No credit card required. You’ll verify your email and log into your dashboard.
The dashboard shows all platform features including funnels, emails, contacts, products and automation. For email marketing, you’ll primarily work in the Contacts and Emails sections.
Step 2: Connect Your Custom Domain
While optional for testing, connecting a custom domain is essential for professional email marketing. Emails from yourbusiness.com look legitimate while emails from systemesites.com look amateur.
Purchase a domain from Namecheap or GoDaddy (costs $10 to $20 annually). In Systeme.io settings, add your domain and follow the DNS instructions. This takes 5 to 10 minutes and dramatically improves deliverability and credibility.
Step 3: Create Your First Email List
In Systeme.io, navigate to Contacts and then Tags. Think of tags as your email lists or segments. You’ll tag subscribers based on what they’re interested in or what actions they take.
Create your first tag for your main email list. For example, if you run a fitness blog, create a tag called “Main Subscribers” or “Fitness Newsletter.”
You can create multiple tags for different lead magnets, products or interests. Tags let you send targeted emails to specific segments rather than emailing everyone every time.
Step 4: Set Up Your Email Settings
Go to Settings and then Email to configure:
From Name: Use your real name or business name. “Sarah from Fitness Tips” works better than “Fitness Tips” alone. Personal names increase open rates.
From Email: Use your custom domain email like sarah@yourbusiness.com, not a free Gmail address.
Reply-To Email: Where replies should go. Usually the same as your from email.
Footer Information: Required by law. Include your business address and unsubscribe link (Systeme.io adds the unsubscribe link automatically).
You need something to offer in exchange for email addresses. This is your lead magnet. Popular options include:
PDF guides or checklists
Email courses delivered over several days
Video training series
Resource libraries
Templates or tools
Exclusive content not available elsewhere
Your lead magnet should solve a specific problem your target audience faces. Make it valuable enough that people willingly trade their email address for it.
Create your lead magnet content, save it as a PDF or video and upload it to Systeme.io. You’ll deliver this to new subscribers through an automated email.
Building Your Email List with Systeme.io
Now that setup is complete, let’s focus on actually growing your list.
Create an Opt-In Page
Systeme.io includes a funnel and page builder. Create a simple opt-in page (also called landing page or squeeze page) that:
Has a Clear Headline: State the main benefit. “Download the Ultimate Guide to Starting Your Garden” is better than “Sign Up for My Newsletter.”
Explains the Benefit: A few sentences describing what they’ll get and why it matters.
Includes an Opt-In Form: The form should ask for minimal information. Just name and email typically. More fields reduce conversions.
Shows What They’ll Receive: Include an image of your lead magnet or bullet points listing what’s included.
Has a Strong Call to Action: “Get My Free Guide” performs better than generic “Submit.”
Systeme.io’s page builder makes creating these pages simple. Choose a template, customize text and colors and publish. No coding required.
Embed Forms on Your Website
If you have an existing blog or website, embed Systeme.io opt-in forms directly on your pages. In Systeme.io, create a form and copy the embed code. Paste this code into your blog sidebar, footer or within blog posts.
Forms placed within content (in-line forms) convert better than sidebar forms because they appear while people are engaged with your content.
Create Multiple Lead Magnets
Don’t limit yourself to one lead magnet. Create different lead magnets for different topics or audience segments.
If you run a cooking blog, you might have:
A lead magnet for quick weeknight dinners
Another for meal prep strategies
A third for dessert recipes
Each attracts a slightly different subscriber interested in that specific topic. You can then send targeted emails based on which lead magnet they downloaded.
Promote Your Opt-In Page
Your opt-in page won’t generate subscribers automatically. Promote it through:
Your Blog: Link to your opt-in page in every blog post. Include a compelling call to action that explains the benefit.
Social Media: Share your lead magnet regularly on all social platforms. Create graphics that highlight the value.
Guest Posts: Write for other blogs in your niche and include your lead magnet in your author bio.
YouTube Videos: Mention your lead magnet in videos and include the link in video descriptions.
Paid Ads: Once you validate your lead magnet converts, consider Facebook or Google ads to scale subscriber growth.
The more traffic you drive to your opt-in page, the faster your list grows. Aim for consistent promotion across all channels.
With subscribers joining your list, let’s create emails that engage and convert.
Understanding Campaign Types
Systeme.io offers two main email types:
Broadcasts: One-time emails sent to your entire list or specific tags. Use broadcasts for announcements, promotions, weekly newsletters or any message you want to send immediately.
Automation Sequences: Pre-written email series that send automatically based on triggers. Welcome sequences, product launch sequences and educational courses use automation.
Most email marketing combines both types. Automation handles predictable communication while broadcasts handle timely announcements.
Writing Your Welcome Email
Your welcome email is the most important message you’ll send. It arrives when subscriber interest peaks. Open rates for welcome emails often exceed 50% while typical emails get 15% to 25%.
Your welcome email should:
Deliver the Promised Lead Magnet: Include a download link or access instructions immediately. This builds trust by delivering what you promised.
Set Expectations: Tell subscribers what they’ll receive from you. “I’ll send you one email weekly with gardening tips” manages expectations and reduces unsubscribes.
Introduce Yourself: Share your story briefly. Why do you help people with this topic? What qualifies you? Make it personal.
Encourage a Reply: Ask a question and invite replies. “What’s your biggest challenge with gardening right now?” Replies improve deliverability and start conversations.
Include a Call to Action: Don’t sell hard in your welcome email but consider a soft invitation to check out your best content or a relevant product.
Keep your welcome email conversational and warm. You’re starting a relationship, not making a hard sales pitch.
Creating Your Welcome Sequence
Beyond the initial welcome email, create a welcome sequence of 3 to 7 emails sent over the first week or two. This sequence warms up subscribers and establishes your authority.
Example Welcome Sequence Structure:
Email 1 (immediate): Deliver lead magnet and introduce yourself
Email 2 (day 2): Share your best blog post or video on the topic
Email 3 (day 4): Tell your origin story. Why do you care about this topic?
Email 4 (day 7): Provide additional value. A case study or success story.
Email 5 (day 10): Soft sell. Mention a relevant product with a story about how it helps
Email 6 (day 14): Transition to regular content. Explain what they’ll receive going forward
This sequence builds rapport and trust before asking for a purchase. Each email provides value and strengthens the relationship.
Writing Regular Email Content
After your welcome sequence, maintain regular communication. Most successful email marketers send at least one email weekly. Some send daily.
Content Ideas for Regular Emails:
Teaching Content: Share tips, strategies or how-to information related to your niche
Stories: Personal anecdotes that illustrate lessons or entertain
News and Updates: Industry news, personal updates or announcements
Product Recommendations: Affiliate products or your own products you genuinely recommend
Questions: Ask subscribers about their challenges or preferences
Curated Content: Share interesting articles, videos or resources you’ve found
The key is consistency. Pick a schedule you can maintain long term and stick with it. One great email weekly beats three sporadic emails followed by silence.
Email Copywriting Best Practices
Subject Lines Matter: Your subject line determines whether people open your email. Make it curious, benefit-driven or personal. “3 mistakes killing your tomato plants” beats “This week’s gardening tips.”
Write Conversationally: Email feels personal. Write like you’re talking to one person, not broadcasting to thousands. Use “you” and “I” liberally.
Keep Paragraphs Short: Long blocks of text are hard to read on mobile devices. Break content into 1 to 3 sentence paragraphs.
Focus on One Topic: Each email should have one main point or call to action. Don’t overwhelm subscribers with multiple messages in one email.
Always Include a Call to Action: Every email should ask subscribers to do something. Read a blog post, reply to your email, check out a product or attend a webinar.
Be Yourself: Don’t try to sound corporate or overly formal. Your personality makes your emails memorable.
Setting Up Email Automation in Systeme.io
Automation transforms your email marketing from a time-consuming task to a system that runs itself.
Understanding Automation Rules
Systeme.io’s automation builder uses visual workflows with triggers, conditions and actions. Think of it like: “When this happens, check if this is true and then do this.”
Triggers: Events that start automation. Someone opts in, clicks a link, purchases a product or reaches a certain date.
Conditions: Rules that determine whether someone continues down the automation path. “If they have this tag” or “If they clicked this link.”
Actions: What happens. Send an email, add a tag, move to a different automation or send to a different sequence.
Creating Your First Automation
Let’s create a simple automation that sends your welcome sequence automatically.
Step 1: Go to Automation in Systeme.io and click Create Rule
Step 2: Choose your trigger. Select “Contact is tagged” and choose your main subscriber tag
Step 3: Add action “Send email.” Select your first welcome email
Step 4: Add a delay action. “Wait 2 days”
Step 5: Add another “Send email” action for your second welcome email
Step 6: Continue adding delays and emails for your complete sequence
Step 7: Save and activate your automation
Now anyone who joins your list automatically receives your entire welcome sequence without any manual work from you.
Advanced Automation Ideas
Once you master basic sequences, explore advanced automation:
Behavior-Based Segmentation: Tag subscribers based on which links they click. If someone clicks your yoga content, tag them “Interested in Yoga” and send yoga-specific content.
Product Launch Sequences: Create automated sequences that sell products. Share value upfront, introduce the product, handle objections and close with urgency.
Re-Engagement Campaigns: Automatically identify subscribers who haven’t opened emails in 60 days and send a special re-engagement sequence.
Post-Purchase Sequences: When someone buys, automatically send onboarding emails, request reviews or offer complementary products.
Abandoned Cart Recovery: If someone starts checkout but doesn’t complete it, automatically send reminder emails with incentives to return.
Automation lets you deliver personalized, timely messages at scale without manual effort.
Following these best practices ensures your email marketing succeeds while avoiding common pitfalls.
Build Your List Organically
Never buy email lists or add people without permission. Purchased lists have terrible engagement, damage your sender reputation and violate anti-spam laws. Every subscriber should actively opt in to receive your emails.
Segment Your Audience
Not every subscriber cares about every topic. Use tags to segment subscribers by interests, purchase history or engagement level. Send targeted emails to relevant segments rather than blasting everyone with everything.
Segmented emails get 14% higher open rates and 100% higher click rates compared to non-segmented emails.
Focus on Deliverability
Your emails are worthless if they land in spam folders. Improve deliverability by:
Using a Custom Domain: Free email addresses and default platform domains harm deliverability
Avoiding Spam Trigger Words: “FREE!”, “ACT NOW”, excessive exclamation marks and all caps trigger spam filters
Encouraging Engagement: High open and click rates tell email providers your content is wanted
Making Unsubscribing Easy: Hiding unsubscribe links increases spam complaints which destroy deliverability
Maintaining List Hygiene: Remove subscribers who never open emails. Inactive subscribers hurt deliverability.
Test Different Approaches
Don’t assume you know what works. Test subject lines, send times, email length and content types. Systeme.io includes A/B testing features on higher plans but you can manually test by trying different approaches and comparing results.
Send one subject line style for two weeks, then try a different style the next two weeks. Compare open rates and click rates to see what resonates with your specific audience.
Balance Value and Promotion
The classic ratio is 80% value content and 20% promotional content. Most of your emails should educate, entertain or help subscribers. Occasional promotional emails are fine and expected but if every email is a sales pitch, people unsubscribe.
Even promotional emails can provide value by explaining how a product solves specific problems rather than just listing features and saying “buy now.”
Monitor Key Metrics
Track these essential email metrics:
Open Rate: Percentage who open your emails. Aim for 20% to 30% for cold traffic and 30% to 50% for warm lists.
Click Rate: Percentage who click links in your emails. 2% to 5% is typical.
Unsubscribe Rate: Should stay under 0.5% per email. Higher rates indicate poor targeting or frequency.
Conversion Rate: Percentage who take your desired action (purchase, register, etc.). Varies widely by offer.
These metrics tell you what’s working and what needs improvement.
Common Email Marketing Mistakes to Avoid
Learning from others’ mistakes saves time and frustration.
Mistake 1: Not Emailing Consistently
The biggest mistake beginners make is building a list then rarely emailing. Subscribers forget who you are, engagement plummets and your list becomes worthless.
Pick a schedule (weekly is minimum) and stick to it. Consistency builds trust and keeps you top of mind.
Mistake 2: Making Every Email a Sales Pitch
Constantly pitching products turns subscribers off. Provide genuine value most of the time. When you do promote something, your audience is more receptive because you’ve built trust.
Mistake 3: Neglecting Mobile Optimization
Over 60% of emails are opened on mobile devices. If your emails don’t display well on phones, you’re losing more than half your audience.
Use short paragraphs, clear formatting and mobile-responsive templates. Systeme.io’s email templates are mobile-responsive by default.
Your welcome sequence is your highest-performing email series. Many beginners create one welcome email then move on. Invest time creating a strong 5 to 7 email welcome sequence that maximizes this high-engagement period.
Mistake 5: Not Cleaning Your List
Keeping inactive subscribers hurts deliverability and costs money on some platforms. Remove or re-engage subscribers who haven’t opened an email in 6 to 12 months.
Mistake 6: Overcomplicating Everything
Beginners often get paralyzed trying to build the “perfect” email system. Start simple. One opt-in page, one lead magnet, one welcome sequence and weekly broadcasts. You can add complexity as you grow.
Mistake 7: Writing Only About Yourself
Nobody cares about your day unless you make it relevant to them. Frame every story and lesson around how it helps your subscribers. “You” should appear more than “I” in your emails.
Real World Email Marketing Example
Let me show you how this works in practice with a concrete example.
Scenario: You run a website teaching people how to grow vegetables in small spaces.
Step 1: Lead Magnet You create a PDF guide called “10 Vegetables Perfect for Small Space Gardens.” It’s 8 pages with photos, growing tips and space requirements.
Step 2: Opt-In Page You build a simple landing page in Systeme.io with the headline “Grow Fresh Vegetables Even in Tiny Spaces.” The page explains the guide’s value and includes an opt-in form asking for name and email.
Step 3: Welcome Sequence You create a 5-email welcome sequence:
Email 1: Delivers the PDF guide and introduces yourself
Email 2: Your biggest small space gardening mistake and how to avoid it
Email 3: Your story of starting with a tiny balcony garden
Email 4: Three essential tools for small space gardening (with affiliate links)
Email 5: Invitation to check out your paid course on year-round small space gardening
Step 4: Promotion You link to this opt-in page in every blog post you write. You mention it in YouTube video descriptions. You share it on Pinterest and Instagram. Within three months, you’ve built a list of 500 subscribers.
Step 5: Regular Emails Every Tuesday, you send a value-packed email with one gardening tip, a story and a call to action. Some weeks you share blog posts. Other weeks you recommend products. Occasionally you promote your course.
Results: After six months, you have 1,200 subscribers. About 350 open each email (29% open rate). You’ve made 40 course sales at $97 each ($3,880 revenue) plus $600 in affiliate commissions. All through email marketing that takes 2 to 3 hours weekly.
This isn’t hypothetical. This is how real online businesses grow through email marketing.
Once you master the basics, these advanced strategies help you scale results.
Create Multiple Email Sequences
Beyond your welcome sequence, create sequences for:
Product launches
Event promotions
Educational courses delivered via email
Holiday sales
Re-engagement campaigns
Having pre-written sequences ready means you can activate them whenever needed without starting from scratch.
Implement Win-Back Campaigns
Some subscribers go inactive. Before removing them, send a win-back sequence asking if they still want to hear from you. Offer an incentive like a special discount or exclusive content for re-engaging.
Win-back campaigns recover 5% to 15% of inactive subscribers and help clean your list of truly uninterested people.
Use Email to Drive Webinar Attendance
Host live webinars and use email to drive registrations and attendance. Send:
Invitation emails explaining the webinar value
Reminder emails the day before and hour before
Replay emails for those who missed it
Webinars often convert 20% to 40% of attendees into customers when done well.
Personalize Based on Behavior
Advanced segmentation tags subscribers based on actions they take. If someone clicks your link about indoor plants, tag them “Interested in Indoor Plants” and send targeted content about that topic.
Behavioral personalization dramatically increases engagement and conversions compared to one-size-fits-all approaches.
Build Relationship Beyond Email
Use email to move subscribers to other platforms where you can build deeper relationships:
Invite them to join your Facebook group
Ask them to follow you on Instagram
Suggest they subscribe to your YouTube channel
Offer to connect on LinkedIn
Multi-platform relationships are stronger and more valuable than email-only relationships.
Frequently Asked Questions
How often should I email my list?
At minimum, email weekly. Daily emails work for some niches if every message provides value. Test frequency with your specific audience but never go longer than two weeks between emails or subscribers forget you.
What’s a good open rate?
Industry average is 15% to 25% but this varies by niche and list warmth. Fresh subscribers open at 30% to 50% while older lists might see 15% to 20%. Focus on improving your own open rate over time rather than comparing to others.
Should I segment my list?
Yes. Even basic segmentation (by interest or purchase history) improves results dramatically. Start simple with 2 to 3 segments and add more as your business grows.
Can I move my existing list to Systeme.io?
Yes. Export your contacts from your current platform as a CSV file and import into Systeme.io. Just ensure you only import people who opted in to receive emails from you.
What if my emails go to spam?
Use a custom domain, avoid spam trigger words, encourage engagement and maintain list hygiene. If problems persist, check your domain’s sender reputation and consider working with email deliverability specialists.
How long should emails be?
There’s no perfect length. Some successful marketers send 100-word emails while others send 1,000-word essays. Match length to your content and audience preference. Test different lengths and see what gets better engagement.
When is the best time to send emails?
Tuesday, Wednesday and Thursday mornings (9-11 AM in your audience’s timezone) typically perform best. However, your specific audience might differ. Test different days and times to find your optimal send window.
Should I use plain text or designed emails?
Both work. Plain text emails often get higher open rates because they feel personal. Designed emails can look more professional and are better for visual content. Many successful marketers alternate between both styles.
Your Email Marketing Action Plan
You now understand how email marketing works in Systeme.io. Here’s your step-by-step action plan to implement everything:
Week 1: Setup
Create your Systeme.io account
Connect your custom domain
Configure email settings
Create your first tag/list
Week 2: Lead Magnet
Decide what lead magnet to create
Create the content (PDF, video, etc.)
Upload to Systeme.io
Build your opt-in page
Week 3: Welcome Sequence
Write 5 welcome emails
Set up automation to deliver sequence
Test the complete subscriber experience
Week 4: Promotion
Add opt-in links to your blog
Create social media posts promoting lead magnet
Embed forms on your website
Start driving traffic to your opt-in page
Week 5+: Consistency
Send weekly broadcast emails
Monitor metrics and adjust approach
Create additional lead magnets for different segments
Build more automation sequences
Following this plan, you’ll have a functioning email marketing system within a month.
Conclusion: Start Your Email Marketing Journey Today
Email Marketing with Systeme.io doesn’t need to be complicated or expensive. This platform gives beginners everything needed to build professional email campaigns that generate real revenue. The free plan alone is more powerful than some paid platforms while the affordable paid plans scale with your business growth.
The hardest part is starting. Most people spend weeks researching the “perfect” email platform and never actually build their list. Don’t let that be you. Systeme.io removes technical and financial barriers. The only thing stopping you is taking action.
Your email list becomes your most valuable business asset over time. Every subscriber represents someone interested in what you offer. Nurturing those relationships through consistent, valuable email communication transforms subscribers into customers and customers into lifelong fans.
Start today. Create your free account, build your first opt-in page and send your first email. You’ll learn more from doing than from reading another guide. This comprehensive introduction to Email Marketing with Systeme.io has given you everything needed to succeed. The rest is up to you.
Your future subscribers are waiting. Go build something amazing.