
How To Create an Online Store on Shopify and Actually Make Sales
Starting an online shop has never been more accessible. You do not need a developer, a big budget or a technical background to launch something real. However, knowing how to create an online store on Shopify is only part of the story. The platform makes setup fast, and the interface is genuinely beginner-friendly. So the bigger challenge is not the tech. It is making the right decisions at each step so your store attracts customers rather than sitting empty once it goes live.

Why Shopify Is the Platform Most New Store Owners Choose
Shopify powers millions of stores across every country and every niche imaginable. Indeed, there is a reason for that. The platform bundles hosting, payments, checkout, themes, abandoned cart recovery, SSL security and analytics into a single subscription. You do not need to manage separate tools or stitch services together.
Compared to building a store on WooCommerce, Shopify requires far less technical effort. WooCommerce is free to install, but you still pay for hosting, plugins, security certificates and ongoing maintenance. In fact, the total cost can easily match or exceed a Shopify subscription once you factor in all the components. Furthermore, Shopify’s uptime record is strong, and the platform handles traffic spikes without the store going down at peak moments.
Indeed, Shopify also scales well. You can start on the entry-level plan as a solo seller and move up to plans suited for larger teams and higher volumes without migrating to a different platform. That continuity has real value over time.
Crucially, Shopify Payments is built into every plan. Specifically, when you use it, there are no transaction fees on your sales beyond the standard card processing rate. Indeed, that removes a meaningful cost that other platforms charge on top of your plan fee.
Understanding Shopify’s Plans Before You Build
So, before you open the dashboard, it is worth understanding what you are actually paying for. Shopify currently has four main plans for standard online stores.
The Starter plan at $5 per month is not a full online store. Specifically, it gives you checkout links and a simple product page you can share on social media. So, it is fine for testing a single product on Instagram, but it is not what most people mean when they talk about building a store.
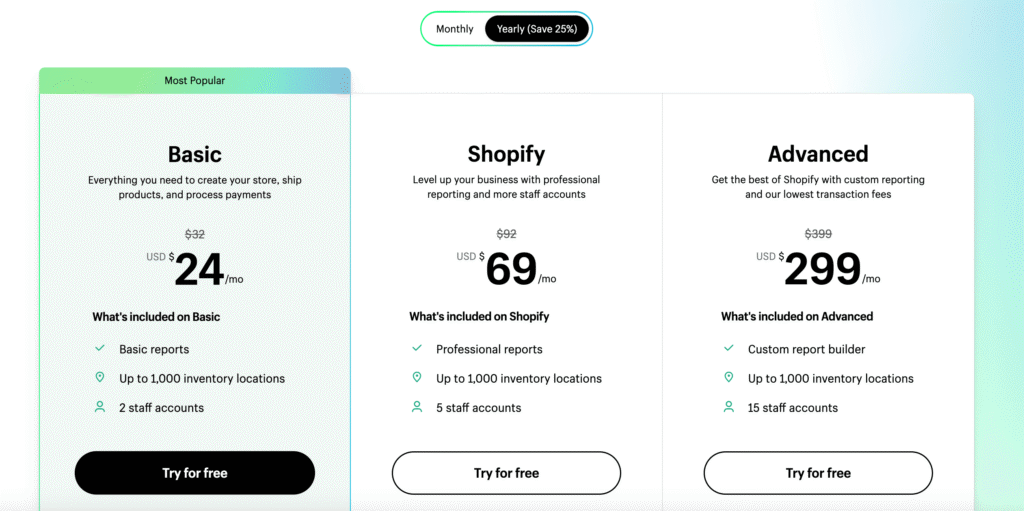
The Basic plan at $29 per month is the right starting point for most new sellers. It includes a full online store with unlimited products, a blog, discount codes, abandoned cart recovery and 24/7 support. Card processing through Shopify Payments costs 2.9% plus 30 cents per transaction. If you use a third-party payment processor instead, Shopify adds a 2% fee on top of that.
The Grow plan at $79 per month reduces the card rate to 2.7% plus 30 cents, and the third-party transaction fee drops to 1%. It also adds up to five staff accounts and better reporting. In fact, for stores turning over $10,000 or more per month, the maths often favour upgrading to Grow purely from the fee savings.
The Advanced plan at $299 per month drops card rates further to 2.5% plus 30 cents and adds advanced reporting, 15 staff accounts and the ability to calculate third-party shipping rates at checkout.
Also, all plans come with a 3-day free trial with no credit card required. Furthermore, annual billing saves 25% on the Basic, Grow and Advanced plans.
Step 1: Start Your Free Trial
So, go to shopify.com and click Start Free Trial. You will be asked for your email address and to create a password. Shopify will ask you a few questions about your business at this point. Answer them honestly so the setup wizard shows you relevant options.
Indeed, you do not need to choose a paid plan immediately. The 3-day free trial gives you access to the full platform. So, use that time to build out your store, add products and set up your payment settings before committing to a plan.
Step 2: Set Up Your Store Basics
Once you are inside the Shopify dashboard, the first step is to fill in your store details. Go to Settings and then General. Add your store name, business address, currency and time zone.
These details flow through to your invoices, tax calculations and shipping rates. Indeed, getting them right from the start prevents confusion later.
Specifically, your store name becomes your default Shopify subdomain in the format yourstore.myshopify.com. Indeed, this works fine during setup. However, for a professional store, you will want a custom domain. A .com domain costs around $12 to $15 per year, and you can purchase it directly through Shopify or connect one you have already registered elsewhere.
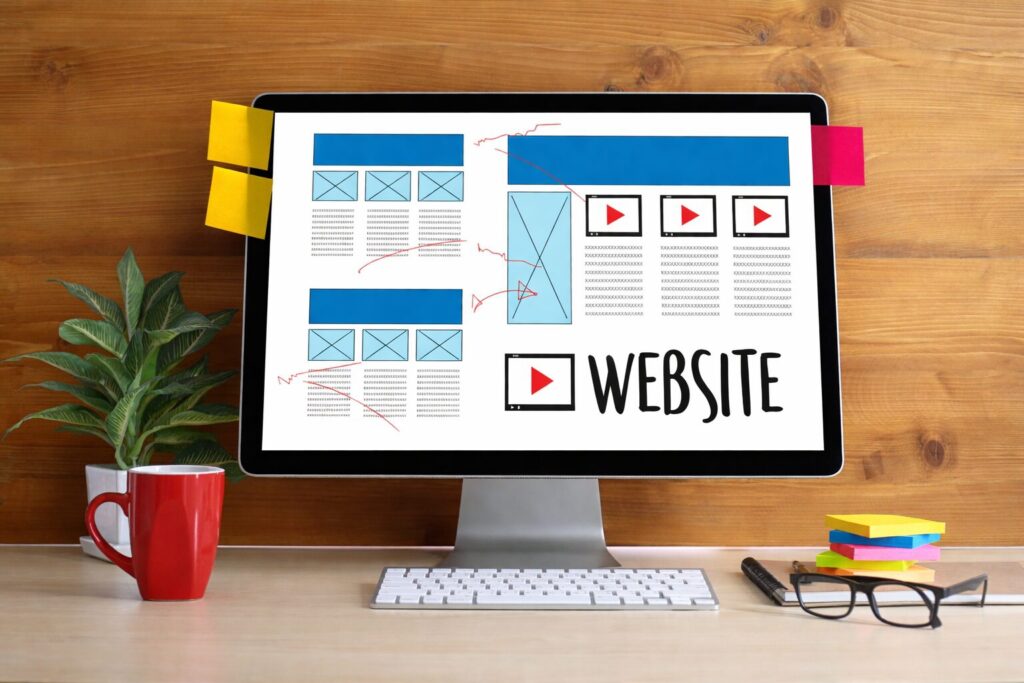
Step 3: Choose and Customise Your Theme
Your theme controls how your store looks. Shopify offers over a dozen free themes and a theme store with premium options typically priced between $180 and $350 as a one-time purchase.
Indeed, for most new stores, a free theme is the right starting point. Dawn is the most popular free Shopify theme, and for good reason. It is lightweight, fast-loading, fully mobile-responsive and flexible enough for most product types. Furthermore, Horizon and Refresh are also strong free options worth considering, depending on your niche.
Specifically, to apply your theme, go to Online Store and then Themes in the left-hand menu. Browse the theme library, click Add and then Customise to open the theme editor.
The Shopify theme editor is a drag-and-drop interface. You can add, remove and rearrange sections on each page without touching any code. Spend time here customising the colours, fonts and layout to match your brand.
Upload your logo to the header. Set a consistent colour palette. Ensure your homepage leads visitors naturally towards your products.
Also, preview your store on mobile before publishing. Over 60% of online shopping happens on mobile devices. In fact, if your theme looks clean on a desktop but is clunky on a phone, you are already losing potential customers before they reach the checkout.
For a detailed breakdown of which free themes work best for different store types, Shopify’s official guide to the best themes covers every free option with recommendations by niche and business type.
Step 4: Add Your Products
So, in the Shopify dashboard, go to Products and then click Add Product. Every product in your store needs a handful of key elements to perform well.
Title and description. Your product title should be descriptive and include the words your customers are likely to search for. The description below it is your selling space. Use it to explain what the product does, who it is for and why it is worth buying. Write for the customer, not for search engines. Indeed, a clear, helpful description converts better than one loaded with keywords.
Images. Product photos are the most powerful conversion tool available to you. In fact, customers cannot touch or try your product online. Clear, well-lit images from multiple angles give them the confidence to buy. Add a main image and a gallery showing different views of the product in use. Shopify supports image zoom and video on product pages.
Pricing and inventory. Set your price in the Price field. If you want to show a reduced price, enter the original in Compare at Price and the sale price in Price. Scroll down to the Inventory section and enter a SKU if you use one. Enable inventory tracking so Shopify can alert you when stock runs low.
Product type and collections. Assign each product to a collection so customers can browse by category. In practice, good collection organisation makes it easier for shoppers to find what they want and reduces the time to purchase.
Variants. If your product comes in multiple options such as size, colour or material, use Shopify’s Variants section to set those up. Each variant can have its own price, SKU and stock level.
Step 5: Configure Your Payment Settings
Before you can accept any money, you need to connect a payment method. In your Shopify dashboard, go to Settings and then Payments.
Indeed, Shopify Payments is the simplest option. It is Shopify’s own payment processor, and it activates in minutes. When you use it, there are no transaction fees beyond the card processing rate for your plan. Shopify Payments supports Visa, Mastercard, American Express, Shop Pay and Apple Pay out of the box.
However, if you prefer to use a third-party processor like PayPal or Stripe instead, you can do that too. However, Shopify adds its transaction fee on top of whatever the external processor charges. For most US-based stores starting out, Shopify Payments is the more cost-effective choice.
Indeed, PayPal is worth enabling as a secondary option regardless of your primary processor. Many shoppers default to PayPal at checkout because they trust it and their payment details are already saved. In fact, offering it alongside card payments typically improves conversion rates.
Step 6: Set Up Shipping
Indeed, if you are selling physical products, shipping configuration matters enormously. Incorrect shipping settings lead to lost sales, undercharging that eats into your margins and overcharging that sends customers to competitors.
In Shopify, go to Settings and then Shipping and Delivery. Here, you create shipping zones for different geographical regions and set the rates that apply to each one.
So, flat rate shipping is the simplest approach for new stores. Choose a rate that covers your average postage cost without significantly overcharging customers on small orders. Many sellers use $4.99 to $7.99 for domestic US orders as a starting point.
Indeed, free shipping on orders above a threshold is one of the most effective tactics in e-commerce. Setting a free shipping threshold of $50 or $75 encourages customers to add more to their cart. However, if you use this approach, factor the shipping cost into your product pricing or minimum order value so the economics still work.
For digital products, you do not need a shipping configuration. In the product settings, mark the product as a digital product and configure a download link or fulfilment service instead.
Step 7: Configure Taxes
Specifically, US-based sellers need to charge sales tax in states where they have a tax nexus, typically the state where the business is registered. Specifically, Shopify includes automatic tax calculation based on your store’s address and your customers’ shipping addresses.
In Settings and then Taxes, enable automatic tax calculation. Shopify uses current tax rates for each US state and updates them regularly. This handles the basics for most small sellers.
However, as your store grows and you sell across multiple states, tax compliance becomes more complex. Many sellers eventually use a third-party tool like TaxJar or Avalara to manage sales tax across different jurisdictions. So, at launch, Shopify’s built-in tool is sufficient.
Step 8: Set Up Your Essential Store Pages
Beyond product pages, your store needs a few supporting pages to build customer trust and meet legal requirements.
About page. People buy from people they trust. A genuine About page explaining who you are, why you started the store and what makes your products worth buying builds credibility. It does not need to be long. It needs to be honest and specific.
Contact page. Indeed, a visible contact method reduces purchase anxiety. Shopify’s Contact page template includes a simple form. Add your email address or a customer service inbox so buyers can reach you easily.
Returns and Refund Policy. In fact, a clear, fair returns policy is both a legal requirement in most US states and a proven conversion tool. Customers are more likely to buy when they know what happens if something goes wrong.
Privacy Policy. If your store collects any customer data, you need a Privacy Policy. Shopify provides a free Privacy Policy generator under Settings and then Legal.
Specifically, to create these pages, go to Online Store and then Pages. Add them to your footer navigation so they are accessible from every page on your site.
Step 9: Test Your Store Before Going Live
So, before you launch publicly, go through the full customer experience yourself. Add a product to your cart, proceed to checkout and complete a test purchase. Specifically, Shopify offers a Bogus Gateway in the payment settings for this purpose. Use it to simulate a transaction without processing real money.
During your test, check the following. Does the checkout page display correctly on mobile? Does the confirmation email arrive with the right order details?
Do all your product images load at the right size? Are the shipping rates calculating correctly for different postcodes?
Also, click through every page of your store. Check that navigation menus link to the right places. Confirm that your About page, Contact page and policy pages are accessible. So, fix anything that feels broken or confusing before you send any visitors to your store.
When you are satisfied with the experience, remove the password protection that Shopify applies to new stores by default. Go to the Online Store and then Preferences and disable the storefront password.
Step 10: Drive Traffic to Your Store
Indeed, a live store with no traffic earns nothing. This is where most new Shopify owners underestimate the work involved. Indeed, getting your store built is the beginning, not the end.
Search Engine Optimisation
Specifically, Shopify includes built-in SEO fields for every product and page. Fill in your page titles and meta descriptions for every product, collection and page on your store. Include the keywords your customers search for naturally in your product titles and descriptions.
Indeed, a blog is one of the most powerful long-term traffic tools available to a Shopify store. Specifically, writing articles that answer the questions your target customers are already searching for brings in organic traffic that compounds over time. Shopify includes a blog editor on every plan. Use it consistently, and it becomes one of your most valuable assets.
Social Media and Paid Advertising
Specifically, Shopify integrates directly with Facebook, Instagram, TikTok and Pinterest for social selling and advertising. You can sync your product catalogue to these platforms and run ads that link directly to your product pages.
So, for new stores with a small budget, organic social media content is the lower-risk starting point. Post consistently, show your products in use and build a following before investing in paid advertising. So, once you have data on which products your audience responds to, paid ads become far more predictable.
Email Marketing
So, build an email list from your first sale. Shopify connects with major email marketing tools, including Klaviyo, Mailchimp and its own Shopify Email feature. In fact, an automated welcome email to new subscribers, an abandoned cart sequence and a post-purchase email all run without ongoing effort once you set them up.
Indeed, email marketing consistently outperforms social media for converting subscribers into buyers. In fact, a small but engaged email list of 500 people is worth more than 5,000 followers on a platform whose algorithm you do not control.
For a full step-by-step walkthrough of how to start and build a successful Shopify store from the first product listing to your first sale, Shopify’s official guide to starting an online store covers the complete process in detail.

How Much Does a Shopify Store Really Cost?
Unfortunately, the headline plan price is only part of the picture. Here is a realistic breakdown of what a new Basic Shopify store actually costs per month.
The Basic plan is $29 per month, billed monthly or around $22 per month on an annual subscription. A custom domain costs approximately $15 per year, which works out to about $1.25 per month. A premium theme, if you choose one, is a one-time cost of around $200 to $350 that you amortise over years of use.
Indeed, apps add up quickly. Most new stores add at least two or three paid apps for functions like product reviews, email pop-ups and upsells. Budget $20 to $60 per month for apps once your store is running.
In fact, a realistic Basic Shopify store costs around $50 to $90 per month to run. Compare that with WooCommerce, where hosting, plugins and SSL on a comparable setup often reach $50 to $100 per month anyway, with far more technical maintenance required on your side.
For an honest comparison of what Shopify actually costs across all plans once apps and transaction fees are included, this detailed Shopify pricing breakdown covers the real numbers at each revenue level.
Common Mistakes to Avoid
Unfortunately, most new Shopify sellers make the same handful of errors. Knowing about them before you launch saves real money and frustration.
Choosing a Slow Theme
A heavily designed premium theme with complex animations and large image sliders may look impressive in the demo. In fact, it slows your page load time and hurts both your search ranking and your conversion rate. Stick with a fast, clean theme and invest in the quality of your products and copy instead.
Neglecting Mobile
Most of your visitors will arrive on a phone. If your product pages are difficult to navigate, your add-to-cart button is hard to find, or your checkout is awkward on a small screen, you are losing sales every day. Test your entire store on a phone before and after every significant change.
Weak Product Descriptions
Indeed, a product description that simply lists specifications does not sell. It just informs. Write descriptions that speak to the customer’s situation, address their hesitations and give them a clear reason to buy this product rather than a similar one.
Ignoring Abandoned Carts
Importantly, Shopify’s abandoned cart recovery is included on the Basic plan and above. So, set it up on day one. A well-written automated recovery email sent one hour after a customer abandons their cart can recover 5% to 15% of lost sales. That is revenue you would otherwise simply lose.
Not Collecting Emails
Indeed, your Shopify store can disappear tomorrow due to account issues, policy changes or platform problems. Your email list cannot be taken from you. Build it from your first customer and treat it as your most valuable business asset.

Ready to Build Your Online Business?
Knowing how to create an online store on Shopify is a great foundation. However, the broader strategy around content, marketing and growing a genuine audience matters just as much as the platform itself.
Visit my Get Started Here page for an honest walkthrough of how I am building an online income from scratch alongside a full-time job. It covers the tools I use, the strategy I follow and how to get started without overspending.
Final Thoughts
Shopify genuinely does make it easier than ever to get a store live. The interface is clean, the themes are professional, and the payment integration is seamless. However, none of that guarantees sales, but it removes the technical friction so you can focus your energy on the parts that actually drive revenue.
Knowing how to create an online store on Shopify is the starting point. What you do after launch determines whether your store earns. Write great product descriptions.
Build an email list from day one. Drive consistent traffic through SEO, social media or both. Test, learn and improve continuously.
In fact, the stores that succeed are not always the most beautifully designed or the most technically advanced. They are the ones where the owner showed up consistently, listened to customers and kept improving. Everything you need to do that is available on Shopify from your first day.
Affiliate Disclosure: This post contains affiliate links. I may earn a commission if you sign up through my links, at no additional cost to you. I only recommend tools and platforms I genuinely believe offer value to my readers.